Prep time: 20 minutes
Cook time: 15 minutes
Total time: 35 minutes
Servings: 8 servings
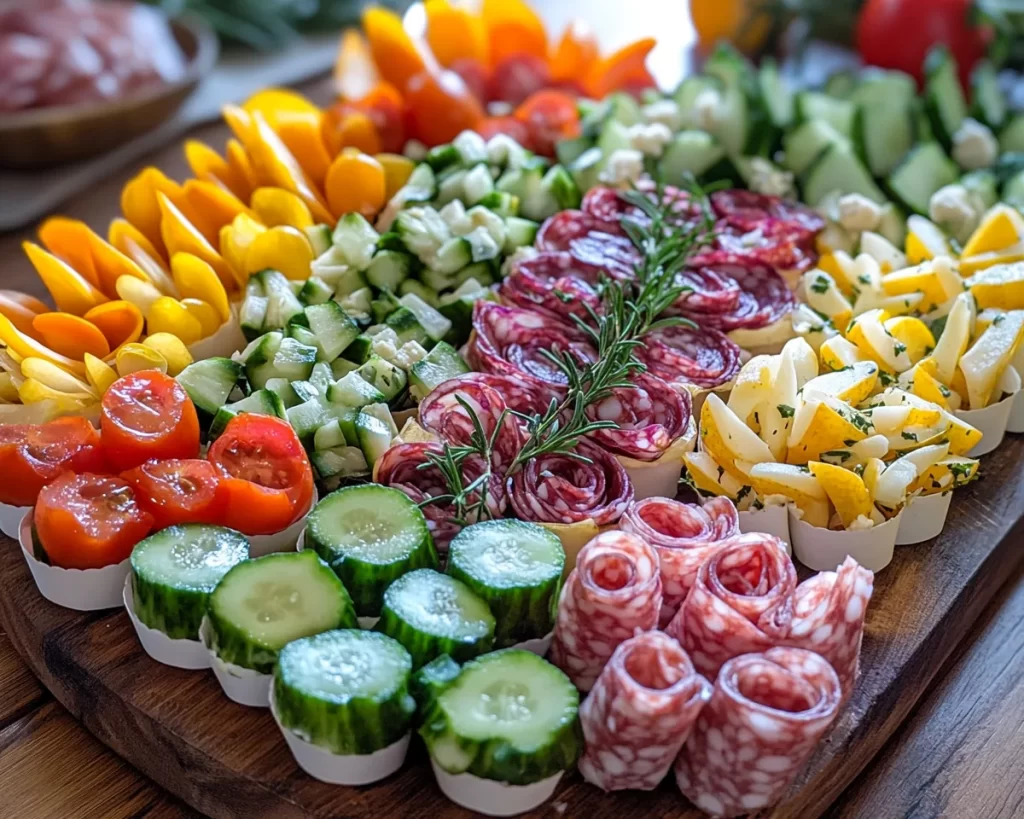
Spring is a delightful time of year to gather with friends and family, celebrating the season with fresh and vibrant flavors. One of the best ways to enjoy spring produce is by assembling a colorful and delicious charcuterie board, complete with spring veggie cups. In just five simple steps, you can create a beautiful display that’s not only visually appealing but also caters to a variety of tastes and preferences.
What Is Spring Charcuterie Board Ideas with Spring Veggie Cups in 5 Steps?
This appetizer guide combines the art of charcuterie with fresh spring vegetables, providing a casual yet sophisticated dining experience. A charcuterie board typically includes a selection of cured meats, cheeses, nuts, fruits, and vegetables. By adding in *spring veggie cups*, you elevate the presentation and offer guests an opportunity for interactive dining. Each cup can be filled with fresh, crunchy vegetables and accompanied by a delightful dipping sauce, making this a perfect contribution to any gathering or picnic.
Why You’ll Love This
Creating a spring charcuterie board is not just about the food; it’s also about the experience. Aesthetically pleasing and customizable, it caters to all diets and preferences, whether your guests are meat-lovers, cheese aficionados, or health-conscious eaters. The incorporation of seasonally available vegetables ensures that you’ll have the freshest ingredients possible. Plus, assembling this board is easy and enjoyable, allowing you to spend more time with your loved ones and less time in the kitchen.
Ingredients You’ll Need
To build your perfect Spring Charcuterie Board with Spring Veggie Cups, gather the following ingredients:
- Cured Meats: Prosciutto, salami, and chorizo. These salty, flavorful meats add richness and depth to the board.
- Cheeses: A mix of soft (such as Brie), hard (like aged Gouda), and goat cheese provides a variety of textures and flavors.
- Fresh Spring Vegetables: Baby carrots, radishes, sugar snap peas, and cucumber cut into sticks for crunch and color.
- Fruits: Strawberries, grapes, and edible flowers to bring sweetness and a pop of color.
- Nuts: Almonds and walnuts for added texture and nutrition. These give a nice crunch to balance the meats and cheeses.
- Dips: Hummus, tzatziki, or a creamy ranch dressing for dipping your veggie cups.
- Crackers: A variety of savory and artisanal crackers for a delightful crunch and to carry the flavors.

How to Make
- Begin by preparing your ingredients. Slice the cheeses and cured meats into bite-sized pieces. Arrange them on a large wooden board or platter. The goal is to have a visually stunning display that encourages everyone to dive in!
- Next, assemble the spring veggie cups by filling small glasses or cups with a selection of the fresh vegetable sticks. You can also add a dollop of your chosen dip at the bottom of each cup. This adds flavor and makes the veggies easy to access.
- Now, it’s time to fill in any spaces on the board. Place the fruits in clusters to create visual interest and add sweetness. Sprinkle the nuts in small piles around the board to encourage snacking. Arrange crackers in a way that they’re easily reachable.
- For presentation, consider using edible flowers as a decorative touch, along with fresh herbs like parsley or basil, which not only add color but also an aromatic element to the board. This small detail will really elevate your charcuterie experience.
- Finally, step back and take a look at your creation! Make any adjustments as needed, ensuring that all ingredients are visible and accessible. Invite your guests to gather around, serve themselves, and enjoy the variety of flavors!
Variations & Substitutions
Vegetarian Option: Substitute the cured meats with an array of grilled vegetables like zucchini, eggplant, and bell peppers. This not only gives a smoky flavor but also adds heartiness to the board. Consider adding marinated olives and different spreads, such as spinach artichoke dip, to replace the meat elements.
Gluten-Free Option: Swap out the crackers for gluten-free alternatives, or serve the charcuterie elements with gluten-free vegetable chips. Include quinoa crackers or rice cakes to ensure that everyone at your gathering can indulge without worry.
Cheese Lover’s Delight: If you’re a cheese enthusiast, feel free to double the variety of cheeses on your board. Pair creamy burrata with spicy pepper jack and tangy feta for a wider range of flavors. Adding unique cheeses like truffle-infused varieties will definitely impress your guests.
Kid-Friendly Version: Make the charcuterie board fun for kids by integrating more fruits, like banana slices, apple wedges, and small cupcakes for sweetness, along with mild cheeses. Brightly colored vegetables like bell pepper strips and cherry tomatoes will encourage them to munch on healthier choices without being overwhelmed.
Common Mistakes to Avoid
When preparing a charcuterie board, it’s easy to make some common mistakes. Firstly, avoid overloading the board with too many elements, which can lead to a chaotic display. Instead, aim for a balanced approach with a good selection of meats, cheeses, fruits, and vegetables.
Another note is regarding the freshness of your produce. Make sure to select **fresh** vegetables that are crisp and vibrant. Dull or wilted items can detract from the appeal of your board. Lastly, pay attention to the texture variance. If you use only dry items (like crackers and nuts), guests may find it less enjoyable without contrasting textures such as creamy cheeses or juicy fruits.
Storage, Freezing & Reheating Tips
It’s best to assemble your charcuterie board right before serving for optimal freshness. However, should you have leftovers, *storage* is essential. Keep meat and cheese covered tightly in the refrigerator to prevent them from drying out. Vegetables should ideally be kept in an airtight container. If you decide to prepare items in advance, do so no more than a day ahead.
For extended storage, you can freeze some items but keep in mind that the texture may change upon thawing. Cured meats can be frozen for about 2 months, while cheeses can often survive freezing if they’re grated or cubed. Always ensure that these items are well-wrapped to avoid freezer burn.
When reheating any component, especially dips, it’s best to do so slowly in the microwave or oven to retain their original flavors and textures without making them too hot or overcooked.
Frequently Asked Questions
What are the best meats to include on a charcuterie board?
The best meats for a charcuterie board often include a combination of cured options like salami, prosciutto, and chorizo. These meats vary in flavor and texture, providing an enjoyable experience for your guests. Including one smoked option can add a nice depth to the overall taste.
Can I prepare the charcuterie board a day in advance?
While it’s recommended to assemble your board fresh, you can prep the ingredients (slicing cheeses and meats, cutting veggies) a day in advance. Store everything in airtight containers in the fridge. Assemble the board only a few hours prior to serving for the best presentation and freshness.
How do I pair drinks with a charcuterie board?
When choosing drinks, aim for those that complement the flavors on your board. A light white wine, such as Sauvignon Blanc or a rosé, pairs well with salty meats and rich cheeses. Non-alcoholic options like sparkling water with fresh fruit slices or iced tea can also be refreshing companions.
Can I include vegan options on my charcuterie board?
Absolutely! You can create a vibrant vegan charcuterie board by focusing on plant-based cheeses, an assortment of nuts, fruits, and a variety of dips such as hummus. Adding roasted chickpeas and seasoned tofu can also provide a satisfying crunch and protein to your board.
How can I make my charcuterie board more visually appealing?
To enhance the visual appeal, consider using various heights and sizes in your serving vessels. Arranging items in groups rather than uniformly distributes more color and creates a natural flow. Utilize edible flowers or fresh herbs for decorative touches, and remember to keep colors balanced for an eye-catching display.
Conclusion:
Creating a Spring Charcuterie Board with Spring Veggie Cups not only celebrates the bounties of the season but also provides an interactive and enjoyable experience for your guests. With simple preparation and vibrant ingredients, you’re sure to impress and create a centerpiece that invites people to linger. Don’t hesitate to polish your board with variations and substitutions tailored to your guests’ tastes. Enjoy the laughter, conversations, and delicious food as you make unforgettable memories.