Prep time: 20 minutes
Cook time: 10 minutes
Total time: 30 minutes
Servings: 6
Are you ready to elevate your entertaining game with a delightful and visually stunning Spring Charcuterie Board featuring Mini Sandwich Bites? This culinary masterpiece is an enchanting mix of flavors, colors, and textures that will impress your guests and satisfy their cravings. Perfect for spring gatherings such as garden parties, baby showers, or casual picnics, this charcuterie board brings together various ingredients that harmonize beautifully.
In just five simple steps, you’ll create a stunning display that showcases your culinary creativity, all while offering guests a chance to curate their own bites. The perfect balance between savory and sweet, this charcuterie board is incredibly versatile, allowing you to customize it based on your preferences or dietary needs. Let’s dive deeper into what makes a Spring Charcuterie Board irresistible!
What Is Spring Charcuterie Board Ideas with Mini Sandwich Bites in 5 Steps?
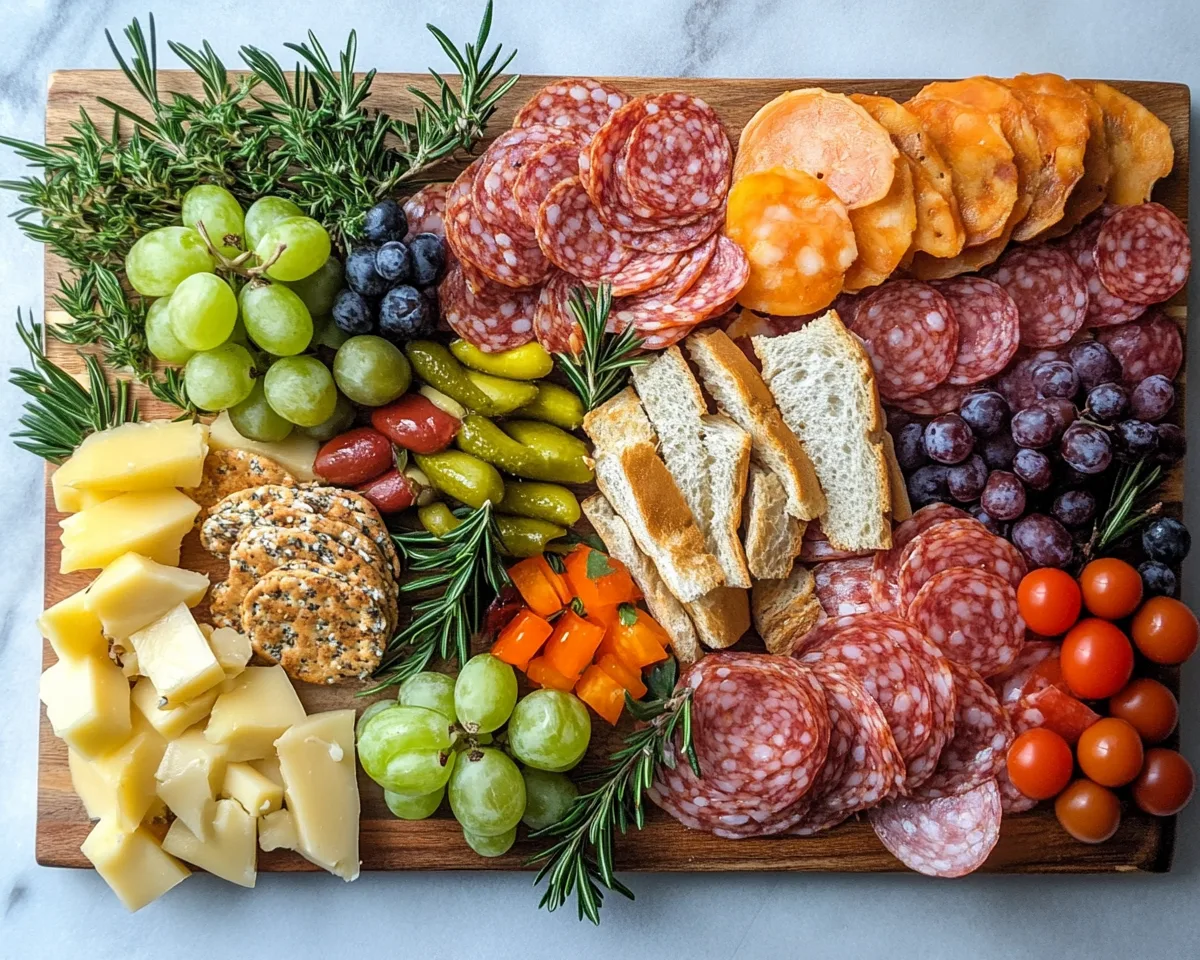
A Spring Charcuterie Board is an artful arrangement of various cured meats, cheeses, fruits, nuts, and ready-to-eat snacks, beautifully presented on a wooden or slate board. The focal point of this board is the mini sandwich bites, which can be tailored to individual tastes. These adorable and nutritious sandwich bites can feature seasonal ingredients like fresh herbs, seasonal vegetables, and artisanal breads. When arranged thoughtfully, this board becomes an eye-catching centerpiece that sparks conversation and joy.
Creating a Spring Charcuterie Board is not only about the visual appeal; it also encompasses the joy of sharing. It’s a creative way to offer a variety of flavors without overwhelming your guests with full-course meals. Each element brings something unique, allowing people to mix and match according to their preferences. Plus, with the changing seasons, the possibilities for seasonal ingredients are endless.
Why You’ll Love This
There are numerous reasons for falling in love with Spring Charcuterie Board Ideas. Firstly, it accommodates diverse dietary preferences, making it a perfect choice for guests with varying tastes and restrictions. You can easily include options for vegetarians, gluten-free individuals, and meat lovers, ensuring that everyone feels included.
Secondly, the preparation is quick and simple. With minimal cooking involved, you can spend more time enjoying your company rather than sweating in the kitchen. The variety of colors and textures on the plate is not only stunning but also encourages healthy snacking. Each bite brings a burst of flavor, making your taste buds dance with delight.
Finally, creating your charcuterie board offers a sense of achievement and an opportunity for creative expression. You can customize it to reflect your style or theme of the occasion. Letting your personality shine through the intricate layout invites guests to appreciate your attention to detail, making them feel special and catered to.
Ingredients You’ll Need
To craft your Spring Charcuterie Board along with mini sandwich bites, gather the following ingredients:
- Cured Meats (100g each of salami, prosciutto): Adds a savory kick to your board with rich flavors.
- Cheeses (200g assorted cheeses): A selection of creamy brie, sharp cheddar, and tangy goat cheese balances the board.
- Mini Baguette or Assorted Bread (1 packet): Freshly baked, this provides the perfect base for your mini sandwiches.
- Fresh Vegetables (1 cup of sliced cucumbers, cherry tomatoes, carrots): Adds crunch and freshness, contrasting beautifully with the richness of meats and cheeses.
- Fruits (1 cup of berries and grapes): Sweet and juicy, these provide a vibrant pop of color and natural sweetness.
- Nuts (1 cup of mixed nuts): Offer a crunchy texture and a healthy boost of energy.
- Hummus or Dip (1 small bowl): Great for spreading on bread and complementing the flavors.
- Herbs (a handful, such as basil or mint): Fresh herbs elevate the flavors and add a garden-fresh touch.
- Mini Sandwich Fillings (various options): Consider egg salad, tuna salad, or roasted veggies as delicious fillings for your sandwiches.
How to Make
Creating your Spring Charcuterie Board with Mini Sandwich Bites is a straightforward process. Here are the detailed steps to ensure your board looks delightful and is easy to enjoy.
- Begin by selecting a large board or platter. Make sure it’s spacious enough to hold all of your ingredients. If you have a slate or wooden board, it adds a rustic appeal that enhances presentation.
- Arrange your cured meats. Start by folding salami and prosciutto slices and clustering them at one area on the board. This creates inviting pockets that guests can easily grab.
- Add your assorted cheeses next. Place different types of cheese at various points on the board to create visual interest. A cheese knife allows guests to slice off cheese and pair it with meats and bread.
- Now, it’s time to prepare your mini sandwich bites. Slice the mini baguette into bite-sized pieces and layer them with your choice of fillings. Use small toothpicks to secure the sandwiches, making them easy to grab.
- Fill in the gaps on the board with fresh vegetables, fruits, and nuts. Scatter berries, grapes, and sliced cucumbers artistically around the board to ensure every corner has a splash of color.
- In the center, place a small bowl of hummus or dip. Fresh herbs can be sprinkled around or used as garnish in the center. This not only adds to the aesthetics but also gives a burst of flavor.
Variations & Substitutions
Vegetarian Variation: Ditch the cured meats entirely and focus on a vibrant assembly of vegetables and cheeses. Incorporate items such as roasted bell peppers, artichoke hearts, and marinated olives alongside a great selection of cheeses like feta or mozzarella. Adding a variety of dips, such as tzatziki or spinach artichoke dip, provides a delicious alternative while maintaining a satisfying selection. Consider including hearty whole-grain breads or pita for pairing.
Gourmet Variation: For a luxurious touch, why not upscale your charcuterie board by including specialty ingredients? Truffle-infused cheeses, artisanal cured meats, and a drizzle of honey over brie will elevate the flavors. Add gourmet olives and fancy crackers for an upscale presentation. Incorporate microgreens for an exquisite finish.
Kid-Friendly Variation: Make it fun and engaging for young ones by including kid-favorite ingredients such as ham and cheese sandwiches shaped with cookie cutters, peanut butter and jelly bites, and fruit skewers. This variation encourages kids to explore new foods without overwhelming them with unfamiliar tastes.
Breakfast Board Variation: Turn your charcuterie concept into a delightful breakfast board with mini breakfast sandwiches, assorted cheeses, fresh fruits, pastries, and yogurt. Serve with a selection of breakfast dips, such as maple syrup, honey, or flavored cream cheeses.
Common Mistakes to Avoid
When creating your charcuterie board, avoid the common mistake of overcrowding. Too many elements can overwhelm the board and detract from the overall aesthetics. Aim for a balanced presentation with more visual interest rather than over-complication.
Also, don’t forget to include serving utensils. Providing needed tools is essential for a smooth snacking experience. Guests will appreciate having a means to serve themselves, keeping the gathering clean and experience enjoyable.
Finally, it’s easy to fall into the trap of using only traditional ingredients. Step outside the box and strive for unique flavors and seasonal items. Experimenting with textures and colors will not only delight your sense of taste but also create a conversation starter for your guests.
Storage, Freezing & Reheating Tips
After your event, it’s crucial to know how to store the leftover ingredients properly. First, items like cured meats and cheeses should be kept in airtight containers in the refrigerator, where they can last up to five days. Ensure that was separate compartments to prevent moisture transfer.
If you have sandwiches leftover, it’s better to remove ingredients that may become soggy with time, like tomatoes or spreads. Wrap them tightly in cling film and consume within two days for the best taste.
Freezing is generally not recommended for items already assembled on your board, as textures may change adversely. Instead, consider freezing individual sandwich fillings or unused meats and cheeses, which can be thawed as required for future gatherings.
Reheating any items like cookies or certain pastries can bring back their delightful freshness. However, remember to use low heat to preserve texture, ensuring they do not dry out.
Frequently Asked Questions
Can I use different types of bread for mini sandwiches?
Absolutely! You can use any bread you prefer. Consider options like ciabatta, whole-grain, or even gluten-free varieties. Each type of bread brings its own flavor and enhances the combination of textures.
How long can I store leftovers?
Typically, you can store leftovers in the refrigerator for up to five days, ensuring they are sealed properly. However, sandwich components like vegetables and spreads should be checked for freshness.
Can I create a charcuterie board ahead of time?
Yes, you can. Preparing your ingredients the night before makes assembly a breeze. However, for the best quality, it’s advisable to assemble the board a few hours before your gathering.
What is the benefit of using seasonal ingredients?
Using seasonal ingredients not only enhances flavor but also supports local farmers and ensures maximum freshness. Seasonal produce is generally more affordable, allowing you to get more bang for your buck while creating a stunning board.
How can I ensure that my board looks visually appealing?
Building height and balance is key. Use various bowls for dips and pile ingredients in clusters to create depth. Play with colors and textures by mixing crunchy with soft, rough with smooth, and vibrant with neutral. This approach will lead to an impressive display that captivates guests.
Conclusion: Crafting a Spring Charcuterie Board with Mini Sandwich Bites is an enjoyable and rewarding experience that can cater to any occasion. By following the steps provided along with incorporating the variations and tips, you will not only impress your guests but also give them a memorable dining experience they will cherish. Get ready to create something beautiful and delicious that everyone will love!