Prep time: 20 minutes
Cook time: 0 minutes
Total time: 20 minutes
Servings: 8
Spring is a time for renewal, and what better way to celebrate the season than with a vibrant and fresh charcuterie board? A Spring Charcuterie Board Ideas with Chocolate & Fruit in 5 Steps effortlessly combines rich flavors and aesthetic beauty to delight your guests. This dish offers an array of colors, textures, and tastes that will elevate any gathering, from casual brunches to sophisticated soirées. The allure of this charcuterie board lies not only in its enticing appearance but also in the delightful combinations of fresh fruits, savory cheeses, meats, and, of course, delectable chocolate. Let’s unlock the secrets to creating a memorable spring charcuterie board that will impress both family and friends.
What Is Spring Charcuterie Board Ideas with Chocolate & Fruit in 5 Steps?
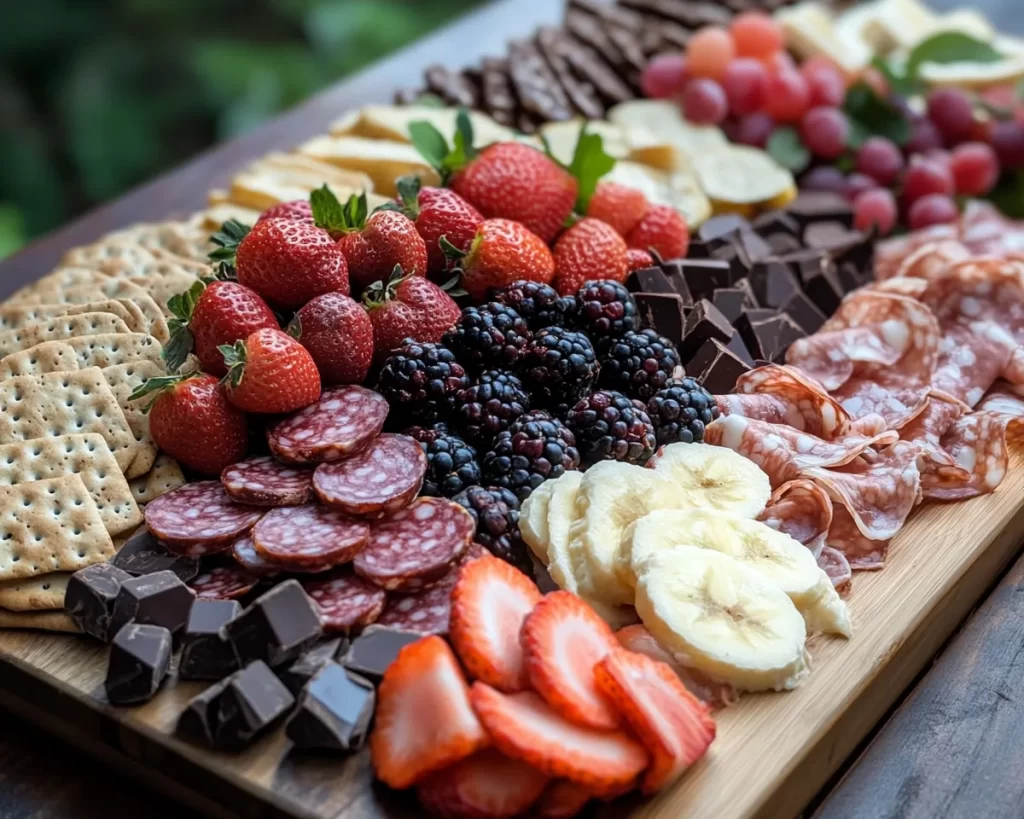
A Spring Charcuterie Board is a selection of cured meats, assorted cheeses, seasonal fruits, nuts, and chocolates, arranged artfully on a board or platter. This vibrant presentation tells a story of springtime freshness. The inclusion of chocolate adds an unexpected twist, blending savory with a touch of sweetness. The sheer beauty of this arrangement beckons guests to explore different flavors, making it not just a meal but an experience.
Why You’ll Love This
You will love this charcuterie board for several reasons. First, it showcases the bounty of spring with colorful fruits like strawberries, blueberries, and fresh herbs that evoke a sense of joy. Second, this board is incredibly versatile, allowing you to customize it according to personal preferences or dietary requirements, making it suitable for everyone. Third, the addition of chocolate, whether it’s dark, milk, or white, brings a luxurious touch that pairs beautifully with cheeses and fruits. Last but not least, this is an easy, no-cook option, which is perfect for busy parents or anyone short on time yet wanting to impress their guests.
Ingredients You’ll Need
- Assorted Cheeses (8 oz): Choose a mix of textures like creamy brie, sharp cheddar, and tangy goat cheese. Their different flavors complement the sweetness of fruit.
- Cured Meats (8 oz): Prosciutto, salami, and chorizo add a savory depth, balancing the sweetness of the fruits and chocolate.
- Fresh Fruits (2 cups): Include seasonal picks such as strawberries, raspberries, kiwi, and apple slices for pops of color and sweetness.
- Nuts (1 cup): A selection of almonds, walnuts, or pecans provides crunch and richness, enhancing the overall taste.
- Chocolate (6 oz): Opt for dark chocolate squares or chocolate-covered strawberries to introduce an indulgent element that pairs perfectly with the other ingredients.
- Crackers or Breadsticks (8 oz): These are essential for creating texture and providing a base for layering flavors.
- Fresh Herbs (for garnish): Add sprigs of mint or basil for a refreshing aroma and a pop of green.

How to Make
- Start by preparing your board or platter. Choose a large wooden board or a decorative platter that can accommodate all your ingredients. Arrange the cheeses first; this helps create a base structure for the rest of the items.
- Next, section off the cured meats. Think of visually appealing shapes and formations. Roll the slices of prosciutto and fold the salami into flowers to bring an artistic flair to your board.
- Add your fresh fruits in clusters or small bowls. Grouping the fruits, such as strawberries and blueberries, adds wonderful visual contrast and encourages guests to help themselves.
- Intersperse the nuts throughout the board. Scatter them in small piles near the fruits and meats. These crunchy additions provide texture and are a lovely snack on their own, enticing guests to reach for more.
- Finally, introduce chocolate to your board. Place squares of dark chocolate or chocolate-covered strawberries in an eye-catching area. Their richness invites a delightful juxtaposition against the savory elements.
Variations & Substitutions
Vegetarian Option: For a vegetarian version, substitute the cured meats with hummus or a variety of plant-based cheeses. This version not only caters to vegans and vegetarians but also adds a unique twist by incorporating flavors like roasted red pepper or garlic hummus. Pair these with olives and pickled vegetables to enrich the palette. This option maintains the board’s colorful aesthetics while offering a different texture and taste experience. Moreover, it can easily accompany the fruits and nuts without leaving anyone feeling like they’re missing out on flavors.
Gluten-Free Version: To make this board gluten-free, ensure that the crackers are gluten-free and consider adding items such as rice cakes or fresh cucumber slices. This variation allows gluten-sensitive guests to enjoy the board without worry. Fresh veggie sticks can also replace crackers, offering crispness and a healthy crunch that complements both the cheeses and dips. Ensuring that all elements are gluten-free will accommodate various dietary preferences while still being delicious and pleasing to the eyes.
Common Mistakes to Avoid
When assembling your charcuterie board, avoid the mistake of overcrowding. Overpacking the board can overwhelm guests and detract from its beauty. Give each item some space for easy access and an inviting display. Another common error is choosing ingredients that do not complement each other. Ensure that your cheeses, meats, and fruits are balanced. For example, pairing a strong blue cheese with mild fruit can clash. Finally, don’t forget about seasonality. Using out-of-season fruits or ingredients can affect the freshness and overall taste of your board. Stick to what’s currently in season for the best flavor.
Storage, Freezing & Reheating Tips
Charcuterie boards are best enjoyed fresh, but you can store leftovers properly. Place any uneaten items in airtight containers to maintain their freshness. Cheeses should be wrapped tightly to prevent drying out, while fruits can be stored in a separate container to avoid wilting. The meats should be kept refrigerated, ideally in their original packaging or wrapped in plastic wrap. Avoid freezing items on your board, especially cheeses and meats, as this can alter their texture. For any dips or spreads that might be included in a future board, they can usually be refrigerated for a few days. When serving leftovers, bring them to room temperature for the best flavor.
Frequently Asked Questions
Can I use different types of cheese on my charcuterie board? Absolutely! Feel free to mix your favorite cheeses. Using a variety of textures and flavors enhances the board’s visual appeal and allows guests to pick what they enjoy the most. You can include hard cheeses like aged gouda, soft cheeses like brie, and tangy ones like feta for an enticing flavor contrast.
What types of meat work best for charcuterie boards? Common choices include prosciutto, salami, and chorizo. Each meat offers unique flavors and textures. If you’re looking for something milder, turkey or chicken breast can also be great alternatives. It’s also fantastic to experiment with smoked meats to give your board an additional layer of flavor.
How many people does a charcuterie board serve? This depends on the size of your board and the amount of food you prepare. A standard charcuterie board of around 1-2 pounds of food can serve approximately 4 to 6 people as an appetizer or snack. For larger gatherings, consider scaling up based on your guest count.
How do I choose fruits for my charcuterie board? Opt for seasonal fruits, which offer the best flavor. A range of colors—such as strawberries, blueberries, and kiwi—not only adds visual appeal but also varying tastes and textures. Additionally, consider dried fruits like apricots or figs for a sweet contrast to the savory elements.
Can I prepare a charcuterie board in advance? Yes! Many components can be prepared a few hours ahead of time. If you plan to assemble a few hours before serving, cut fruits and slice cheeses, then cover and refrigerate. Just remember to add the ingredients that are more prone to wilting closer to serving time for the freshest experience.
Conclusion: Creating a Spring Charcuterie Board Ideas with Chocolate & Fruit in 5 Steps doesn’t have to be daunting. With a little inspiration and some basic guidelines, you can impress your guests with a stunning collection of flavors and textures, perfectly suited for any occasion. Whether you’re hosting a brunch or a spring gathering, your chartreuse board will surely be a hit. It’s a beautiful way to celebrate the spring season and indulge in the tastes it has to offer. Enjoy the process and have fun mixing and matching ingredients tailored to your liking!