Prep time: 30 minutes
Cook time: 45 minutes
Total time: 2 hours 15 minutes (including rising time)
Servings: 12 slices
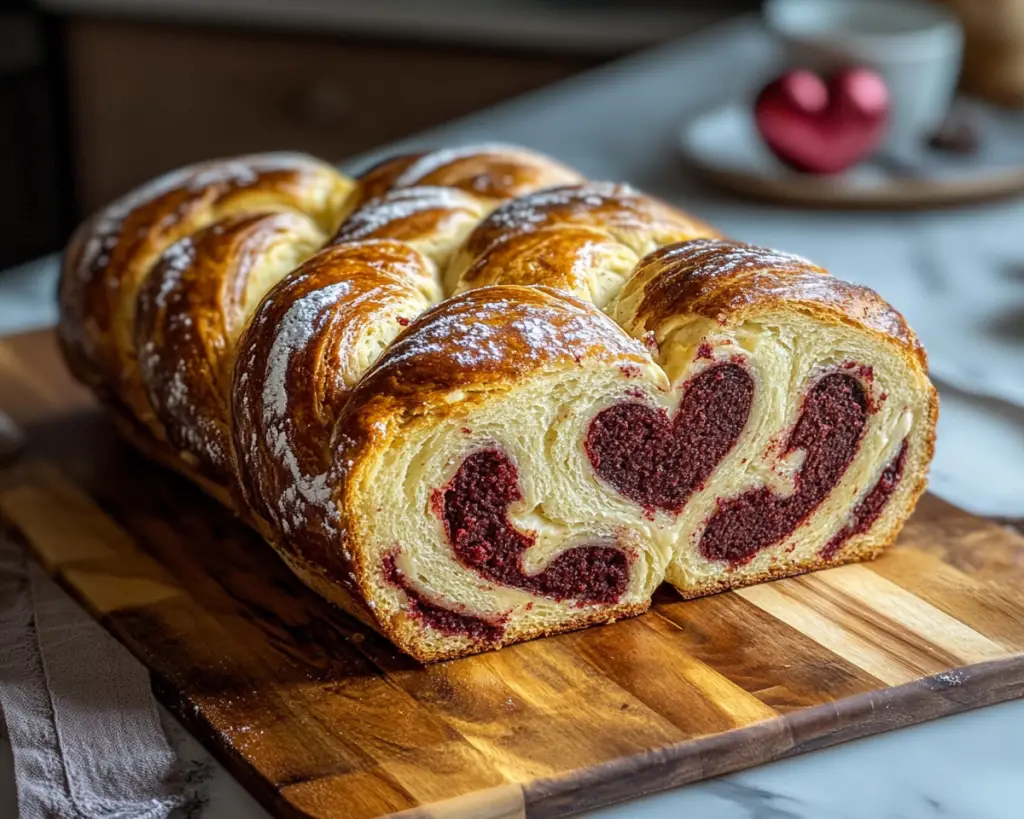
This Valentine’s Day, are you looking for a baking project that will not only impress but also enchant your taste buds? Look no further! The **Red Velvet Sourdough Babka** is a delightful twist on the classic Jewish pastry that combines the rich, deep flavors of sourdough with the eye-catching red hue and velvety texture of red velvet cake. Not only does this recipe introduce you to the unique world of sourdough baking, but it also offers a sweet way to show love to friends and family. The enticing aroma as it bakes is sure to pull you and your loved ones into the kitchen.
Throughout this article, you’ll learn how to create this stunning treat step-by-step. Whether you’re a seasoned baker or just starting, I’ll guide you through the intricacies with tips, tricks, and variations so you can tailor it to your preferences. The result? A beautifully swirled loaf that’s perfect for sharing on Valentine’s Day!
What Is Red Velvet Sourdough Babka Recipe Easy Valentine’s Day Treat?
Red Velvet Sourdough Babka is a festive variation of the traditional babka, which originates from Eastern Europe. This decadent pastry features a rich, buttery dough that has been transformed with the addition of cocoa powder and red food coloring, resulting in a striking red hue indicative of its namesake. The unique aspect of this recipe is the incorporation of sourdough, which adds a delightful tanginess and depth of flavor.
The dough is typically filled with a sweet and chocolaty concoction, where elements such as chocolate chips, nuts, or a cinnamon sugar blend can be introduced. With a crumb that is soft yet chewy and a luscious filling that gives each bite a burst of flavor, Red Velvet Sourdough Babka is not only a visual delight but also a culinary wonder. This treat is perfect for a special occasion and is bound to become a cherished recipe in your collection.
Why You’ll Love This
This Red Velvet Sourdough Babka stands out for numerous reasons. First and foremost, the **flavors** are heavenly. Imagine biting into a soft, buttery slice that is ethereal in texture, enveloped in sweet chocolate and complemented by the faint tang of sourdough. It’s an experience that delights the senses and warms the heart.
Additionally, the recipe is surprisingly **easy to make**. Although it may look intricate, the process involves straightforward steps that even beginners can conquer with confidence. You can customize your babka by adding various fillings or toppings, making it versatile for different occasions! Plus, it’s more economical than purchasing gourmet pastries from a bakery, making it a win-win for any home baker.
Common misconceptions about sourdough often deter potential bakers, creating a belief that it requires extensive skill or time. With this recipe, I’ll help you understand how to simplify the process, avoid typical pitfalls, and create a show-stopping dessert effortlessly.
Ingredients You’ll Need
- Active sourdough starter: Vital for fermentation, creating the unique flavor in the dough. If you don’t have one, you can use store-bought yeast, but the sourdough will give the best flavor.
- All-purpose flour: The base of your dough, providing structure. You can substitute part of this with whole wheat flour for added nutrition.
- Cocoa powder: Essential for giving the babka its distinct chocolate flavor and color. Opt for unsweetened cocoa powder.
- Granulated sugar: Sweetens the dough and filling. You can substitute with brown sugar for a slightly richer flavor.
- Butter: Adds richness and a soft crumb. Ensure it’s unsalted for control over sweetness.
- Eggs: Contributes to the tenderness and richness of the dough. They’re also a binding agent.
- Milk: Adds moisture; you can use non-dairy alternatives like almond milk or oat milk if needed.
- Red food coloring: Makes the babka visually striking. You can omit this if you prefer a more rustic look.
- Chocolate chips or nuts: Optional additions to enhance the filling; they add texture and flavor spots throughout the babka.
Every ingredient plays a critical role in developing the flavors and textures that define this iconic dessert. Understanding each component can help you make informed substitutions in the future.
How to Make
- Prepare the sourdough starter: In a mixing bowl, combine your active sourdough starter with ¼ cup of warm water and ¼ cup of all-purpose flour. Stir until combined, and let it rest for about 30 minutes. This step ensures your starter is lively and ready to go. If it’s bubbling, you know you’re on the right track!
- Make the dough: In a large mixing bowl, combine 3 cups of all-purpose flour, 2 tablespoons of cocoa powder, and ¼ cup of granulated sugar. Create a well in the center, and add the activated starter, 1 cup of milk, 1 beaten egg, and ½ cup of melted butter. Mix until a sticky dough forms, using a spatula or your hands.
- Knead the dough: Transfer the dough onto a floured surface and knead for 10-15 minutes until smooth and elastic. If the dough is too sticky, dust a little flour as needed. Kneading builds the gluten structure in the dough, which is essential for that chewy texture we adore in babka!
- First rise: Place the kneaded dough in a greased bowl, cover it with plastic wrap or a damp cloth, and let it rise in a warm space for 1-2 hours, or until it has doubled in size. This process allows the flavors to develop, creating a more complex taste in your babka.
- Prepare the filling: In a separate bowl, mix ½ cup of cocoa powder, ½ cup of sugar, and 1 cup of chocolate chips or chopped nuts. This combination makes for a rich and indulgent filling. You can also add a pinch of salt or cinnamon for an extra flavor kick.
- Shape the babka: Once the dough has risen, roll it out on a floured surface into a rectangle approximately 12×18 inches in size. Spread the melted butter across the surface, followed by an even layer of the filling mixture. Roll the dough tightly from the long side into a log, then slice it down the center lengthwise to reveal the beautiful filling.
- Twist and shape: Gently twist the two halves of the dough together, creating a braid effect. Carefully place it into a greased loaf pan, tucking any loose ends underneath. This shaping enhances the presentation and creates visually appealing swirls in your final loaf.
- Second rise: Cover the loaf and let it rise again for about 30-45 minutes. You want it to puff up nicely, preparing it for baking. The second rise is crucial for achieving that fluffy texture.
- Bake the babka: Preheat your oven to 350°F (175°C). Bake the babka for about 40-45 minutes, or until it’s deeply golden and a toothpick inserted in the center comes out clean. The aroma wafting through your kitchen during this stage will be simply irresistible!
- Cool and serve: Let the babka cool in the pan for 10-15 minutes before transferring it to a wire rack to cool completely. Once cooled, slice and serve. Enjoy the fruits of your labor alongside coffee or tea, and watch it disappear in record time!
Each step in this process builds upon the last, ensuring that you create a babka that is not only beautiful but also delicious. Remember, the best part about baking is that it often allows you to be flexible and creative!
Variations & Substitutions
Cinnamon Sugar Filling: Instead of using cocoa powder for the filling, you can create a cinnamon sugar base. Mix 1 cup of sugar with 2 tablespoons of cinnamon and ½ cup of melted butter. This will yield a sweet and spiced filling that complements the rich dough nicely. This variation is great for those who prefer a warm, autumnal flavor.
Cheese Filling: For a unique and savory twist, consider a cream cheese filling. Whip 8 oz of softened cream cheese with 1/4 cup of sugar, a splash of vanilla extract, and an egg until smooth. This filling creates a rich and creamy contrast to the otherwise sweet flavors. It’s terrific for brunch gatherings and will appeal to cheese lovers!
Nutella Swirl: If you adore chocolate hazelnut spread, try incorporating Nutella as the filling. Simply spread a layer over the rolled-out dough before rolling it up. The end result will be an intensely chocolatey babka that will make any chocolate lover swoon. Garnish with chopped hazelnuts for extra texture.
Berry Jam Filling: For a fruity twist, spread your favorite jam over the dough instead of chocolate. This variation pairs beautifully with a cream cheese glaze post-baking, resulting in a sweet yet tart pastry. Opt for homemade or high-quality store-bought jam for the best flavor experience.
Each of these variations provides a different flavor profile, ensuring that your Red Velvet Sourdough Babka can suit any occasion or personal preference!
Common Mistakes to Avoid
One of the most common mistakes when making babka is under-kneading the dough. Insufficient kneading reduces gluten formation, resulting in a dense and less chewy texture. Ensure you knead the dough until it is smooth and elastic; this is crucial for achieving that classic babka crumb.
Another pitfall is not allowing sufficient **rising time**. Rushing this stage can lead to a dense loaf that won’t rise properly during baking. Patience is key! Be sure to look for the dough to double in size during both rises, which takes a couple of hours but contributes significantly to the final product.
Finally, monitor the **oven temperature meticulously**. Ovens can often vary in actual temperature, so using an oven thermometer can be helpful. Baking at too high of a temperature can lead to burning on the outside while leaving the inside undercooked. A well-baked babka should be a deep golden brown.
Storage, Freezing & Reheating Tips
To preserve your Red Velvet Sourdough Babka, store it in an airtight container at room temperature for up to three days. If you know you won’t finish the entire loaf within that timeframe, consider freezing portions instead. To freeze, slice the babka and wrap each slice tightly with plastic wrap, then place them in an airtight container or a freezer bag. It can be frozen for up to three months.
When ready to enjoy, let the slices thaw in the refrigerator overnight, or remove them from the freezer and allow them to sit at room temperature for a couple of hours. For a delightful treat, reheating slices in a toaster oven or microwave will bring back that soft and heavenly texture.
Regarding food safety, always ensure you cool the babka completely before storing. This prevents condensation from forming inside the container, which could create an environment for bacteria and mold.
Frequently Asked Questions
Can I use a different color for the velvet effect?
Absolutely! While red is traditional for red velvet, you can experiment with other colors too, like blue or green, for a creative twist. Just remember to adjust the amount of food coloring as required.
What if my sourdough starter isn’t very active?
If your starter isn’t bubbling vigorously, consider feeding it at least once before using it in the recipe. A healthy starter will lend an impressive rise and flavor. If it’s still sluggish, you can supplement with instant yeast for guaranteed results.
Can I make this with whole wheat flour?
Yes! You can substitute half of the all-purpose flour with whole wheat flour for a more nutritious version. Note that this may result in a denser texture compared to using all white flour.
Is it necessary to use chocolate in the filling?
Not at all! You can customize your filling based on your preferences. Whether you incorporate fruit preserves, a simple cinnamon sugar mix, or try a nut butter, the choice is yours!
What do I serve with the babka?
This delightful babka pairs wonderfully with coffee or tea. You could also serve it with fresh fruit or a dollop of whipped cream for a rich dessert experience. It’s versatile enough to stand alone or complement other treats!
Conclusion:
The Red Velvet Sourdough Babka is not just a dish; it’s a **culinary adventure** that brings warmth, flavor, and excitement into your kitchen. This recipe’s strengths lie in its unique flavors, the delightful texture achieved through sourdough, and the endless opportunities for customization. I encourage you to try this recipe, play with variations, and make it your own. Whether it’s for Valentine’s Day, a festive brunch, or simply a weekend project, you won’t regret the time spent bonding over baking with loved ones. Get in that kitchen, roll up your sleeves, and enjoy every bite of creation!


