Prep time: 20 minutes
Cook time: 25 minutes
Total time: 45 minutes
Servings: 16
Are you ready to indulge in a deliciously sweet treat that captures the essence of spring? The Raspberry Coconut Magic Bars recipe is just the perfect recipe to satiate your cravings. These bars marry the tartness of fresh raspberries with the rich creaminess of coconut, creating a flavor explosion that dances on your palate. With an easy-to-follow recipe, you can create this delightful dessert that will surely impress your friends and family. In this article, you will learn everything you need to know about making the perfect Raspberry Coconut Magic Bars, from essential tips and variations to avoid common pitfalls.
What Is Raspberry Coconut Magic Bars Recipe – Easy Spring Dessert Ideas?
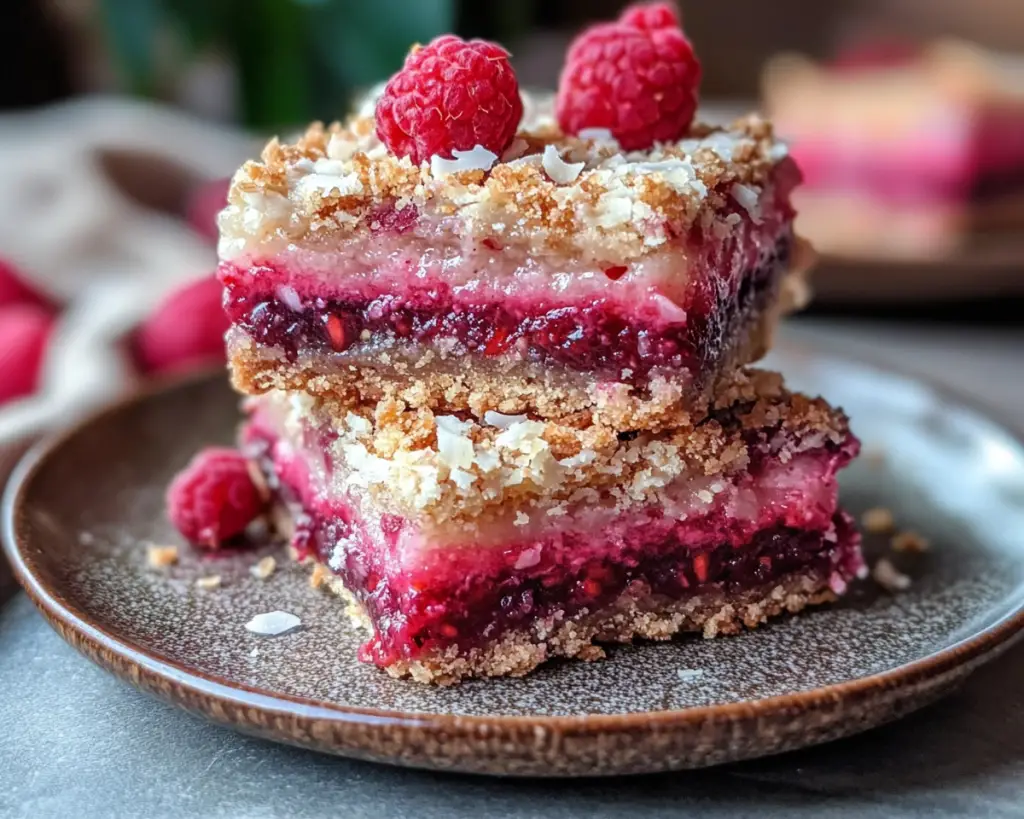
The Raspberry Coconut Magic Bars are a delightful twist on the traditional seven-layer bar. Originating from classic American baking, these bars are an ode to vibrant flavors and heavenly textures. They feature a graham cracker crust layered with sweetened condensed milk, shredded coconut, and plump raspberries. What makes this dessert so special is the perfect balance of flavors: the tartness of the raspberries cuts through the sweetness of the coconut, making each bite a refreshing experience.
The texture is equally enticing. You get a satisfying crunch from the graham cracker base, a gooey, chewy center from the coconut, and a burst of juicy sweetness from the raspberries. The harmonious blend of textures and flavors makes this dessert perfect for picnics, potlucks, or simply a cozy night in. Whether you’re an experienced baker or a novice in the kitchen, these raspberry coconut magic bars are sure to become a go-to recipe this spring.
Why You’ll Love This
You will absolutely adore the Raspberry Coconut Magic Bars for several compelling reasons. Firstly, the taste is simply out of this world. With the sweetened condensed milk bringing everything together, the flavor combination of coconut and raspberry creates a dessert that is not only satisfying but also a little bit addictive. Second, the ease of preparation means that you can whip these bars up in no time, making them perfect for busy parents or those new to baking.
Cost-effectiveness is another attractive aspect—most of the ingredients are easily accessible and budget-friendly. From graham crackers to shredded coconut, you won’t break the bank while preparing these indulgent treats. This recipe is versatile as well; you can customize it based on your preferences, whether you’re aiming for a gluten-free option or looking to switch out the raspberries for another berry.
Common misconceptions such as needing advanced baking skills or a myriad of complicated ingredients are simply not true for this recipe. With just a handful of simple ingredients, you can create something extraordinary. Whether you’re preparing for an event or simply want to enjoy a homemade dessert, the Raspberry Coconut Magic Bars recipe is the sweet solution you’ve been searching for.
Ingredients You’ll Need
- Graham cracker crumbs: This forms the base of the magic bars and adds a delightful crunch. If you’re gluten-free, look for gluten-free graham cracker alternatives.
- Unsalted butter: Butter will help bind the crust ingredients together and add richness to the bars. You can substitute with coconut oil for a dairy-free option.
- Sweetened condensed milk: This is the key to moisture and sweetness in the bars. It infuses the dessert with a creamy texture. Use evaporated milk as a substitute if you prefer a less sweet variant.
- Shredded coconut: This ingredient contributes to the chewy texture. For a healthier alternative, opt for unsweetened coconut flakes.
- Fresh raspberries: The star of the show! Raspberries add brightness and tartness. You could use frozen raspberries in a pinch, just make sure to thaw and drain them first.
- Vanilla extract: A hint of vanilla elevates the flavor profile. Feel free to use almond extract for a unique twist.
- Chopped nuts (optional): Pecans or walnuts can add additional texture. If you choose to include nuts, toast them lightly for enhanced flavor.
How to Make
To create your delicious Raspberry Coconut Magic Bars, follow these simple step-by-step instructions:
- Preheat the oven: Begin by preheating your oven to 350°F (175°C). This step is crucial for even cooking and achieving that perfect golden crust.
- Prepare your baking pan: Line a 9×13 inch baking dish with parchment paper, allowing some overhang for easy removal later. This will also ensure that your bars don’t stick!
- Make the crust: In a mixing bowl, combine the graham cracker crumbs and melted butter. Stir until the mixture resembles wet sand. Press this mixture firmly into the bottom of the prepared baking dish, creating an even layer. Bake for approximately 10 minutes until set and slightly golden.
- Prepare the filling: While the crust is baking, mix the sweetened condensed milk, vanilla extract, and shredded coconut in a separate bowl. Add a pinch of salt to balance the flavors.
- Add raspberries: Once your crust has cooled slightly, sprinkle the fresh raspberries evenly over the crust. Gently pour the coconut mixture over the raspberries, spreading it evenly with a spatula.
- Bake: Return the baking dish to the oven and bake for an additional 15 to 20 minutes, or until the top is golden brown. Keep an eye on it, as oven temperatures can vary.
- Cool down: When finished baking, remove the dish from the oven and let it cool completely in the pan. This step will help the bars firm up and make them easier to cut later.
- Cut and serve: Once cool, use the parchment overhang to lift the bars out of the pan. Cut them into squares or rectangles and enjoy!
Variations & Substitutions
Chocolate Chip Raspberry Coconut Bars: If you are a fan of chocolate, consider adding semi-sweet or dark chocolate chips to the filling. Sprinkle them over the raspberries before adding the coconut mixture. This variation brings an indulgent richness that complements the tart raspberries superbly.
Nut-Free Version: For those with nut allergies or who prefer to avoid nuts entirely, simply omit any chopped nuts from the recipe. The bars will still be deliciously satisfying with just the graham crust, coconut, and raspberries.
Vegan Raspberry Coconut Bars: To make this recipe vegan, replace the butter with coconut oil, utilize canned coconut milk instead of sweetened condensed milk, and choose dairy-free chocolate chips if you’re incorporating them. This variation maintains the divine flavors while accommodating a vegan lifestyle.
Mixed Berry Magic Bars: Feel free to substitute the raspberries for a mix of strawberries, blueberries, or blackberries. This adds an exciting twist and allows you to use whatever fresh berries you have on hand, making it a versatile option for different seasons.
Gluten-Free Version: Substitute regular graham cracker crumbs with gluten-free versions available in stores. This means everyone can enjoy a slice of raspberry coconut magic bar without compromising on texture or flavor.
Common Mistakes to Avoid
A few common pitfalls can lead to less-than-perfect Raspberry Coconut Magic Bars. One common mistake is failing to evenly spread the coconut mixture over the raspberries. This can lead to uneven flavor distribution, so take your time to ensure a smooth layer.
Another issue is underbaking the crust. If not baked long enough, your crust may turn out too soft, resulting in a bar that falls apart when cut. Make sure the crust is golden and firm before adding the filling.
Additionally, be mindful of your oven temperature. If it runs hot, keep an eye on the baking time, as overbaking can cause the bars to become dry. Always check near the end of the recommended baking time to avoid this pitfall.
Finally, ensure that the bars cool completely before cutting. This will preserve their structure and prevent them from falling apart.
Storage, Freezing & Reheating Tips
For optimal freshness, store your Raspberry Coconut Magic Bars in an airtight container at room temperature for up to three days. If you want to keep them for a longer period, you can freeze them.
To freeze, cut the bars into squares and wrap each square tightly in plastic wrap, then place them in a freezer-safe container or zip-top bag. They can be stored in the freezer for up to three months. When you’re ready to enjoy them, simply let them thaw in the refrigerator overnight.
It’s essential to avoid reheating these bars in the microwave, as doing so can alter the texture and make them sticky. Instead, let them come to room temperature on their own so that you can fully appreciate their flavors and texture.
Frequently Asked Questions
Can I use frozen raspberries instead of fresh? Yes, you can absolutely use frozen raspberries. Just make sure to thaw and drain them before adding to the recipe to avoid excess moisture that can make the bars soggy.
How can I make these bars healthier? To make your Raspberry Coconut Magic Bars healthier, consider using less sweetened condensed milk or switching to a lower sugar version. Using unsweetened coconut and a natural sweetener can also help reduce sugar content while maintaining delicious flavor.
Can these bars be made ahead of time? Yes, making these bars ahead of time is a great idea! They actually taste even better after they’ve had time to rest. You can prepare them a day or two in advance and store them in an airtight container.
Why did my magic bars turn out too dry? If your bars are too dry, it may be due to overbaking. Be sure to keep an eye on your bars during the last few minutes of baking to ensure they are perfectly cooked but still moist.
What are some serving suggestions for these magic bars? You can serve these Raspberry Coconut Magic Bars with a dollop of whipped cream or a scoop of vanilla ice cream. A drizzle of chocolate sauce or a sprinkling of powdered sugar can also elevate them for special occasions.
Conclusion:
The Raspberry Coconut Magic Bars recipe captures the essence of spring with its delightful mix of flavors and textures. From the sweet and tart berries to the chewy coconut, this dessert is a must-try for anyone looking for an easy and delicious treat. Whether you decide to customize it or share it with loved ones, you won’t be disappointed. Grab your ingredients, roll up your sleeves, and enjoy the sweet rewards of your hard work! You won’t regret adding this delightful recipe to your dessert repertoire.