Let’s Get Real
Okay, let’s talk about this thing called weather. I don’t know where you are, but here it’s oscillating between really cold and oddly warm, like Mother Nature is experiencing some sort of existential crisis. One minute I’m bundled like a burrito in my oversized sweater, and the next, I’m questioning every life choice I’ve ever made that led to me agreeing to step foot outside. The only thing that consistently brings joy during these bizarre climate swings? Cake pops. Not just any cake pops—but the kind that glistens with bright red velvet allure.
I used to kind of hate red velvet cake—not because it’s not delicious, but because I made the rookie mistake of trusting the grocery store pre-mixed boxes. You know, the ones that look glossy and enticing in the baking aisle? Yeah, I thought I could whip up something beautiful, only to discover I had inadvertently created an over-sweetened sponge cake that tasted more like disappointment than enjoyment. Can we talk about how I was just trying to be fancy and fun but ended up feeling like I had committed a culinary crime? Fast forward to today, where I could make red velvet cake pops in my sleep (not that I would—did you see all the steps?).
Now, I see these delightful bites everywhere—weddings, birthdays, office parties—basically, they scream ‘I’ve got my life together’ even if I’m currently wearing sweatpants and debating whether to add another scoop of ice cream to my bowl. So get ready because I’m going to have you rolling out your very own Perfect Red Velvet Cake Pops. Let’s do this!
Ingredients, Unfiltered
What’s Really in Perfect Red Velvet Cake Pops
Alright, gather around my baking comrades! Let’s break down this ingredient list, shall we? I promise you’ll be singing the praises of each item by the end of this.
All-Purpose Flour: The backbone of any baking endeavor. I’ve experimented with different flours, but let’s be real, there’s nothing quite like the comfort of good old all-purpose flour. It’s forgiving, reliable, and never eschews a chance to support your baking dreams.
Cocoa Powder: The kind of cocoa powder you want to reach for is high-quality! Trust me, you don’t want to skimp on this one. I could write sonnets about the joys of dark cocoa powder. I mean, what’s better than chocolate? The answer is—chocolate that isn’t too sweet and adds a rich depth to your cake pops! My go-to is always Dutch-processed.
Granulated Sugar: Sweetness is the name of the game here, my friends! But don’t go overboard. Remember, cake pops are meant for a balanced bite, not a sugar shock that sends you through the roof. Just the right amount, promise.
Baking Soda: I know, I know—this is the unsung hero of baking! It’s not a party without it! Why? Because baking soda is the magic behind that lovely rise. Remember to check the expiration date because that can turn your cake pop dreams into a flat pancake disaster—no one wants to eat those.
Salt: I like my desserts slightly salty to balance the sweetness. Think of it as the voice of reason amongst your sugar-laden ingredients—like all good friends should be!
Buttermilk: This is the secret ingredient to achieving that tender crumb you crave in red velvet cake. Plus, it adds that lovely tanginess, easily fighting off those childhood memories of bland store-bought versions.
Vegetable Oil: Listen, butter is wonderful, but for this particular recipe, I’m leaning towards vegetable oil for that Moist Miracle factor. Seriously, your cake pops will thank you.
Large Eggs: Number one rule: try to use room temperature eggs. They blend better and keep the mixture fluffy! I don’t know if it’s science or magic, but what I do know is I don’t want my eggs to be so cold they think they’re in the Arctic while I’m trying to bake a warm, delicious dessert.
Vanilla Extract: A splash or two for that lovely aromatic flavor—it takes the experience from ordinary to extraordinary. If you have some fancy vanilla bean paste lying around, use it! You’ll feel like a professional chef, even if you’re in your kitchen trying to figure out why you just spilled cocoa powder everywhere.
Red Food Coloring: The pièce de résistance! This isn’t just for show; it’s what makes this cake pop **pop**—let’s go bold but don’t go crazy, friends! Trust me; your frosting will thank you.
Chocolate Melts: Whether you grab milk chocolate, white chocolate, or whatever tickles your tastebuds—you need these to coat your cake pops and seal in all the moistness. Oh, and yes, I said “chocolate melts.” God bless whoever invented these—seriously, a round of applause anyone?
Let’s Talk Health (or Not)
Is This Even Healthy? Let’s Discuss
Funny you should ask! Look, I’m not here to lie about healthiness or adherence to strict diets—because, honey, we’re talking about cake pops, not kale! Sure, yes, there’s a fair bit of sugar and all the other deliciously questionable ingredients—have we mentioned the butter? But if you can’t enjoy a treat now and then, what’s the point?
Let’s actually evaluate a beautiful red velvet cake pop. This little spherical delight is essentially cake and frosting on a stick—excuse me while I fan myself. It’s fun, it’s festive, and positively perfect for sharing, which definitely makes me feel all warm and fuzzy inside. These cake pops are like the unicorn of desserts: whimsical, dreamy, and not your everyday cake slice. So while I won’t be asking you to eat them for breakfast (breakfast is for champions… also coffee), I think it’s totally fine to indulge your sweet tooth every now and then with the iconic red velvet flavor!
Your Grocery List
Here’s What You’ll Need
– 2 ½ cups all-purpose flour
– 1 ½ cups granulated sugar
– 1 tsp baking powder
– 1 tsp baking soda
– ½ tsp salt
– 1 cup vegetable oil
– 1 cup buttermilk
– 2 large eggs (room temperature)
– 1 tsp vanilla extract
– 2 tbsp cocoa powder
– 1 tablespoon red food coloring
– 12 oz chocolate melts (your choice: milk, dark, or white)
This recipe makes about 24 cake pops, or 48 if you’re a sucker for sharing. But let’s be real, we all know you’re going to “test” a few along the way, right?
The Actual Cooking Part
Okay, Let’s Make This
Alright, let’s get this baking party started, shall we? First things first, preheat that oven of yours to 350°F (175°C) because we need to have it nice and toasty for our cake!
1. **Mix It Up!** In a large mixing bowl, combine the all-purpose flour, sugar, cocoa powder, baking powder, baking soda, and salt. I like to use a whisk to blend everything together—because nothing screams ‘I care’ like a well-mixed dry ingredient.
2. **Remember the Wet Ingredients!** Grab another bowl (yeah, we’re dirtying some dishes today) and whisk together the oil, buttermilk, eggs, vanilla extract, and red food coloring. I typically add the food coloring last so I can eyeball the shade—redder is always better, if you ask me.
3. **Combine the Mix!** Pour your wet mixture into your dry ingredients. Now, it’s important not to overmix here; mix until just combined. This is usually where I go a bit wild, because I love the sight of joyful batter swirling together. Just don’t make it angry!
4. **Bake Me Up!** Transfer your batter into a greased and floured 9” x 13” cake pan. Bake for about 25-30 minutes. I typically start checking at the 25-minute mark to avoid drying out my dreams.
5. **The Waiting Game:** Once baked, let your cake cool completely. Seriously, if you skip this step, you might find the whole thing crumbling as you attempt to roll it into balls—trust me, I’ve been there; it’s not pretty!
6. **Crumble and Mix:** Once your cake is cool, crumble it into a mixing bowl. You can use your hands or a fork; sometimes I get a little too aggressive and just dive in there like I’m a cave explorer looking for hidden treasures.
7. **Add Frosting:** Now, remember those bursts of frosting you always avoided? In this case, we’re embracing it! Add about 1 cup of cream cheese frosting to your crumbled cake and mix thoroughly. I like to do this by hand and let my inner “baker who is definitely not controlling” come out. The goal? A sticky but manageable mixture that you can shape into balls.
8. **Roll It Up:** Think golf balls size, people. I usually make mine about 1-inch in diameter. Place these on a baking sheet lined with parchment paper. Once you have them all rolled up, pop them in the fridge for a solid 30 minutes. This helps them firm up—thank you, refrigeration, for always being there for me.
9. **Melt the Chocolate:** While your cake balls are chilling out, melt your chocolate melts according to package instructions. I like to use the microwave, heating in 30-second intervals and stirring until it’s nice and smooth. If you have a double boiler, flex your culinary skills and impress yourself.
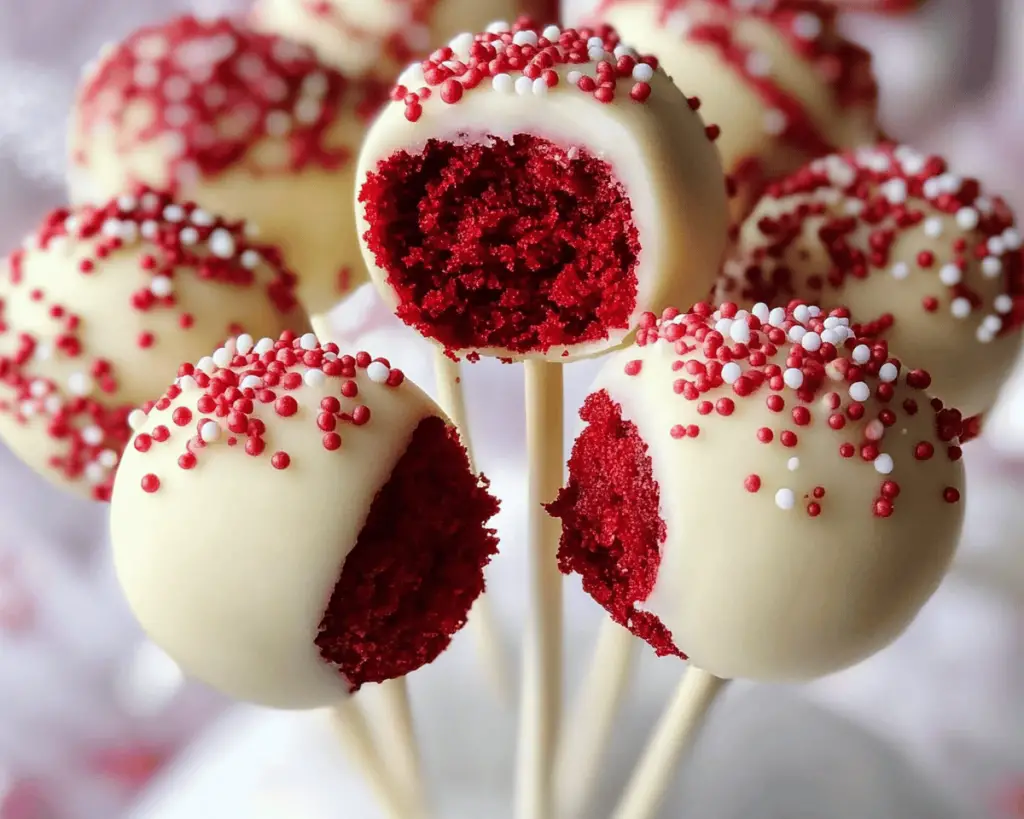
10. **Dipping Time!** Now, here comes the thrilling part! Dip each cake ball into the melted chocolate, making sure they’re fully coated. Use a fork to tap off the excess chocolate before placing the cake pop stick in (if you’re using sticks). If you’re not using sticks, you can simply place them back on the parchment paper.
11. **Let Them Set:** Once all your cake pops are beautifully dipped, allow them to set on the parchment paper or use a floral foam block to keep them upright while they cool down. It’s like giving them a spa day.
12. **Get Creative!** At this point, you can also drizzle some white chocolate on top for that ultimate aesthetic. Or sprinkle some crushed nuts or sprinkles to add flair. Go wild! These cake pops are your playground now!
Side Notes & Sassy Hacks
Bonus Tips You Didn’t Ask For
– **Flavor Swaps:** If you happen to have some leftover cake, you can easily turn this into another flavor by swapping the cocoa powder for different flavored extracts. Almond or coconut flavors? Yes, please!
– **Shortcuts Like a Pro:** If you’re in a time crunch, you can use ready-made cake mix. You’ll skip some steps with the dry ingredients, and no judgment here! Just follow the baking instructions on the box.
– **Inconsistent Size?** No biggie! Nobody’s grading your cake pops on beauty—embrace the rustic charm!
– **Freeze Us To Perfection:** If you made way too many cake pops, you can freeze them before dipping in chocolate! It keeps them fresh for when you need that sweet escape later.
Final Words of (Culinary) Wisdom
So there you have it! Your adventure in baking Perfect Red Velvet Cake Pops. I know it seems like a lot, but just remember, the best recipes come with a little patience and a lot of heart. If you try them, please tag me so I can virtually high-five you! And if you mess up? That’s part of the fun—I can guarantee I’ve earned quite a few battle scars during this cake pop journey!
Now get baking! The world needs more cake pops, and who might as well be you, the amazing baker that you are? Happy baking, friends!