Prep time: 10 minutes
Cook time: 40 minutes
Total time: 50 minutes
Servings: 4
Caramelized onions are a transformative ingredient that can elevate any dish to new heights. The sweet, rich flavor paired with their velvety texture makes them a delightful addition to an array of meals. Whether you’re tossing them onto a gourmet burger, mixing them into creamy risottos, or using them as a pizza topping, knowing how to achieve that perfect caramelization without burning is essential. This recipe will guide you through the process, ensuring you create those delicious, golden-brown onions every time, all while avoiding common pitfalls.
In this guide, we’ll explore the intricate balance of heat and time that leads to achieving perfectly caramelized onions. Not only will you learn the essential steps, but I’ll also share invaluable tips to avoid burning your onions and ensure they cook evenly. After mastering this technique, you’ll find yourself reaching for caramelized onions in your dishes without hesitation. Trust me, once you get the hang of it, you won’t want to cook without them!
What Is Perfect Caramelized Onions Without Burning?
Caramelized onions are made through a slow cooking process that widens their natural sugars, transforming them into beautifully soft, sweet, and golden morsels. Originating from culinary traditions around the globe, the concept of caramelizing vegetables is deeply rooted in many cuisines. However, onions stand out due to their mellow, complex flavor profile when cooked low and slow. The dish is characterized by its rich sweetness and delightful umami notes, making it a versatile addition to numerous meals.
Caramelization occurs when the natural sugars in the onions break down, leading to a change in both color and flavor. The resulting texture is soft and jam-like, almost spreadable, which enhances everything from rustic bread to hearty stews. The process requires patience, but that time investment is well rewarded. You’ll understand the sensations— the aroma that fills your kitchen, the pleasing sizzle on the stove, and the joy of that first taste.
The key to achieving perfect caramelized onions lies in the method. Using the right amount of oil, controlling the heat, and choosing the best onions are essential elements in crafting this flavorful masterpiece. Ideally, yellow onions are best for this technique, but other varieties like red or sweet onions can also work wonderfully. They each provide different flavor nuances, adding depth and character to your cooking.
Why You’ll Love This
One of the primary reasons you will adore this recipe is the unmatched flavor it brings to your dishes. Caramelized onions offer a deep sweetness that can enhance both savory and sweet meals. This versatile ingredient works beautifully in a range of cuisines and is incredibly easy to make once you’ve mastered the technique. Furthermore, they’re an affordable ingredient that can help you stretch your meals further, making this perfect for anyone on a budget.
Many people mistakenly believe that caramelizing onions is daunting and only for advanced cooks. The truth is, it’s a technique anyone can learn with a little practice. The process requires commitment, specifically the commitment to cooking at a low heat for an extended period. Yet, with this recipe, you’ll gain confidence in layering flavors, giving you a sense of accomplishment every time you serve these delightful jewels.
You can incorporate caramelized onions into countless dishes. Think of adding them as a topping on homemade pizzas, blending them into soups for added depth, or mixing them with sautéed greens for a nutritious side dish. Their adaptability makes them a staple you’ll want to keep on hand at all times. Not to mention, the satisfaction of preparing them perfectly will make you eager to share this skill with your friends and family.
Ingredients You’ll Need
- 3 large yellow onions – The backbone of this recipe, yellow onions have a wonderful balance of sweetness and savory flavor.
- 2 tablespoons olive oil – This allows for smooth cooking while enhancing the flavor of the onions. Feel free to use butter for a richer taste.
- 1 teaspoon salt – This will help draw out moisture from the onions, aiding in the caramelization process.
- 1 tablespoon balsamic vinegar (optional) – For a touch of acidity and additional sweetness, a splash of balsamic vinegar can be added towards the end of cooking.
- Fresh herbs (optional) – Adding a sprinkle of thyme or rosemary can provide an aromatic garnish that complements the dish beautifully.
Selecting the right type of onion is essential. While yellow onions are commonly recommended, red and sweet onions can be excellent substitutes as well. Each variety brings a different flavor profile, so feel free to experiment based on your personal preference or what you have available. Additionally, using a good quality olive oil or butter will further enhance the richness of the caramelized onions. The salt not only extracts moisture but also intensifies the natural flavors, making each onion slice burst with taste.
How to Make
- First, prepare your onions by peeling them meticulously. Remove only the outer layer to prevent any bitterness in the final dish. Slice the onions in half, and then slice each half into thin slices, about 1/4 inch thick. The size matters—if they are too thick, they may take longer to caramelize.
- Heat a large skillet over medium heat. Add the olive oil and let it warm for a minute. The oil should shimmer slightly, indicating it’s ready for cooking. Ensure you’re using a pan that provides even heat distribution for the best results. A cast-iron or stainless-steel skillet can work wonderfully.
- Add the sliced onions and sprinkle the salt evenly over them. Stir the onions once to ensure they’re coated in the oil. The salt will start drawing out moisture right away, which is crucial for the caramelization process. Don’t rush this step; let them sit for a bit to release their natural juices.
- As the onions begin to cook, reduce the heat to low. This low-and-slow cooking method is key. Stir the onions every 5–10 minutes. This gentle approach allows the natural sugars to develop without burning. You might notice the onions starting to stick a bit; that’s normal. Just scrape the bottom of the skillet to release those beautiful browned bits.
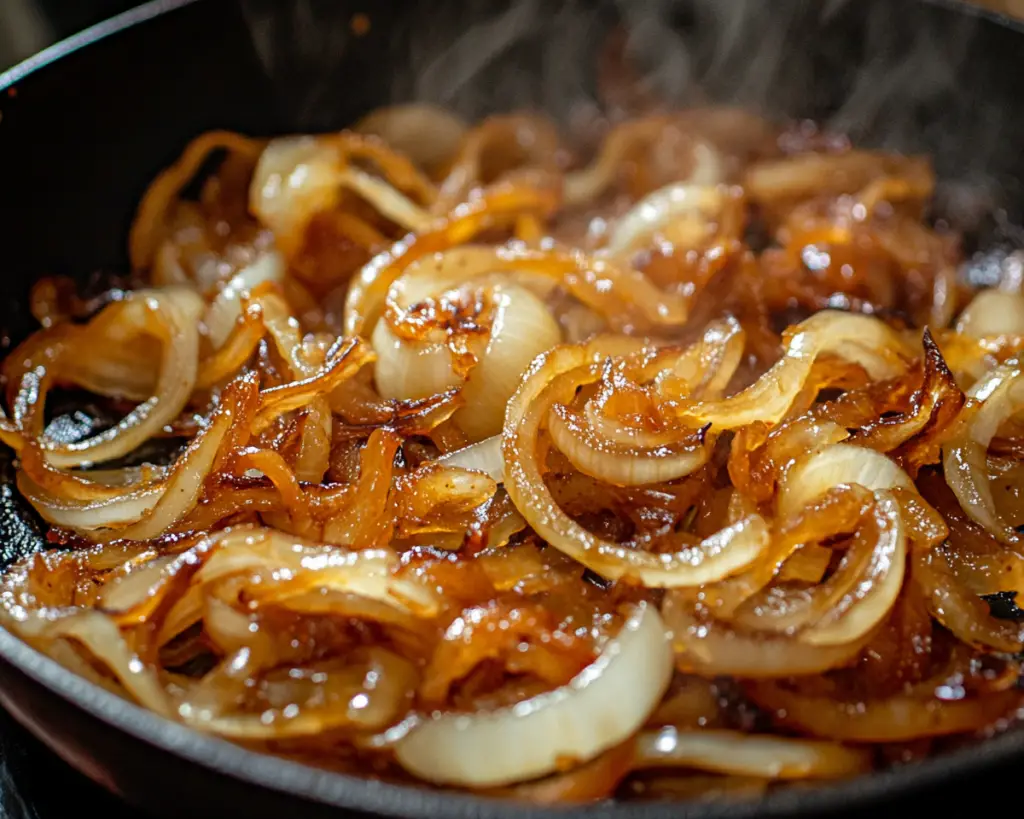
- After about 30 minutes, you will start to notice a significant change in color and aroma. The onions should slowly shift from translucent to a golden-brown color. At this point, you can choose to add balsamic vinegar. This will enhance the rich flavors of the onions, giving them that sweet, tangy finish.
- Continue cooking for an additional 10 minutes, stirring occasionally. The onions should become deeply caramelized, dark brown but not burnt—be vigilant during this phase! If they start to stick too much, you can deglaze with a splash of water or broth to help lift the fond from the bottom of the pan.
- Once your onions are the perfect shade of caramel brown, remove them from heat. Allow them to cool slightly before serving. Enjoy their warm, sweet aroma as they’re ready to be added to your meals.
Remember to be patient during this process. It’s the low heat and time that yields those perfect caramelized onions you’ll want to add to every dish. Don’t be tempted to increase the heat; it will only lead to burnt bits and uneven cooking.
Variations & Substitutions
Sweet Onion Variation: Using sweet onions, such as Vidalia or Walla Walla, will provide a different flavor profile—much sweeter but softer in texture. You can follow the same method with perhaps a touch less oil, as sweet onions release more moisture than their yellow counterparts. This variation is perfect for those who prefer a milder sweetness.
Vegan Butter Version: For a dairy-free alternative, consider substituting regular butter with vegan butter. It offers the same rich taste without any animal products. This is especially ideal for vegans or those sensitive to dairy. Simply replace the butter quantity in the recipe with an equal amount of your chosen vegan butter.
Herbed Caramelized Onion Variation: Adding fresh herbs, such as thyme or rosemary, during the last stages of cooking will serve to elevate the flavor. The herbs will infuse into the onions, giving them an aromatic quality that enhances their inherent sweetness. This version is perfect when serving with roasted meats or adding to a savory pie.
Balsamic Glaze Finish: If you want to take your caramelized onions to the next level, finish them off with a drizzle of balsamic glaze right before serving. This can lend a beautiful lustrous finish and additional tangy sweetness, making them a standout for topping pizzas or sandwiches.
Common Mistakes to Avoid
One of the most common mistakes when making caramelized onions is cooking them at too high a temperature. This results in burnt bits rather than the desired golden-brown color and sweet flavor. Always remember, low and slow is the way to go—be patient and let the onions cook gently for the best results.
Another mistake is overcrowding the pan. When too many onions are in a single layer, they can end up steaming rather than caramelizing properly. If you’re making a larger batch, consider using two pans or cook in smaller quantities to ensure even cooking.
Lastly, some people forget to add salt at the beginning. Salt helps draw moisture out and speeds up the caramelization process. Skipping this step can lead to a lengthy cooking time with uneven flavors.
To prevent burning, stay attentive while cooking. Stir frequently to ensure even cooking throughout, and don’t be afraid to add a splash of water if you notice them sticking too much.
Storage, Freezing & Reheating Tips
Proper storage of your caramelized onions can extend their shelf life and allow you to enjoy their rich flavors later. Once cooled, store them in an airtight container in the refrigerator. They can last up to one week, making them a perfect candidate for meal prep.
If you want to extend their life even further, consider freezing them. Portion them into smaller containers or bags, and ensure all the air is squeezed out before sealing. Frozen caramelized onions can last for up to three months. You can thaw them in the refrigerator overnight or quickly defrost them in the microwave before using.
When reheating, do so gently over low heat in a skillet to prevent them from drying out. Add a small splash of water or broth to help reinvigorate the flavor and moisture.
Frequently Asked Questions
Can I use red onions instead of yellow onions?
Absolutely! Red onions will impart a different flavor and a slightly sharper taste, but they can be caramelized just like yellow onions. They will yield a sweeter result but may take a bit longer to reach that perfect caramelized state. Many people enjoy the vibrant color red onions add to dishes.
Is it possible to caramelize onions in a slow cooker?
Yes, you can! Caramelizing onions in a slow cooker requires a bit more time but yields delicious results. Simply slice your onions, add some oil and salt, and set your slow cooker on low for around 8 hours. Stir occasionally if possible, and you’ll have perfectly caramelized onions waiting for you.
What’s the best way to know when my onions are fully caramelized?
The best indicator of perfect caramelization is color and aroma. Look for a deep golden-brown color and take in the sweet, nutty aroma that fills the kitchen. They should be soft and silky. If they start to burn or blacken, you should reduce the heat and add a bit of liquid.
Can I caramelize onions without oil?
Yes, you can caramelize onions using broth or water instead of oil. This method takes longer and requires more attention to prevent sticking, but it is entirely possible for those looking to cut down on fat. Just be sure to use a non-stick pan for easier cooking.
How do I use caramelized onions in recipes?
Caramelized onions can be used in numerous recipes! Try incorporating them into sandwiches, salads, soups, or pizzas. They add depth and richness to scrambled eggs, pastas, or grain bowls. You can also use them to enhance the flavor of stews and casseroles.
Conclusion:
Caramelizing onions is a simple, yet profound skill that can elevate your home cooking in ways you never imagined. Their rich, sweet flavor adds depth to countless dishes and makes them incredibly versatile. With the tips, techniques, and variations outlined here, you’ll be well-prepared to make the perfect caramelized onions without burning. The kitchen aroma alone is worth the effort, and I encourage you to try it out yourself! Customize them to fit your meals, and don’t shy away from experimenting. Share your fabulous results with friends and family—the joy of cooking together can create lasting memories!