Let’s Get Real
You know those days when you’re sweating more than a popsicle on the pavement, and all you can think about is how much you wish summer would just chill for a second? Yeah, that’s been my week. I swear, every time I step outside, I feel like I’m stepping straight into a sauna — a really poorly ventilated, somewhat sticky sauna. But you know what? This sweltering heat means one thing: it’s time for No-Bake Orange Creamsicle Swirl Cheesecake. Just hearing the words “creamsicle” makes my heart skip a beat like an awkward first date gone right.
Growing up, I had a serious case of ‘I-don’t-want-to-eat-this’ when it came to cheesecake. Oh, the horror! But that was before I discovered the magic of no-bake cheesecakes. Excuse me while I do a dramatic swoon! This no-bake wonder has become my new summer fling. A union of creamy cheesecake and tangy orange bliss — oh, honey, buckle up because we’re going to dive into the full, delicious abyss here!
I’ve made this cheesecake so many times now that I think my kitchen appliances are starting to file for a restraining order. My mixer is like, “Again?!” Every single bite of this dessert takes me back to those long, lazy days of summer. You know, the days where the hardest decision was whether to play outside or binge-watch cartoons. This cake is a time machine. I made one last week for my friend’s birthday, and all I can say is, if you’re not ready for your taste buds to do a happy dance, then I suggest you sprint away. Because this No-Bake Orange Creamsicle Swirl Cheesecake is about to rock your world!
Ingredients, Unfiltered
So let’s dive into the arsenal of ingredients for this creamy dream:
What’s Really in No-Bake Orange Creamsicle Swirl Cheesecake
Graham cracker crumbs: The classic cheesecake crust. Or as I like to call them, the crunchy little base of happiness. You could use store-bought crumbs, but let’s be real — smashing them with a rolling pin is so cathartic.
Sugar: Because not enough calories have been consumed yet, and also because it makes everything taste better. I prefer using granulated sugar, but if you want to get sassy, brown sugar can add some depth. Just don’t get crazy!
Butter: The magical glue of the crust. I use unsalted because I want to control that sweet-salty balance, unlike my ex who could never decide on a restaurant. I always melt it, so it binds the crumbs like lifelong friends.
cream cheese: Hello, central character. The velvety, creamy star of our show. Make sure it’s softened, so it blends smoothly. I didn’t do this once, expecting it to just “work,” and the lumps still haunt me.
Powdered sugar: This is my secret weapon for a level of sweetness that feels like a hug. Also, it creates a smooth texture. Just be careful not to have a tornado of powdered sugar happen; I once ended up looking like a ghost at a Halloween party.
Vanilla extract: For that delightful depth of flavor. It rounds out the sweetness like a finishing touch on a masterpiece painting — you know, the kind you stare at in an art gallery and pretend you understand.
Heavy cream: The cream on the top (literally) makes your cheesecake light and fluffy. This is NOT the time for skim milk, folks — we’re going full-fat here!
Orange juice: Fresh is best. It’s like a summer fiesta for your taste buds. The tangy-ness really gives that creamsicle vibe. If you don’t have fresh oranges, I won’t judge you for using the bottled stuff. Rarely does anyone die from bottled juice, right?
Orange zest: Think of this as the natural confetti of the cheesecake world. It provides a pop of color and flavor. Plus, it gives you bragging rights at fancy dinner parties when you say you “zested” something. You’ll feel like a kitchen rockstar.
Orange food coloring (optional): Okay, hear me out. If you want those gorgeous orange swirls to really pop, a few drops of food coloring will do the trick. But if you want to keep it all-natural, that’s cool too. Just know your cheesecake will look like it took a chill pill.
Let’s Talk Health (or Not)
Is This Even Healthy? Let’s Discuss
Alright, so let’s have the “health talk.” I could fluff up this section with a bunch of buzzwords and green smoothie jargon, but let’s get real — we’re making cheesecakes! Are they healthy? To be honest, not really. But you know what? Who cares! Sometimes you just have to embrace the decadence. This is a dessert, people. It’s meant to be enjoyed, savored, and licked off the spoon like you’ve just discovered a hidden treasure at the bottom of your drawer.
Sure, there’s butter, sugar, and cream cheese, but these pleasures are here for a good time, not a long time. Plus, this recipe feeds around 8-10 servings (or just me on a binge-watching marathon), so if we’re really being honest, what’s one slice—err, cobbler of creamy delight every now and then? Live a little, don’t be a sugar scrooge! If you’re worried about your waistline or whatever, our lives have enough stress. Go indulge! It’s summer, after all.
Your Grocery List
Here’s What You’ll Need
– 1 ½ cups graham cracker crumbs
– ½ cup granulated sugar (plus more for sweetening the cream)
– ½ cup unsalted butter, melted
– 2 (8 oz) packages of cream cheese, softened
– 1 cup powdered sugar
– 1 tsp vanilla extract
– 1 ½ cups heavy cream
– ½ cup orange juice (freshly squeezed is best)
– 1 ½ tbsp orange zest
– 3-4 drops orange food coloring (optional)
*This beauty feeds about 8-10 people or one very dedicated cheesecake enthusiast (me).
The Actual Cooking Part
Okay, Let’s Make This
Alright, grab those spatulas because we’re about to do this. Don’t panic if this looks messy — it’s supposed to! And spoiler alert: it will get a bit chaotic, but trust me, it’s all part of the culinary journey!
1. **Make the crust:** In a mixing bowl, combine those graham cracker crumbs and granulated sugar. If you really want to get fit, you can even have a small workout smashing graham crackers into fine crumbs. Add in the melted butter, and mix until combined. The mixture should clump together like a high school reunion of two old friends!
2. **Press the crumb mixture into a 9-inch springform pan**. You want it to be evenly distributed and usually i like to use the bottom of a glass to really pack it tightly. Because trust me, a flimsy crust will just embarrass you when you try to cut it. Good luck getting the pieces out without a sweaty mess!
3. **Chill the crust**. Pop that bad boy in the fridge while we work on the cheesecake. This step is crucial because hello, we want it to harden just right.
4. **Whip up that delicious cheesecake filling!** In a large mixing bowl, beat the softened cream cheese until it’s smooth and creamy. Just keep at it; don’t give up because lumps are not your friends. Once it’s smooth, add the powdered sugar, vanilla extract, and orange juice, and blend until well incorporated.
5. **Whip cream:** In a separate bowl (yes, it means more cleanup, but it’s worth it), whip the heavy cream until soft peaks form. This is where miracle fluffiness happens. Don’t overmix unless you want a butter-like concoction. You are NOT making butter; I’ve made that mistake before.
6. Now, gently fold the whipped cream into the cream cheese mixture. This is the moment where magic happens, and your heart sings a little. It should look like someone made a cloud out of happiness.
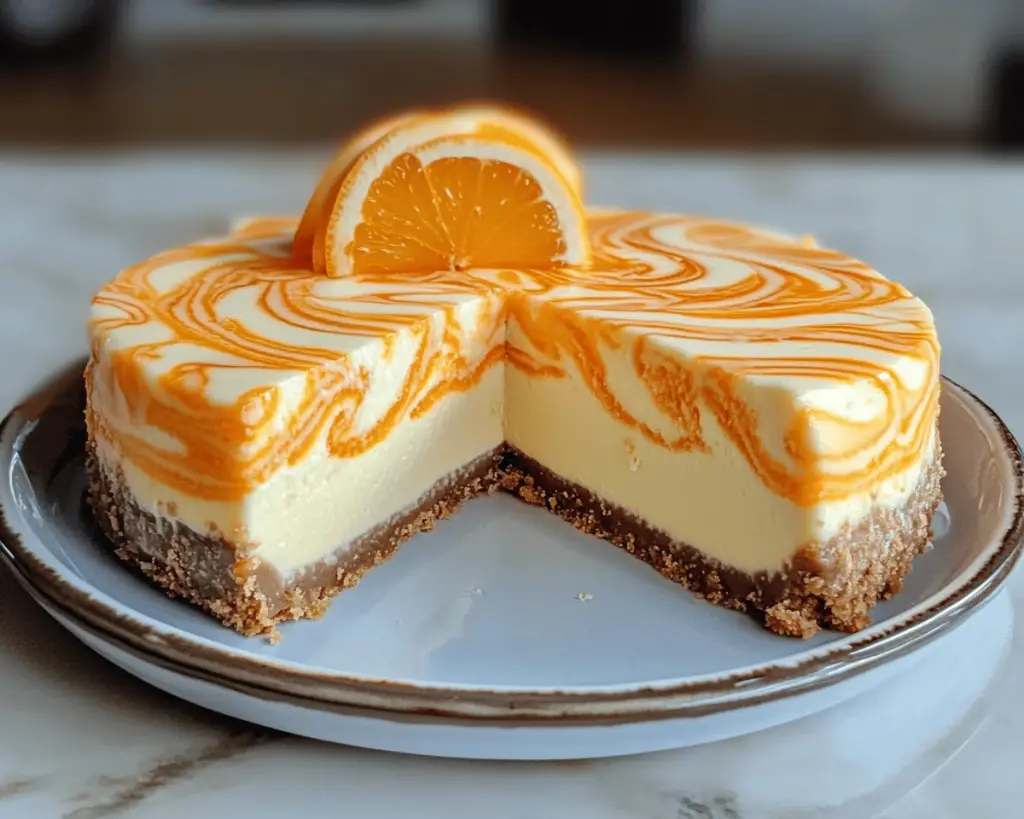
7. **Separate the mixture**: Take about a cup of the cheesecake filling and put it in a separate bowl. This will be your swirler! To this smaller portion, add orange zest and a few drops of orange food coloring if you want that orange vibrancy. This is where the real fun begins.
8. **Layer the cheesecake**: Retrieve your chilled crust. Start by pouring half of the plain cheesecake mixture into the springform pan. Then, dollop the orange cheesecake mixture on top with a spoon. Use a knife or toothpick to create swirls because you want it to look stunning — it’s cheesecake art, darling!
9. **Add the rest of the cheesecake filling**: Pour the remaining plain cheesecake mixture over the orange swirl, and top it off with more dollops of the orange mixture. Once again, swirl it up gently. I’m talking art gallery levels of swirling here.
10. **Chill**: Finally, cover the pan with plastic wrap or a lid and let it chill for at least 4 hours, but overnight is even better!
11. When you’re ready to serve, remove the sides of the springform pan, and voilà! You have a No-Bake Orange Creamsicle Swirl Cheesecake ready to dazzle your friends.
Side Notes & Sassy Hacks
Bonus Tips You Didn’t Ask For
– Want to make it vegan? Swap cream cheese with a vegan alternative (Daiya, I see you!), use coconut cream instead of heavy cream, and maple syrup instead of sugar. Voila, vegan dreams come true!
– Can’t find fresh oranges? Reach for the frozen ones. There’s nothing wrong with frozen fruit; sometimes it’s just easier. I once grabbed a bag of frozen orange segments and ended up with the best experiment of my life!
– If you want these cheesecakes on the go, consider using mini cheesecake cups! Just layer the crust and the filling in individual cups. Perfect for parties or when you want to eat half of the batch in one sitting (no judgment!).
– For decorative purposes, I like to garnish the cold cheesecake with orange slices or zest just before serving. It makes it look like you’ve put in the extra effort (and we know you didn’t).
– I once tried swirling an extra layer of raspberry sauce on top because I live life recklessly. Spoiler: it’s equally awesome but can turn your cream cheese a bit pink. Just saying!
Final Words of (Culinary) Wisdom
Now that you have this No-Bake Orange Creamsicle Swirl Cheesecake at your fingertips, I can almost guarantee you’ll be the culinary rock star of your social circle. I don’t want to say this is the best cheesecake out there (okay, maybe I do), but it’s definitely an instant crowd-pleaser.
So, whip this bad boy up, tag me in your Instagram stories, and send some good vibes my way. And if you mess up? Remember, in the kitchen, we’re all amateurs pretending to be experts. Keep the faith, trust the process, and as always—happy feasting!