Prep time: 20 minutes
Cook time: 12 minutes
Total time: 32 minutes
Servings: 24 cookies
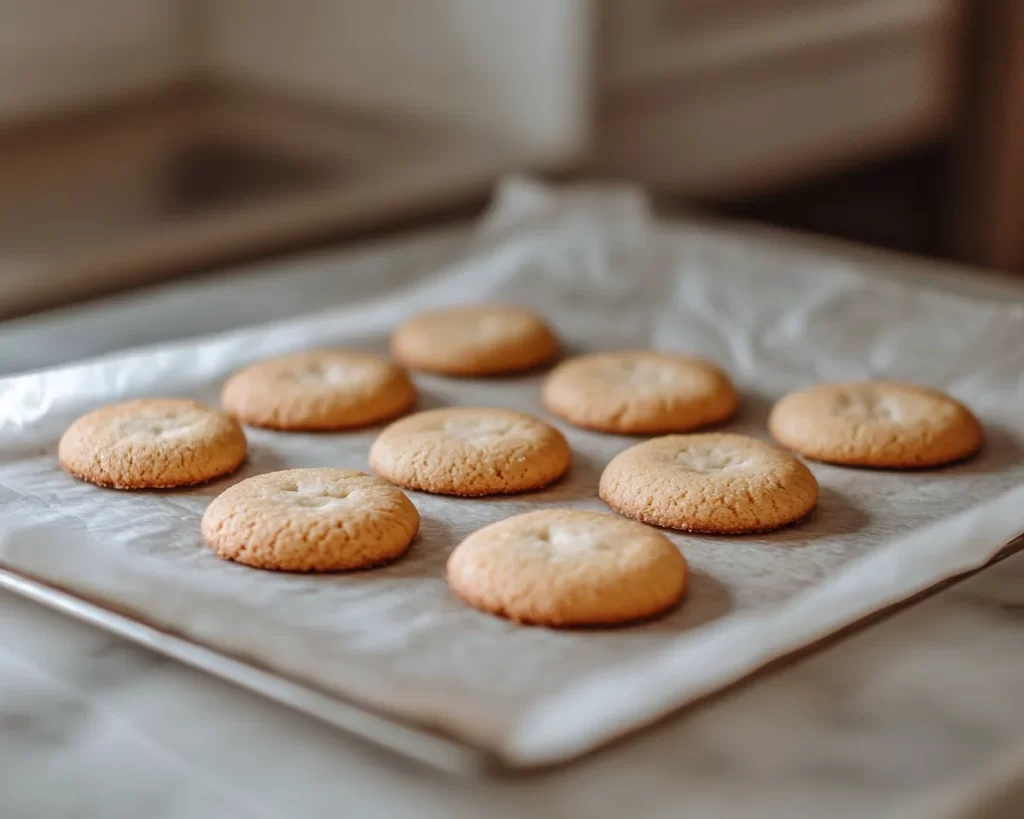
Milk Cookies: Soft Milk Cookies (Classic) is a delightful treat that brings back fond memories for many. Imagine a cookie that feels like a warm hug, with a soft and chewy texture that melts in your mouth. These cookies do not just satisfy a sweet tooth; they transport you to your childhood kitchen, perhaps with a glass of cold milk to accompany them. This recipe is special because it combines simple ingredients to create an irresistible flavor profile, setting it apart from your average cookie.
In this article, you’ll learn how to make these exceptional cookies effortlessly. Not only will you discover the basic method for preparing them, but you’ll also uncover variations and tips that can elevate your baking. Whether you’re a busy parent trying to whip up a quick dessert or a beginner learning the ropes, this guide will ensure that you find success with every batch. You’ll be indulging in the rich, buttery goodness that defines the classic milk cookie in no time.
What Is Milk Cookies: Soft Milk Cookies (Classic)?
Milk Cookies: Soft Milk Cookies (Classic) originate from various culinary traditions, often symbolizing warmth and comfort. Their texture is soft and doughy, striking a perfect balance between chewy and cake-like. The flavor is rich, dominated by creamy notes from the milk and butter, making every bite an experience to savor.
The primary ingredient, milk, enhances moisture, resulting in a cookie that is much softer than typical cookies, which can often be crisp or crunchy. Adding milk gives these cookies a unique tenderness and their distinctive flavor, turning each cookie into a delightful treat. You will also find that these cookies are incredibly versatile; you can enjoy them anytime, from afternoon tea to a late-night snack.
Whether they are baked for a holiday gathering or a spontaneous treat at home, these cookies never fail to impress. The milky aroma wafting through your house while they bake will entice everyone to the kitchen, eagerly awaiting a taste. The classic nature of these cookies makes them beloved by all ages, adapting perfectly to any occasion.
Why You’ll Love This
You’ll love these Milk Cookies for several reasons. First and foremost, their taste is unbeatable. The soft, buttery goodness wrapped in the comforting notes of milk will make you crave another. They are simple and straightforward to prepare, making them ideal for beginners who may feel intimidated by more complex recipes. The ingredients are commonly found in most kitchens, allowing you to whip them up at any moment without a trip to the grocery store.
Another benefit is their cost-effectiveness. With just a few pantry staples, you can create a batch of delicious cookies that are affordable and satisfying. Beyond the taste, these cookies can cater to various dietary needs and preferences. For instance, if you are dairy-free, consider using almond milk or oat milk as a substitute for cow’s milk.
Many home bakers may worry about overcomplicating things. However, this recipe emphasizes simplicity without sacrificing flavor. Avoid the misconception that baking has to be difficult; this Milk Cookies recipe will prove that you can create something delightful with ease and confidence.
Ingredients You’ll Need
- 2 cups all-purpose flour – This serves as the base for the cookies and provides structure.
- 1 cup granulated sugar – Adds sweetness and helps in achieving a lovely golden color.
- 1/2 cup unsalted butter, softened – Contributes to the rich flavor and tender texture.
- 1/2 cup milk – Essential for moisture, giving these cookies their characteristic softness.
- 1 egg – Acts as a binding agent, ensuring that the cookies hold their shape.
- 2 tsp baking powder – Provides lift, making the cookies fluffy.
- 1/2 tsp salt – Balances the sweetness by enhancing the overall flavor.
- 1 tsp vanilla extract – Adds depth and fragrance to the cookies.
Each ingredient plays a crucial role in the final product. For instance, if you are looking to reduce sugar, try substituting with a natural sweetener like honey or maple syrup, keeping in mind that this may affect the moisture level in the cookies. On the other hand, if you prefer a richer taste, consider adding a bit of brown sugar for a slight caramel flavor.
How to Make
To make these cookies, follow these step-by-step instructions for a foolproof result.
- Preheat your oven to 350°F (175°C). This is an essential step to ensure even baking. Preheating allows the cookies to rise properly and helps develop their texture right from the start.
- In a large mixing bowl, cream together the softened butter and granulated sugar. Use a hand mixer or a whisk to ensure they blend well together. You want to achieve a light, fluffy texture – this process adds air into the mixture, which is crucial for those soft cookies.
- Add the egg and vanilla extract to the butter-sugar mixture. Blend well until fully incorporated, giving the mixture a smooth consistency. The egg helps in binding the cookies, while vanilla enhances the overall flavor profile.
- In a separate bowl, combine the all-purpose flour, baking powder, and salt. This step is essential. Mixing dry ingredients separately prevents clumps of baking powder or salt from forming in the cookie dough, ensuring even distribution.
- Gradually add the dry ingredients to the wet mixture, alternating with the milk. Start and end with the flour mixture. Mixing by hand will help maintain the dough’s structure without overworking it. Overmixing can result in tough cookies.
- Once everything is well combined, the dough should be soft and slightly sticky. If the dough is too sticky to handle, add a tablespoon of flour at a time until you reach the desired consistency.
- Prepare a baking sheet by lining it with parchment paper. This prevents sticking and makes cleaning up easier. Use a cookie scoop or two spoons to drop equal-sized portions of dough onto the baking sheet, spacing them about two inches apart.
- Bake the cookies in your preheated oven for 10 to 12 minutes. Keep a close eye on them; they should be lightly golden at the edges while the centers appear slightly underbaked. This will ensure they remain soft after cooling.
- Allow the cookies to cool on the baking sheet for 5 minutes before transferring them to a wire rack. This step allows them to set while still warm, preventing them from breaking apart.
- Let them cool completely on the wire rack before storing, if any remain! Enjoy your freshly baked Milk Cookies with a glass of milk, or package them for sharing.
These steps will guide you smoothly through the baking process. Remember to be patient as you wait for them to cool; the aroma alone will test your willpower!
Variations & Substitutions
Chocolate Chip Milk Cookies: If you’re a chocolate lover, consider adding 1 cup of semi-sweet chocolate chips to the dough. The melty chocolate will complement the cookie’s soft texture, providing a delightful contrast of flavor. This variation is perfect for those looking to indulge further, appealing to both kids and adults alike.
Dairy-Free Milk Cookies: For those with dairy restrictions, substitute the cow’s milk with almond milk or oat milk and use vegan butter. These simple substitutions will create a cookie that is still invitingly soft and comforting without any dairy. Keep in mind that the brand of milk used might slightly alter the flavor, but it will remain delicious.
Nutty Milk Cookies: To add an unexpected crunch, fold in 1/2 cup of chopped walnuts or pecans into the dough. The nuts provide texture and flavor, creating a pleasing contrast to the soft cookies. This variation is especially appealing to those who enjoy a nutty flavor, enhancing the overall richness.
Spiced Milk Cookies: For a touch of warmth and complexity, mix in 1 teaspoon of cinnamon or nutmeg to the dry ingredients. This simple addition creates a comforting fragrance and flavor reminiscent of cozy winter days. If you enjoy seasonal spices, this variation can become your go-to for holiday gatherings.
Gluten-Free Milk Cookies: For those who are gluten intolerant, replace the all-purpose flour with a 1:1 gluten-free flour blend. Make sure the blend has xanthan gum, which will help achieve a similar structure to the cookies. With this substitution, you can enjoy soft cookies without sacrificing taste.
These variations allow you to tailor the Milk Cookies to your preferences or dietary needs, ensuring that everyone can enjoy this classic treat.
Common Mistakes to Avoid
One common mistake when making Milk Cookies is overmixing the dough, resulting in tough cookies. As mentioned in the instructions, mix until just combined. This ensures a tender texture.
Another issue is not measuring ingredients accurately, particularly the flour. Scooping directly from the bag can lead to using too much flour, causing dense cookies. Always spoon flour into your measuring cup and level it off for accuracy.
Also, don’t overlook the importance of resting the cookies on the baking sheet after baking. If you transfer them too early, they may crumble. Allow adequate time for them to set before moving them to the cooling rack.
Finally, make sure to check for doneness visually rather than relying solely on time. Each oven behaves differently; your cookies might need an extra minute or two. Keeping an eye on them as they bake will ensure you get that perfect soft center while still achieving that lovely golden edge.
Storage, Freezing & Reheating Tips
To store your cookies, let them cool completely and place them in an airtight container at room temperature. They can last for about 5-7 days, though they are often devoured much quicker! If you prefer them to stay fresher longer, consider freezing them.
To freeze, layer the cookies between parchment paper in a freezer-safe container or bag. This prevents them from sticking together and can last for up to three months. When you’re ready to enjoy them, let the cookies thaw at room temperature or pop them in the microwave for about 10-15 seconds for a fresh-baked warmth.
Always follow food safety best practices. If you notice any signs of spoilage, such as unusual odors or appearance, it’s best to err on the side of caution and discard the cookies.
Frequently Asked Questions
Can I make these cookies without an egg?
Yes, you can substitute the egg with 1/4 cup of unsweetened applesauce or a flaxseed mix (1 tablespoon of ground flaxseed mixed with 2.5 tablespoons of water). This will help bind your ingredients and create a similar texture.
How can I make my cookies softer?
To ensure softness, avoid baking them too long. The cookies should look slightly underbaked when you take them out of the oven. They will continue to cook on the baking sheet during the cooling process.
Is it necessary to chill the dough?
Chilling the dough is not necessary for this Milk Cookies recipe; however, if you choose to chill it for 30 minutes, it can help the cookies maintain their shape and enhance the flavors.
Can I use whole wheat flour instead of all-purpose flour?
Yes, you can substitute whole wheat flour for some or all the all-purpose flour, but this will result in a denser texture. If using all whole wheat flour, consider adding a bit more liquid (milk) to counter the absorbent quality of the whole grain.
What beverages pair well with Milk Cookies?
These cookies are wonderful with a glass of milk, but they also pair beautifully with tea or coffee. The richness of the cookies balances nicely with both flavors, making them perfect for afternoon snacks or dessert.
Conclusion:
In summary, Milk Cookies: Soft Milk Cookies (Classic) is a timeless treat that offers incredible flavors and textures in every bite. Their simple preparation makes them accessible for any home cook, whether you’re baking for your family or hosting a gathering. I encourage you to try this recipe, customize it with your favorite variations, and share it with friends and family. The joy of baking and the delight of a fresh cookie will make each batch memorable. Happy baking!