Prep time: 15 minutes
Cook time: 10 minutes
Total time: 25 minutes
Servings: 24 cookies
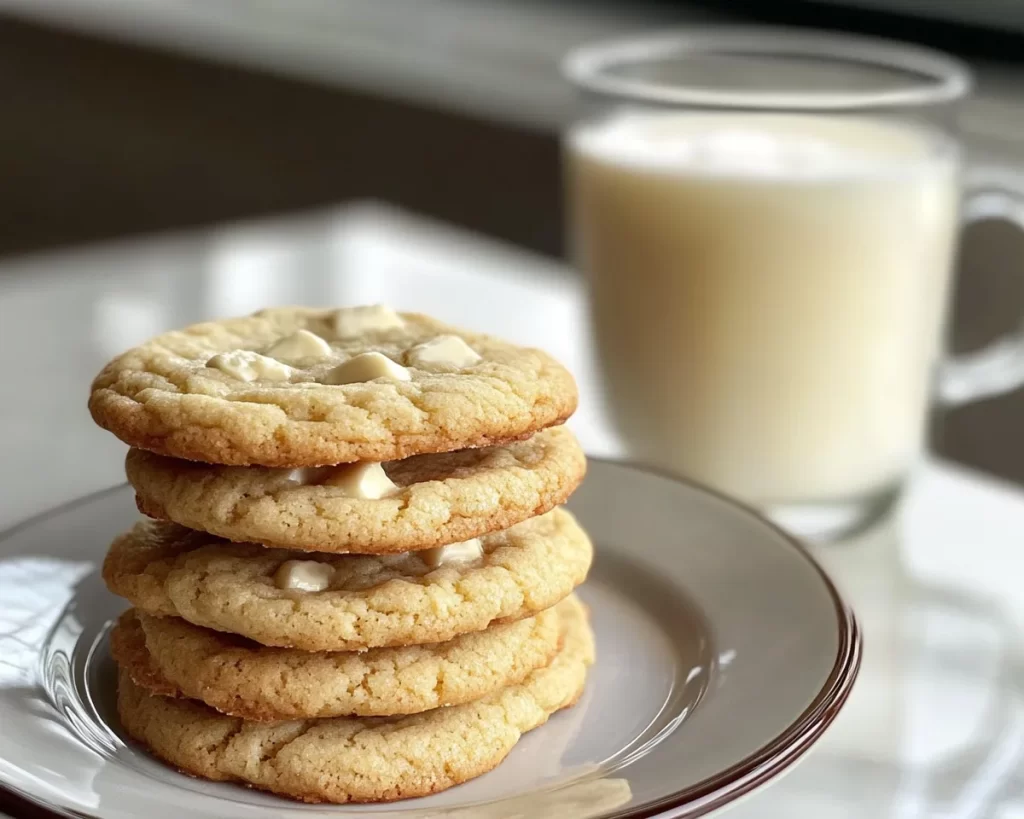
Milk Cookies are not just any ordinary treat; they are a delightful journey down memory lane for many. Remember those simple days of childhood when a warm cookie and a glass of milk made everything feel right? This recipe encapsulates that cozy feeling, offering you a chance to bake soft, chewy cookies that are perfect for snacking, dessert, or even as a sweet treat for your kids after school. The secret lies in the rich, creamy taste of milk, which elevates these cookies into something truly memorable.
In this article, you will learn how to perfect the art of making Milk Cookies, encompassing tips for achieving that coveted soft-baked texture while enhancing the flavor profile with a few easy variations. Whether you’re a busy parent looking to whip up a quick snack, a beginner looking to hone your baking skills, or just someone who simply loves cookies, this recipe will guide you every step of the way.
What Is Milk Cookies: Classic Soft Milk Cookies (Easy)?
Milk Cookies, often called “classic soft milk cookies,” are a delectable treat, stemming from simple, traditional baking roots. Their origin can be traced back to home kitchens where families would often whip up batches to share during gatherings or enjoy with a glass of milk. Often characterized by their soft, chewy interior and slightly crispy edges, these cookies are truly comforting. The essential ingredient here, which sets them apart from other cookies, is the milk that adds not only moisture but also a rich flavor profile that lingers pleasantly on your palate.
The texture of Milk Cookies is something to behold: they offer a slight crunch on the outer layer, while the inside remains soft and pillowy. When you take a bite, you’ll immediately notice how the flavors meld together—sweet yet subtle, with hints of vanilla that dance in harmony with the creamy essence of the milk. This delightful combination is further enhanced by the addition of various ingredients such as butter and sugar, making them not only satisfying but also a versatile choice for various occasions.
Why You’ll Love This
You’ll soon discover that Milk Cookies are incredibly easy to prepare, which makes them perfect for both seasoned bakers and those new to the kitchen. With straightforward ingredients and clear directions, you’ll enjoy the process just as much as the end result. Not to mention, the cost-effectiveness of this recipe primarily comes from basic pantry staples. You can create a big batch for under budget, making it an accessible option for anyone.
One common misconception is that cookies must always be extravagant or overly complicated to be delicious. On the contrary, Milk Cookies are proof that simplicity holds a timeless charm. Furthermore, whether you’re looking to indulge in a quick afternoon snack or want to impress guests, these cookies certainly deliver. They can be easily paired with any drink, from a glass of cold milk to a warm cup of tea. Plus, they’re incredibly versatile and can be customized to suit various dietary restrictions or preferences.
Ingredients You’ll Need
- 2 ½ cups all-purpose flour: This forms the base of the cookies and provides structure. You can substitute whole wheat flour for a healthier alternative, though it may alter the final texture slightly.
- 1 cup unsalted butter: Softened at room temperature, butter adds richness and flavor. If you’re looking for a dairy-free option, coconut oil can work well here.
- 1 cup granulated sugar: This sweetener balances the flavors. You might consider using brown sugar for a deeper caramel flavor.
- ½ cup milk: The secret ingredient! Whole milk gives the cookies a soft texture, though almond milk or oat milk can also be used for a dairy-free option.
- 1 large egg: Acts as a binding agent; substitutes such as a flax egg can be used for vegan variations.
- 1 teaspoon vanilla extract: Adds a lovely aroma and flavor. Vanilla paste can serve as an excellent substitute.
- 1 teaspoon baking powder: For leavening, ensuring that your cookies rise and achieve that perfect texture.
- ½ teaspoon salt: Balances the sweetness and enhances other flavors.
- Optional add-ins (chocolate chips, nuts, etc.): These are custom choices that provide additional flavors and textures, making each cookie unique.
How to Make
- Preheat your oven: Start by preheating your oven to 350°F (175°C). This is crucial to ensure that your cookies bake evenly and achieve that lovely golden hue.
- Prepare your baking sheets: Line two baking sheets with parchment paper or silicone baking mats. This will prevent the cookies from sticking, allowing for easy cleanup.
- Mix the butter and sugar: In a large mixing bowl, cream together the softened unsalted butter and granulated sugar until the mixture becomes light and fluffy. This process typically takes about 3-5 minutes. Remember to scrape down the sides of the bowl to incorporate all ingredients evenly!
- Add egg and vanilla: Beat in the large egg and vanilla extract until well-combined with the butter-sugar mixture. You should see a smooth, cohesive batter forming.
- Combine dry ingredients: In another bowl, whisk together the all-purpose flour, baking powder, and salt. Gradually add this dry mix to the wet ingredients, stirring gently until fully combined. Avoid over-mixing, as this can lead to tougher cookies.
- Incorporate milk: Pour in the milk slowly while mixing the dough. This will help to achieve a soft, moist cookie texture. If you’re using any optional add-ins like chocolate chips or nuts, fold them into the dough now.
- Scoop the dough: Use a cookie scoop or tablespoon to drop rounded balls of dough onto your prepared baking sheets, leaving enough space for spreading—around 2 inches apart should suffice.
- Bake: Place the cookie sheets in the preheated oven and bake for 10-12 minutes, or until the edges are lightly golden. The center might still look slightly underbaked; that’s perfectly okay as they will continue to cook while cooling!
- Cool: Once out of the oven, let the cookies cool for about 5 minutes on the baking sheet before transferring them to a wire rack to cool completely. This helps to avoid them breaking apart.
- Enjoy: Finally, indulge in your warm Milk Cookies with a glass of milk or hot beverage of your choice. Trust me; there’s nothing quite like it!
Variations & Substitutions
Chocolate Chip Milk Cookies: For those who crave a richer flavor, adding chocolate chips is a game changer. Simply fold in about 1 cup of semi-sweet or dark chocolate chips into the dough before scooping it onto your baking sheets. The creamy texture of the cookies coupled with melted chocolate creates a heavenly experience that’s hard to resist. This variation is perfect for chocolate lovers and children alike, bringing a sense of joy to snack time.
Nutty Milk Cookies: If you’re looking to add some crunch to your cookies, consider incorporating chopped nuts such as walnuts or pecans. Adding about 1 cup of nuts brings a delightful texture and a nutty richness that complements the sweet flavor perfectly. Plus, nuts are an excellent source of healthy fats and protein, making these cookies a bit more nutritious. This is an excellent option for those who enjoy nutty flavors or are following a low-carb diet.
Gluten-Free Milk Cookies: For those with gluten sensitivities, substituting regular flour with a gluten-free blend will yield similar results. Just ensure that the gluten-free flour has xanthan gum included to mimic the texture of regular flour. The process remains the same, and your cookies will still turn out soft and delicious without sacrificing flavor.
Dairy-Free Milk Cookies: If you’re aiming for a dairy-free option, simply replace the butter with coconut oil or vegan butter and use plant-based milk such as almond or soy milk. These alternatives won’t compromise the cookie’s texture, but will alter the overall flavor slightly. You won’t miss the dairy at all when you take that first bite of these cookies, making them a wonderful option for lactose-intolerant friends and family.
Spiced Milk Cookies: For a warm, comforting raise, consider adding spices such as cinnamon or nutmeg to the dough. Incorporate about 1 teaspoon of ground cinnamon for a classic taste that adds depth. This is especially delightful for fall baking or holiday gatherings, where such warming spices heighten the overall ambiance of enjoying homemade treats.
Common Mistakes to Avoid
One of the most common pitfalls when making Milk Cookies is overmixing the dough. When you mix too vigorously after adding the flour, the gluten can develop, resulting in tougher cookies than you’d prefer. Remember to mix gently until just combined; it’s perfectly fine if there are a few flour streaks remaining.
Another mistake is not allowing sufficient time for cooling. Cookies that are still hot from the oven will crumble and break if you try to move them too quickly. Allow them to cool on the baking sheet for about 5 minutes, which allows them to firm up before transferring.
Lastly, always remember to check your oven temperature and adjust accordingly, as ovens can vary quite a bit. If your cookies seem to be browning too quickly or not rising enough, it might indicate you’re using an incorrect temperature setting. Investing in an oven thermometer can greatly help in baking scenarios where precision is crucial for success.
Storage, Freezing & Reheating Tips
To store your milk cookies, keep them in an airtight container at room temperature for up to one week. This will help maintain their soft texture and flavor. If you’d like a longer shelf life, these cookies can also be frozen. Just place them in a zip-top freezer bag or airtight container with parchment paper between layers and freeze for up to three months.
When you are ready to enjoy your frozen cookies, let them thaw at room temperature. If you’d like to enjoy them warm, pop them in the microwave for about 10-15 seconds or reheat in the oven at a low temperature for a few minutes. This will revive their freshly baked aroma and texture perfectly.
For food safety practices, ensure that all cookies are completely cool before storing them to avoid condensation inside the container, which could lead to spoilage. Always check that your storage methods are clean and dry to help prolong their freshness.
Frequently Asked Questions
Can I use whole wheat flour instead of all-purpose flour?
Yes, you can substitute whole wheat flour for all-purpose flour in this recipe. However, be mindful that whole wheat flour can yield a denser texture, so you may want to adjust the liquid slightly to accommodate the difference.
What can I do if my cookies come out too dry?
If you find that your cookies are dry, it’s likely due to overbaking or the ratio of flour to liquid ingredients. Make sure to carefully monitor the baking time and test with a toothpick for doneness. Next time, try using slightly less flour or adding more milk to achieve a softer outcome.
Are these cookies suitable for freezing?
Absolutely! Milk Cookies freeze exceptionally well. Just ensure they are stored in a proper airtight container and separated with parchment paper to avoid sticking. They can last for up to three months in the freezer.
Can I add different mix-ins to the cookie dough?
Certainly! Adding a variety of mix-ins like chocolate chips, dried fruits, or nuts can enhance the flavor and texture of your Milk Cookies. Just be conscious of how much you add, as introducing too many ingredients can affect the dough consistency.
How do I make these cookies vegan-friendly?
You can easily adapt this recipe to be vegan by replacing butter with a plant-based alternative and using almond or oat milk instead of cow’s milk. For the egg, a flax egg can be made by mixing one tablespoon of flaxseed meal with three tablespoons of water. Allow it to thicken before adding it to the dough.
Conclusion:
Milk Cookies are a timeless treat that resonates with the warmth of home and the joy of baking. Their simple ingredients, ease of preparation, and delightful flavors make them a must-try for any cookie lover. Whether you stick to the classic recipe or explore tempting variations, you’ll find that these cookies are endlessly customizable to suit your preference. I encourage you to gather your loved ones, share this recipe, and savor the sweetness that comes with making and sharing Milk Cookies. Happy baking!