In the world of comforting dishes, few can evoke memories and warmth quite like a Japanese curry bun. The first time I encountered this delectable treat was during a rainy afternoon spent wandering the streets of Tokyo. The smell of something savory wafted through the air, intriguing me enough to step into a small bakery, where I stumbled upon a freshly made curry bun, or kare-pan as it’s lovingly called in Japan. The golden, crispy exterior beckoned me, but it was the promise of a cozy, spiced curry filling that sealed the deal.
As I took my first bite, the crunch of the bread gave way to a flavorful explosion — a blend of sweet, savory, and subtly spicy notes coming together in perfect harmony. It was an experience that transcended mere hunger; it felt like home. Since that day, Japanese curry buns have become a staple in my kitchen, beloved not just for their deliciousness but for the memories they bring back of Japan’s culture and cuisine. There’s a sense of nostalgia that clings to every bite, reminding me that food is, after all, a connection to places and moments that shape who we are.
There’s nothing quite like making Japanese curry buns from scratch. The process is a beautiful dance of precision and passion, and while it takes time and a touch of finesse, I can promise you the joy is worth every minute. Today, I want to share this recipe with you — one that I have tested and perfected over many flour-dusted afternoons in my kitchen.
Inside the Ingredients of Japanese Curry Bun
To create something as classic as the Japanese curry bun, you must first understand its components. Each ingredient plays a part not just in flavor but in tradition, and I like to treat them with the respect they deserve.
All-purpose flour is the star of the show for the dough. It provides the structure necessary to hold the bun together while allowing it to achieve that fluffy, airy quality when baked, or as I like to do, deep-fried. Look for a high-quality brand; the protein content can make a notable difference in how your message holds up during the bread-making process. If you’re in a pinch or have dietary restrictions, you can also use bread flour for a chewier texture.
Yeast, that magical little organism, is what makes the dough rise. I find it fascinating to think about how something so tiny can create such vast changes in texture and flavor. Instant yeast is what I prefer for its simplicity; it doesn’t require proofing and can be added directly to the dry ingredients. If you have active dry yeast on hand, you may need to activate it first by mixing it with warm water and sugar before adding it to the recipe.
Milk enriches the dough and helps to make it soft. It contributes to that lovely golden color during frying but can be substituted with a plant-based milk if you’re looking for a dairy-free version. I often find myself reaching for oat milk, as it has a nicely creamy texture without being overly sweet.
Butter is a crucial ingredient, lending richness to the dough. Using unsalted butter allows you to control the saltiness of your buns, and the flavor it imparts is simply unmatched. If you want a dairy-free alternative, coconut oil is a great substitute; it carries a subtle hint of sweetness that complements the curry filling well.
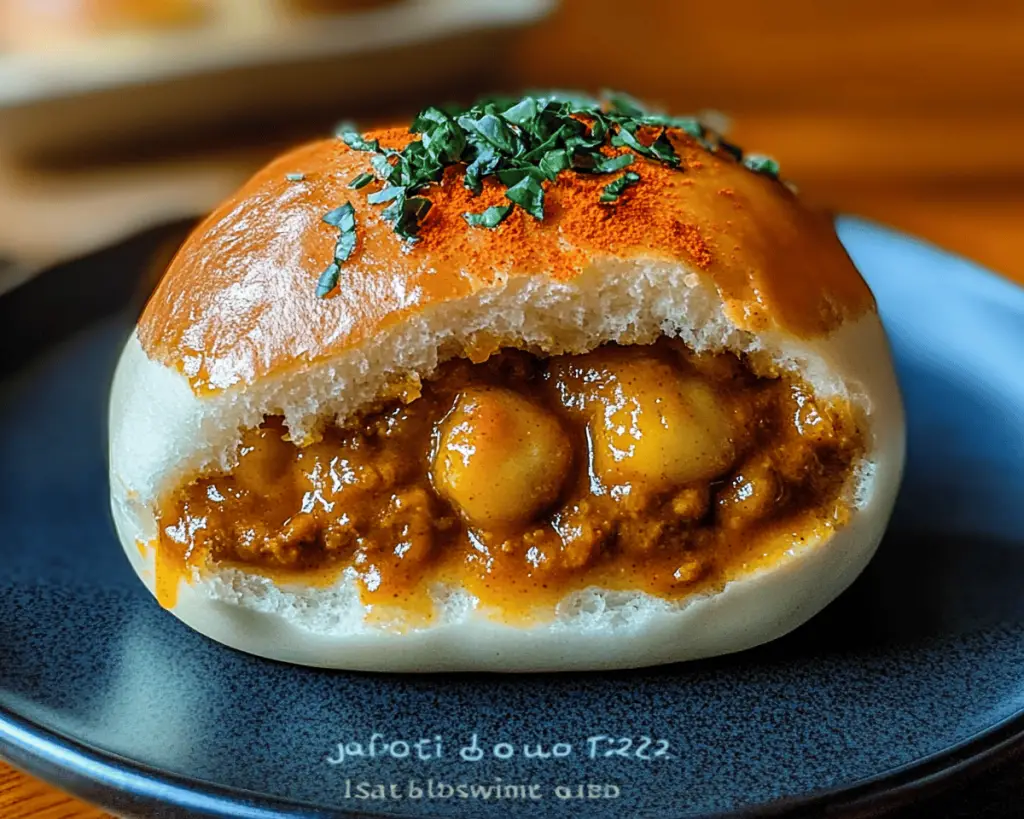
Now, let’s talk about the filling, which brings us to our next star, the Japanese curry roux. This is what separates a regular curry from the unique flavor profile of Japanese curry. You can find this pre-made in stores, but if you want to take the route of authenticity and homemade goodness, I suggest whipping up a roux with curry powder, flour, butter, and water. You can play with the spice levels depending on your preference — some brands are sweeter while others are more pungent.
The additional filling components often include potatoes, carrots, and onions. These vegetables add texture and balance to the spiciness of the curry roux. I love using golden Yukon potatoes and vibrant orange carrots for the sweetness they offer, creating a satisfying variety in each bite. Vegetables should be diced into small pieces for even cooking and easier stuffing.
For added flavor, I sometimes toss in a bit of chicken or ground meat if I’m feeling indulgent, but this is completely optional. You can also make it entirely vegetarian by enhancing the filling with soy sauce and just letting the veggies shine.
Finally, you’ll need some panko breadcrumbs and either oil for frying or a baking sheet for those who prefer a healthier alternative. Panko crumbs create the perfect flaky crust that is quintessential to the curry bun experience.
How Japanese Curry Bun Fits Into a Balanced Life
Now, let’s discuss what makes this dish not just exquisite but also a balanced choice in our culinary arsenal. Japanese curry buns might come off as indulgent, with their deep-fried exterior and rich filling; however, they can play a significant role in a balanced diet.
The mixture of starches from the bun, fiber from the vegetables, and protein — especially if you opt for meat — provides a satisfying meal that fuels you for hours. The inclusion of carrots and potatoes means you’re getting a dose of vitamins and the potential for fiber, while the curry itself is a wonderful source of antioxidants, thanks to the spices used in the roux.
The key with any dish, especially one as tempting as this, lies in portion control and preparation method. When dedicating a day to making Japanese curry buns, I often batch the filling and freeze half of it. This way, I can indulge in a warm bun, but it’s not something I’m eating every day. When you fry these buns, I recommend using high-quality oil and monitoring the frying time closely for the crispiest texture — you want that golden exterior, not a soggy or overly greasy experience.
Another way to make this dish more wholesome is to bake instead of fry. While the fried version is, without a doubt, the most traditional and what makes my heart sing, baking will yield a lighter bun that is still deeply satisfying. Using the right technique and oven temperature will ensure you maintain that buttery flavor while cutting down on the oil.
What You’ll Need
– **For the Dough:**
– 2 cups all-purpose flour
– 1 tablespoon instant dry yeast
– 1/4 cup sugar
– 1/2 cup warm milk (110°F)
– 2 tablespoons unsalted butter (softened)
– 1/2 teaspoon salt
– 1/2 cup warm water (approximately)
– **For the Filling:**
– 1 medium-sized onion (finely diced)
– 1 medium-sized carrot (finely diced)
– 1 medium-sized potato (finely diced)
– 1 tablespoon vegetable oil
– 1/4 cup Japanese curry roux
– 1 cup water
– Optional: 1/2 cup cooked ground chicken or beef
– **For Coating:**
– 1 cup panko breadcrumbs
– Oil for frying or for baking
This recipe yields about 10–12 curry buns, depending on size.
Preparing Japanese Curry Bun Step by Step
Now, let’s dive into the joy of creating our curry buns!
1. **Prepare the Filling**: Start by heating the vegetable oil in a medium sauce pan over medium heat. Add the diced onions and sauté until they become translucent and aromatic, about 5 minutes.
2. Next, toss in the diced carrots and potatoes, sautéing them for a few more minutes until they’re coated in that delicious onion flavor.
3. Sprinkle in the curry roux, mixing everything beautifully, then pour in the water. Stir well to dissolve the roux evenly into the mixture. If you’re using meat, add it at this stage, breaking apart any clumps, and bring to a simmer.
4. Allow the filling to simmer on low heat until your vegetables have softened, approximately 10 minutes. You want all those flavors to meld. Once done, set it aside to cool while you prepare the dough.
5. **Make the Dough**: In a large mixing bowl, combine the flour, sugar, yeast, and salt.
6. Slowly add in the warm milk and water, followed by the softened butter. Stir until everything is coming together.
7. Transfer your dough to a floured surface and knead for about 5–7 minutes until you achieve a smooth, elastic texture. This is the best part for me — feeling that dough come together under my hands is a sort of meditation.
8. Place the kneaded dough into a greased bowl, cover with a damp cloth, and allow it to rise in a warm area for about one hour or until it has doubled in size. When it rises, it’s like watching your hard work bloom.
9. Once the dough has risen, punch it down gently and turn it out onto a floured surface. Divide it into 10–12 equal pieces, forming each piece into a small ball.
10. Take a ball of dough and flatten it gently in your palm. Place about a tablespoon of the cooled curry filling in the center. Carefully pinch the edges together to seal the filling inside, shaping it into a bun.
11. Repeat this for the remaining dough balls, placing each filled bun seam-side down on a parchment-lined baking tray.
12. Once all your buns are ready, cover them with the damp cloth once again and let them rise for 30 minutes, allowing them to puff up just a bit more.
13. **Coat the Buns**: Prepare your frying station (or oven). If you’re frying, heat the oil in a large pot to about 350°F. For baking, preheat your oven to 375°F.
14. Dust each bun in flour, dip it into an egg wash (beaten egg), and finally coat it thoroughly in panko breadcrumbs. If you are baking, place the buns on a parchment-lined baking sheet and spray or brush them lightly with oil.
15. If frying, carefully lower the buns into the hot oil, frying them in batches for about 3-4 minutes on each side, or until golden brown. Make sure not to overcrowd the pot!
16. If baking, pop them into the preheated oven for about 20 minutes until they are golden and crispy.
17. Once cooked, set the buns on a wire rack to cool slightly before devouring them!
Lessons from My Kitchen
In my years of making Japanese curry buns, I have learned countless lessons, most of which are steeped in both joy and frustration. For instance, one of my early attempts was a bit of a disaster. I was so excited about the process that I skipped allowing the buns to rise a second time. Hungry sounds filled my kitchen as I set my sights on frying, only to be met with deflated dough that barely held together. It was a lesson in patience and letting the dough do its thing — a small reminder that good things often take time.
I’ve also learned that variations can be delightful. You don’t have to stick purely to traditional fillings — sometimes I make a spicy version with sweet potatoes or even a southwestern flair with black beans and corn. The beauty of this dish is that it’s a canvas, and you are the artist.
Moreover, friends and family often join me in making these buns, each taking away a part of the experience that lends itself to memories; laughter spills over the countertop while we work. And in those moments, whether the buns turn out perfectly or with a bit of character, the pleasure lies not just in the food itself but in the connection formed over the mixing bowls.
Lastly, I feel inclined to share the importance of making these curry buns at your own pace. Cooking is not merely about following instructions strictly but engaging with the process. It’s about creativity, exploration, and even those little mishaps that lead to happy accidents. I encourage you to take your time. Feel the dough, savor the filling, and let the aromas carry you back to your own cherished memories.
To make these Japanese curry buns part of your life is to invite a comforting ritual into your home. They have a way of uniting friends and family, igniting laughter and conversation. As you bring them to your table, they will undoubtedly become part of your culinary story, one that you will revisit again and again.
So gather your loved ones, roll up your sleeves, and dive in. The world of Japanese curry buns is waiting for you. Enjoy the journey, and let your kitchen be filled with joy.


