Prep time: 15 minutes
Cook time: 30 minutes
Total time: 45 minutes
Servings: 8 mini loaves
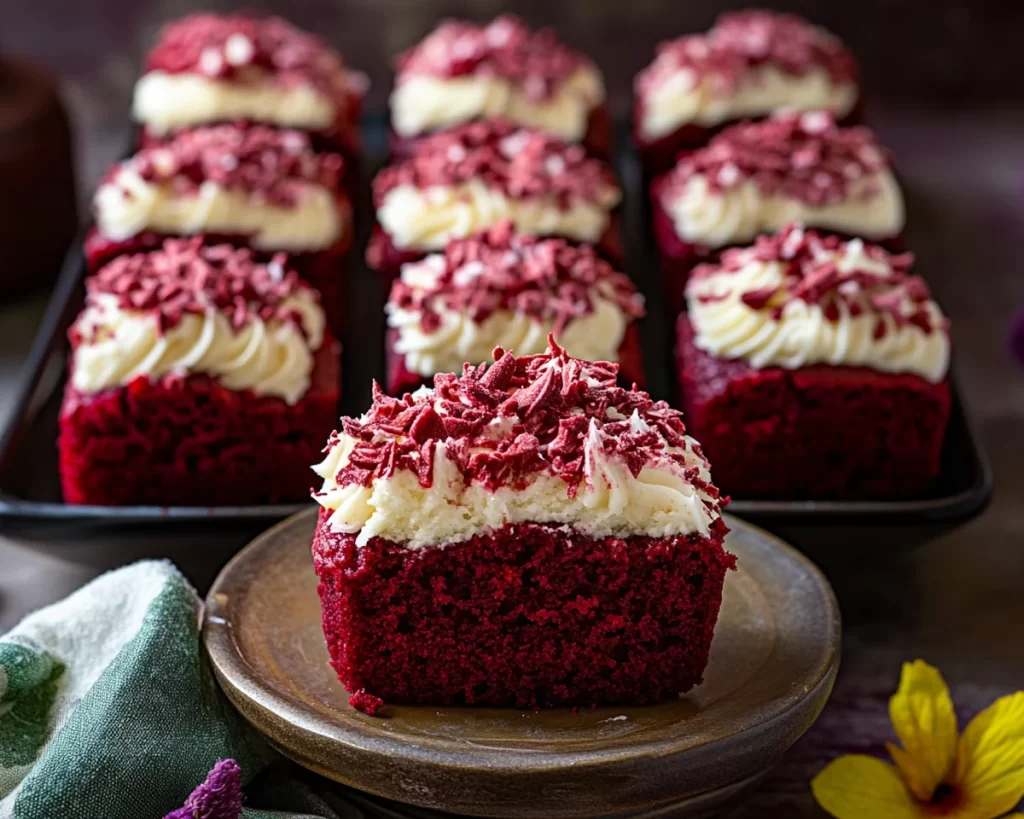
When you think of comfort food, what comes to mind? The warm, inviting aroma of freshly baked bread, perhaps? The rich, velvety sweetness of red velvet cake might be right there, too. Now, imagine combining these two worlds into one delightful treat: Irresistible Red Velvet Mini Loaves. This recipe is bound to become a staple in your kitchen, evoking memories of loved ones gathered around the table, sharing laughter over slices of this enchanting dessert. With its striking red hue, smooth cream cheese frosting, and soft texture, this dish is as visually appealing as it is delicious.
In this recipe, you will learn not just how to make these delectable mini loaves, but also discover tips to elevate your baking game. Each step is designed to ensure your success, whether you’re a beginner or a seasoned cook looking to try something new. We’ll discuss variations that cater to dietary restrictions, explore possible ingredient substitutions, and help you avoid common pitfalls. So, let’s get started!
What Is Irresistible Red Velvet Mini Loaves Recipe?
The Irresistible Red Velvet Mini Loaves are a delightful twist on the classic red velvet cake. Originating from the Southern United States, red velvet cake is known for its rich flavor, vibrant color, and luxurious cream cheese frosting. But turning this classic into mini loaves brings an entirely new experience. These mini loaves are perfect for sharing during gatherings, office potlucks, or simply enjoying with your family at home.
The texture of these loaves is exceptionally soft and moist—thanks to the buttermilk and vegetable oil that keep them from drying out. Each bite melts in your mouth, leaving a delightful sweet taste balanced perfectly with the tangy cream cheese. If you’re hosting a get-together or simply want to treat yourself, these mini loaves are sure to impress.
In addition to their delicious flavor, they also offer a unique serving option. The small loaves are easily portioned, making them ideal for guests who want just a bite-sized treat or for those who prefer to freeze their leftovers for later enjoyment. All these factors contribute to making Irresistible Red Velvet Mini Loaves an absolute must-try.
Why You’ll Love This
There are countless reasons why you will fall in love with this Irresistible Red Velvet Mini Loaves recipe. First and foremost is the incredible taste. The fusion of cocoa powder with fluffy flour and a hint of vanilla creates a layered flavor profile that is simply captivating. When topped with rich cream cheese frosting, each loaf becomes a decadent treat that can satisfy your dessert cravings without feeling overly indulgent.
The ease of preparation is another major attraction. You don’t need to be an expert baker to create these mini loaves; the recipe is straightforward and forgiving. Whether you have a busy schedule or are new to baking, you will appreciate how quickly you can whip these up. Moreover, since they are baked in smaller portions, they cook faster and more evenly than traditional cakes.
It’s also worth mentioning the cost-effectiveness of this recipe. Many basic ingredients needed to make these loaves are likely already in your kitchen, which minimizes the expense of a trip to the grocery store. Additionally, the versatility of this recipe allows it to fit various dietary preferences. You can make gluten-free or vegan versions with simple substitutions, making this recipe accessible to virtually anyone.
Lastly, the combination of these mini loaves being visually stunning and delicious makes them an excellent choice for gifts or celebrations. You can easily wrap them in decorative paper or put them in a beautiful box, creating a lovely homemade gift that’s sure to please.
Ingredients You’ll Need
- All-purpose flour: 2 cups – This acts as the base of the loaves, providing structure and body. Feel free to substitute with gluten-free flour if needed.
- Cocoa powder: 1 tablespoon – Adds a subtle chocolate flavor without overpowering the red velvet essence.
- Baking soda: 1 teaspoon – This leavening agent helps the loaves rise, ensuring they are light and fluffy.
- Salt: ½ teaspoon – Enhances the overall flavor, balancing the sweetness of the loaves.
- Sugar: 1 cup – Sweetens the loaves while helping to keep them moist.
- Vegetable oil: ½ cup – Provides moisture and tenderness, making your loaves irresistible.
- Buttermilk: 1 cup – Contributes to the softness and tangy flavor. If unavailable, use a mixture of milk and vinegar as a substitute.
- Eggs: 2 large – Act as a binder, adding richness and stability to the batter.
- Red food coloring: 2 tablespoons – This is the secret to that stunning red hue characteristic of red velvet.
- Vanilla extract: 1 teaspoon – Adds additional flavor complexity, enhancing the overall taste of the loaves.
To achieve the perfect mini loaves, gather all your ingredients ahead of time. Knowing the role of each ingredient allows you to make substitutions if necessary, ensuring flexibility in your baking adventure.
How to Make
Creating Irresistible Red Velvet Mini Loaves is easier than you might think. Follow these steps for delicious results:
- Preheat your oven: Begin by preheating your oven to 350°F (175°C). This step is crucial as it allows for even baking. While your oven is warming up, you can prepare your baking pan by greasing it or lining it with parchment paper for easy removal of the loaves later on.
- Mix dry ingredients: In a large mixing bowl, whisk together the all-purpose flour, cocoa powder, baking soda, and salt. This ensures that the leavening agent is evenly distributed through the flour, which leads to consistent rising and texture in your loaves.
- Mix wet ingredients: In another bowl, combine the sugar and vegetable oil, stirring until it’s blended smoothly. Next, add the buttermilk, eggs, red food coloring, and vanilla extract to the oil mixture. Whisk these ingredients together until fully combined and smooth. The red food coloring is essential here—this is what turns the chocolate batter into the signature red velvet color!
- Combine mixtures: Gradually add the dry mixture to the wet mixture, stirring gently with a spatula. Mix until just combined, being careful not to overmix. Overmixing can lead to tough loaves, so the goal here is to incorporate both mixtures while still maintaining a light and airy texture.
- Pour into pan: Divide the batter evenly into your prepared mini loaf pan. Typically, you should fill each cavity about three-quarters full to allow space for rising. Use a spatula to smooth the tops if necessary.
- Bake: Place the loaf pan in the preheated oven and bake for 25 to 30 minutes. You’re looking for a springy texture when gently pressed, and a toothpick inserted into the center should come out clean. Avoid opening the oven door frequently as this can interrupt the baking process.
- Cool: Once baked, remove your mini loaves from the oven. Let them cool in the pan for about 10 minutes, then carefully transfer them to a wire rack to cool completely. Cooling is an important step; it helps to set their shape and prevents sogginess.
- Frost: While the loaves cool, prepare your cream cheese frosting. Cream together softened cream cheese and butter, then gradually add powdered sugar until you reach your desired consistency. This is an optional step but highly recommended for that perfect finishing touch! Once your loaves are cool, generously frost the tops.
When following these steps, always pay attention to the texture and look of your batter and loaves. Trust your instincts and feel free to customize this process to make it your own!
Variations & Substitutions
Gluten-Free Red Velvet Mini Loaves: If you’re gluten intolerant, don’t worry! You can easily make gluten-free mini loaves by substituting the all-purpose flour with a gluten-free all-purpose flour blend. Just ensure that the blend contains a binding agent like xanthan gum, or you might want to add it separately if your blend does not contain it.
Vegan Red Velvet Mini Loaves: For a vegan option, replace the eggs with flaxseed eggs (1 tablespoon of ground flaxseed mixed with 2.5 tablespoons of water for each egg). You can also swap buttermilk with almond milk mixed with a bit of vinegar. And while you’re at it, be sure to use a vegan cream cheese for frosting. This variant maintains the delightful flavor but caters to a vegan lifestyle.
Red Velvet Mini Loaves with Nuts: If you like a little crunch, consider adding chopped walnuts or pecans to the batter. About ½ cup of chopped nuts will add a delightful texture and flavor contrast to the moist loaves. This version is perfect for those who enjoy a nutty twist.
Chocolate Chip Red Velvet Loaves: Incorporating mini chocolate chips into your batter is also a fun twist. The chocolate complements the red velvet flavor beautifully. Just be cautious not to overload the batter; about ½ cup should do. This version is especially attractive to kids and chocolate lovers alike.
These variations allow you to cater to different dietary needs while maintaining the core essence of this irresistible treat.
Common Mistakes to Avoid
When making Irresistible Red Velvet Mini Loaves, it’s critical to avoid certain common mistakes that can compromise the quality of your dish. One frequent issue is overmixing the batter. Overmixing can lead to dense and tough loaves rather than the desired fluffy texture. Always mix until just combined.
Another mistake often made is skimping on the ingredients’ quality. For example, using artificial food coloring may not yield the vibrant red you want. Instead, opt for high-quality gel or liquid red food coloring for the best visual appeal.
Also, be sure to measure your ingredients accurately. Baking is a science; even minor discrepancies can lead to unsatisfactory outcomes. Use a kitchen scale if possible, or measure carefully with standard cups to ensure you get it just right.
Finally, make sure to check your mini loaves for doneness. Every oven is different, and baking time may vary. Relying solely on time could lead to either overbaked or underbaked loaves. Use the toothpick test to gauge readiness accurately.
By paying attention to these details, you’ll maximize your chances of creating perfect red velvet mini loaves that are irresistible in every way!
Storage, Freezing & Reheating Tips
To enjoy your Irresistible Red Velvet Mini Loaves at a later date, you must store them properly. Once completely cooled, wrap each loaf in plastic wrap to keep them fresh. Store the wrapped loaves in an airtight container at room temperature for up to three days. For longer storage, consider freezing them.
To freeze the loaves, wrap each one in plastic wrap, then place them in a freezer-safe bag. These loaves can be frozen for up to three months. Thaw them overnight in the refrigerator when you’re ready to indulge in a slice of heaven.
If you’ve added frosting, it’s best to store the loaves in the refrigerator, but keep in mind that the frosting may lose some of its texture when thawed. For reheating, place the loaf in a microwave for about 15-20 seconds, or you can pop it in a preheated oven at 350°F (175°C) for about 5-10 minutes.
Remember, food safety is vital. Always be cautious to avoid any contamination during storage and thawing to keep your loaves as enjoyable as the day they were baked.
Frequently Asked Questions
Can I make these mini loaves ahead of time?
Absolutely! These mini loaves store well, so you can make them ahead of time for events or gatherings. Just ensure they are completely cooled before wrapping and storing them. They can stay fresh in an airtight container for about three days at room temperature.
Can I substitute the cream cheese frosting?
Yes! If you’re looking for dairy-free options, you may use vegan cream cheese or even whipped coconut cream as a lighter alternative. Additionally, you could chocolate or vanilla frosting if you’d like a different flavor profile.
How do I know when my loaves are done baking?
The best way to check is with the toothpick test. Insert a toothpick into the center of one of the loaves; if it comes out clean or with a few moist crumbs, they’re good to go. If it’s batter-coated, give them a few more minutes in the oven.
What can I do if my loaves are too dry?
Dry loaves often result from overbaking or incorrect ingredient proportions. If you find your loaves dry, consider adjusting your baking time or ensuring you’re measuring liquids accurately next time. For an immediate fix, serve them with a little cream cheese frosting or a drizzle of simple syrup.
Can I make this a two-layer cake instead of mini loaves?
Certainly! You can easily adapt this recipe for a two-layer cake. Just double the batter, pour it into two standard cake pans, and adjust the baking time accordingly. The general baking time is about 30-35 minutes, but keep an eye on the cake to prevent overbaking.
Conclusion:
In summary, the Irresistible Red Velvet Mini Loaves are not just a treat but an experience. They offer rich flavors, beautiful presentations, and the ability to cater to a variety of dietary needs—all while being easy to make. Whether you’re preparing for a special occasion or just treating yourself, these mini loaves are perfect for any scenario. I encourage you to try this recipe and consider adding your personal touch. Feel free to experiment with flavors or share it with loved ones; after all, nothing warms the heart quite like a homemade dessert!