Prep time: 20 minutes
Cook time: 45 minutes
Total time: 1 hour 5 minutes
Servings: 8
Indulging in a warm, comforting dish of baked ziti can evoke nice memories of family gatherings and cozy nights at home. If you’ve ever walked into a kitchen carrying that rich, pasta aroma, you know that a home-cooked meal can instantly transform a mundane day into a flavorful adventure. This recipe for Homemade Baked Ziti With Ground Beef And Cream Cheese is not just a meal; it’s an experience filled with rich flavors and comforting textures that can make even the busiest weeknight feel special.
Imagine gliding your fork through layers of perfectly cooked pasta, seasoned ground beef enveloped in a savory tomato sauce, and delightful pockets of cream cheese melting into the mix. In this article, you’ll learn not only how to make this delectable dish packed with taste and texture but also various tips to customize it to suit your family’s preferences. You’ll find easy steps, ingredient substitutions, and practical advice that will make you feel confident, whether you’re a seasoned chef or just starting in the kitchen.
What Is Homemade Baked Ziti With Ground Beef And Cream Cheese?
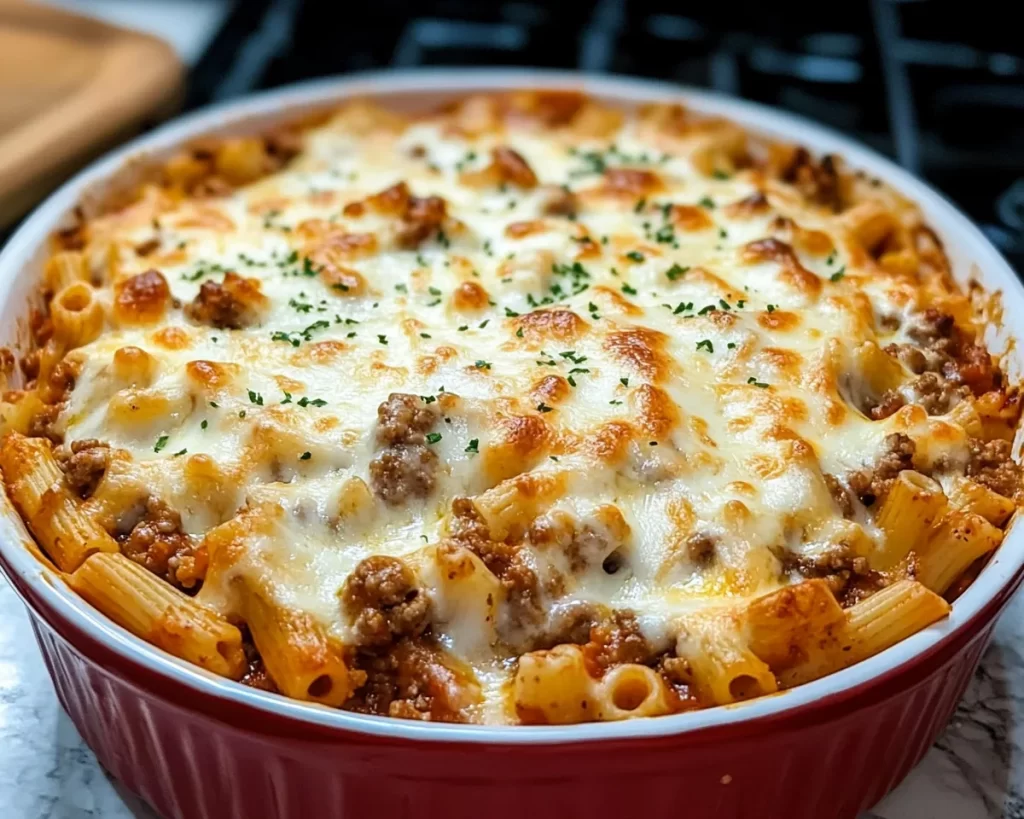
Homemade Baked Ziti is a classic Italian-American dish known for its hearty nature and comforting qualities. Traditionally made with ziti pasta, it features a rich tomato sauce layered with cheese, meat, and other ingredients. The inclusion of ground beef adds a savory component while cream cheese contributes a unique creaminess that balances the dish magnificently.
The essence of this dish lies in its texture. The ziti pasta holds its shape beautifully, providing a sturdy base. The sauce binds everything together, resulting in a dish that remains juicy but not overly wet. The cream cheese melts into the layers, creating bursts of creaminess, enveloping the ingredients in its rich flavor. This twist elevates the traditional recipe, making it perfect for busy weekday dinners or as a crowd-pleaser during gatherings.
In short, this baked ziti dish is not just another pasta bake; it’s a delightful amalgamation of flavors and textures that carries the warmth of a home-cooked meal.
Why You’ll Love This
There are numerous reasons why you will fall in love with this Homemade Baked Ziti With Ground Beef And Cream Cheese. Firstly, the **taste** is absolutely delightful. The rich tomato sauce pairs well with the savory beef and creamy cheese, creating a dish that is mouthwatering and comfort-laden. Not only is it delicious, but it’s also an easy recipe to make, making it a favorite for busy parents or anyone looking for a quick meal that doesn’t compromise on flavor.
This recipe is also incredibly **cost-effective**. With affordable ingredients such as pasta, ground beef, and cream cheese, you can whip up a dish that can feed a crowd without breaking the bank. Additionally, it’s a very **versatile** recipe that allows you to use whatever ingredients you have on hand. This means if you find yourself short on ground beef, you can easily substitute it with ground turkey or even a mix of sautéed vegetables for a vegetarian option.
Common misconceptions revolve around homemade baked dishes being overly complicated or time-consuming. However, you will find that this recipe is straightforward and designed with simplicity in mind. By breaking it down step-by-step, you can easily navigate through the cooking process and enjoy the gratifying experience of creating a delicious home-cooked meal.
Ingredients You’ll Need
- 1 pound ground beef – A **core ingredient** that adds rich flavor. You can opt for lean ground beef to reduce fat.
- 1 onion – Provides a foundational flavor. You may substitute with shallots or garlic for a different twist.
- 2 cloves garlic – A must-have for enhancing the aromatic profile of your dish.
- 1 jar (24 oz) marinara sauce – Offers the essential tomato base. You can use homemade sauce if preferred.
- 12 oz ziti pasta – The primary carbohydrate that holds everything together. Penne or rigatoni can also work.
- 1 package (8 oz) cream cheese – Adds a luscious creaminess. For a lighter option, consider using ricotta.
- 2 cups shredded mozzarella cheese – A staple in baked dishes, offering gooeyness when melted.
- ½ cup grated Parmesan cheese – Enhances depth of flavor and adds a nice crispy topping.
- Salt and pepper – Essential seasonings that bring all the flavors together.
- Fresh basil (optional) – A lovely garnish that can elevate the presentation and provide a fresh burst of flavor.
Each ingredient plays a critical role in achieving that rich, satisfying taste. For instance, using a quality marinara sauce is essential because it serves as the heart of the dish, leading to the overall flavor profile. Remember that cooking is as much about personal preference as it is about following a recipe, so don’t hesitate to customize based on what you enjoy.
How to Make
1. **Preheat your oven** to 375°F (190°C). This initial step is vital as it ensures that your baked ziti cooks evenly, resulting in a perfectly golden and bubbly top.
2. **Cook the ziti pasta** according to package instructions until Al Dente. You want the pasta to be slightly firm, as it will continue to cook in the oven. Drain and set aside.
3. In a skillet over medium heat, **add the ground beef.** Cook until it’s browned and no longer pink, which typically takes about 5 to 7 minutes. Make sure to break the meat apart as it cooks for even cooking.
4. **Sauté the onion and garlic** in the same pan after removing the beef. This step is crucial as it allows the flavors to meld. Cook until the onion is translucent, around 3 to 4 minutes. This will deepen the flavor of your sauce.
5. **Return the beef** to the pan, and **add in the marinara sauce.** Stir to combine everything and let it simmer for about 5 minutes. This will allow the flavors to develop further and results in a delicious sauce that becomes the star of the dish.
6. **Combine the cream cheese** with the sauce mixture in the pan and stir until it’s completely melted and integrated. You’ll notice a delightful creaminess that binds everything together beautifully.
7. In a large mixing bowl, **combine the pasta with the sauce mixture.** Make sure the pasta is well-coated; this is where the flavor really starts to come into play.
8. **Transfer half of the pasta mixture** to a greased 9×13 inch baking dish. Ensure an even layer for optimal cooking results.
9. **Sprinkle a layer of mozzarella cheese** over the pasta. This back-and-forth layering will enhance the textures and flavors in each bite.
10. **Add the remaining pasta mixture** on top, followed by the rest of the mozzarella and the Parmesan cheese. This final layer will create a beautifully melted and bubbly topping.
11. **Cover the dish with aluminum foil** (to prevent burning) and bake for 25 minutes. This will allow the cheese to melt without browning too quickly.
12. **Remove the foil** and bake for an additional 15 minutes or until the cheese is golden and bubbly. Allow it to cool slightly before serving to help set the layers.
The sheer aroma filling your kitchen during this process will make it hard for you to wait. Each step is crucial, but all yield a hearty meal that’s satisfying and comforting.
Variations & Substitutions
Vegetarian Baked Ziti: If you’re looking for a meat-free version, consider using sautéed vegetables such as bell peppers, mushrooms, and zucchini instead of ground beef. This variation maintains the dish’s heartiness while bringing in an array of flavors and textures that will satisfy even the most dedicated meat lovers.
Gluten-Free Baked Ziti: For those with gluten sensitivities, you can easily swap out conventional ziti for gluten-free pasta. In today’s market, you can find an array of gluten-free options that taste just as good and have a similar texture. This allows everyone to enjoy the comforting appeal of baked ziti without worrying about dietary restrictions.
Spicy Baked Ziti: If you love some heat, add crushed red pepper flakes to the sauce for a spicy kick. You can also mix in some sliced jalapeños for an extra kick that not only modifies the flavor but also the overall experience of the dish.
Cheesy Baked Ziti: For a truly indulgent treat, incorporate different types of cheese such as provolone, gouda, or even a sprinkle of blue cheese on top. Different cheeses bring unique flavors and melt in fascinating ways, adding an exciting twist to your baked ziti.
Each of these variations caters to different dietary needs or taste preferences, making this dish incredibly versatile. Experimenting with ingredients keeps the baked ziti experience fresh and exciting, ensuring you’ll never tire of this classic meal.
Common Mistakes to Avoid
When making baked ziti, there are several common mistakes you should be aware of for the best results. One mistake is **overcooking the pasta beforehand**; since it will continue to cook in the oven, ensure that you only cook it Al Dente. Overcooked pasta can lead to a mushy final dish that lacks texture.
Also, avoid using low-quality marinara sauce. A good sauce makes a significant difference in the overall flavor, so choose a quality option that is flavorful and rich.
Be careful not to skip the **layering step**. Proper layering distributes flavors evenly and ensures that every bite has a delightful combination of the sauce, cheese, and pasta. Skipping this step can result in uneven cooking.
Finally, **don’t rush the cooling process** once it comes out of the oven. Letting it rest for a few minutes will help set the layers, making it easier to slice and serve. If you try to serve it immediately, it may fall apart on your plate.
Storage, Freezing & Reheating Tips
Storage is incredibly easy with baked ziti. After it cools, store your leftovers in an airtight container in the refrigerator for up to four days. To freeze, allow it to cool completely, then wrap it tightly with aluminum foil or place it in a freezer-safe container. Properly stored, it can last up to three months in the freezer.
When it comes to reheating, the oven is the best method for maintaining texture. Preheat your oven to 350°F (175°C), cover the dish with aluminum foil, and reheat for about 20-30 minutes until heated through. If you are short on time, you can use the microwave but be cautious not to overheat, as this could result in rubbery cheese. A short burst of heating with intervals for stirring usually works best.
Follow food safety best practices. When thawing, it’s safer to move the dish from the freezer to the refrigerator and allow it to thaw overnight. Never refreeze previously frozen pasta after it’s been cooked.
Frequently Asked Questions
Can I make this dish ahead of time?
Yes, you can assemble the dish ahead of time, cover it properly, and store it in the refrigerator for up to 24 hours before baking. You may need to adjust baking time if you’re baking it straight from the refrigerator.
Can I substitute the meat in this recipe?
Absolutely! This recipe is incredibly versatile. You can use ground turkey, chicken, or even plant-based protein as alternatives to ground beef. Each option brings its own unique flavor profile to the dish.
How do I know when the ziti is done?
You’ll know it’s done when the top is golden brown and the cheese is bubbling. An internal temperature of 165°F (74°C) ensures your baked ziti is fully cooked and safe to eat.
What can I serve with baked ziti?
Baked ziti pairs wonderfully with a side salad or garlic bread. A simple green salad adds freshness while garlic bread provides the crunch you’re looking for.
Can I reheat baked ziti multiple times?
It’s best to only reheat it once, as frequent reheating may compromise the texture and flavor of the dish. Always store and reheat properly to maintain quality.
Conclusion:
This Homemade Baked Ziti With Ground Beef And Cream Cheese not only serves as a comforting meal that evokes nostalgia but also allows for plenty of flexibility through personal variations. Whether you’re serving a busy weeknight dinner or creating a festive meal for friends, this dish promises to delight with its rich flavors and inviting aromas. So roll up your sleeves and get cooking; you’ll be amazed at how you can transform simple ingredients into a masterpiece. Don’t forget to customize it, share it with loved ones, or even build upon this classic recipe with your personal flair. Happy cooking!