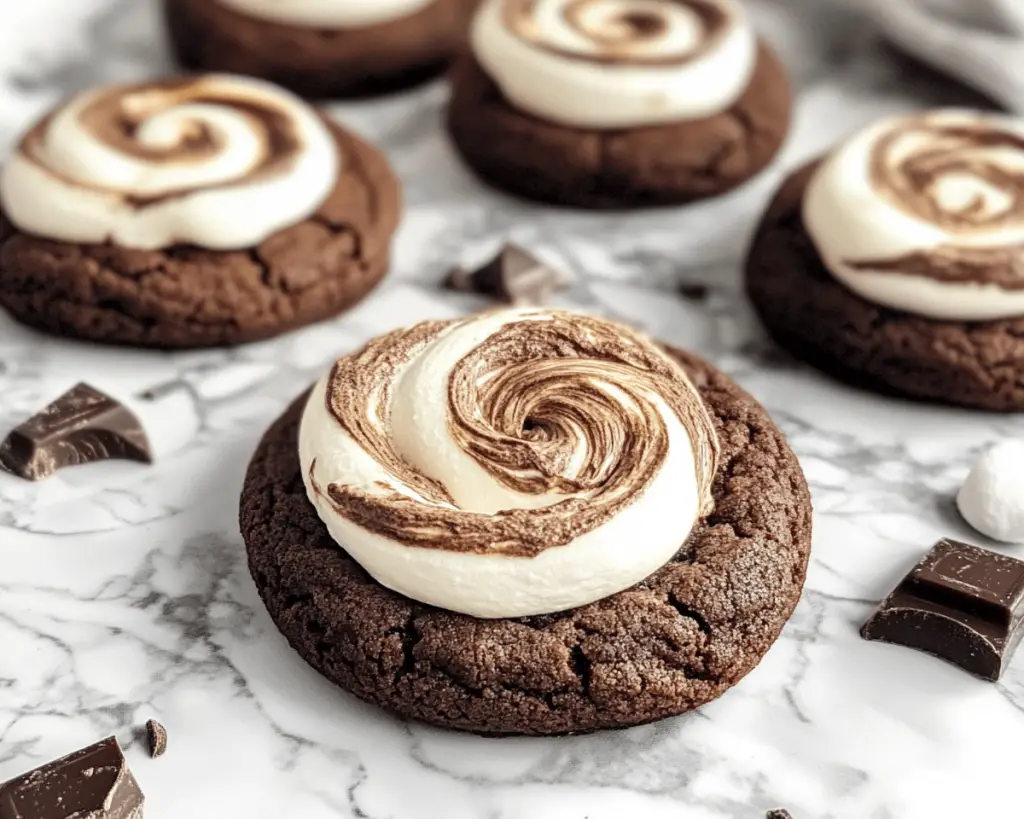
Let’s get real. The weather has been playing some serious mind games lately. One day it’s bright sunshine, and the next, it feels like Mother Nature is auditioning for a role in a horror film, with dark clouds looming overhead and a drizzle so rhythmic it could double as a dramatic soundtrack. So, what’s a snowed-in food blogger like me to do? I bake, of course! More specifically, I bake the most indulgent, mind-blowing, impossible-to-resist, and outright glorious Handmade Chocolate Marshmallow Swirl Cookies. Seriously, people, if you thought heaven was a place on Earth, these cookies must be it.
Now, let’s rewind a bit. I’ll confess, I wasn’t always a fan of marshmallows. When I was a kid, they seemed to be lurking in every birthday cake, s’more, and hot chocolate. And you know what? I would always pick them off. Yep, I was *that* child. Who knew that years later, I’d be whipping up cookies that practically celebrate these pillowy little sweets? Now I can’t stop. It’s a marshmallow revolution, and I’m leading the charge!
So, buckle up because this recipe is going to be one hell of a ride—one that’ll take your taste buds to cloud nine (maybe literally!).
Ingredients, Unfiltered
What’s Really in Handmade Chocolate Marshmallow Swirl Cookies
Alright, let’s break this down. Here’s what you’ll need to create these drool-worthy cookies:
All-Purpose Flour: The backbone of most baking recipes, including these delectable cookies. I typically use King Arthur Flour because, well, I believe in quality over quantity. Plus, it always seems to yield consistent results. Your cookie masterpieces deserve nothing less!
Cocoa Powder: Ahh, chocolate’s lesser-known cousin. I cannot express my love for cocoa powder enough! Not only does it add the rich chocolatey flavor, but it also gives that beautiful dark color. Trust me; this is what transforms ordinary cookies into something akin to sin. Dutch-processed cocoa? Yes, please!
Unsalted Butter: I used to think that margarine could pass for butter. Spoiler alert: it can’t! Butter is what brings all the flavors together and gives our cookies that melt-in-your-mouth quality we’re craving. Just make sure it’s at room temperature, or you’ll end up with an awkward mixing situation. And let’s be honest, no one looks cool battling a stubborn lump of butter.
Brown Sugar: The deep, caramel flavor it gives is nothing short of magic. It adds a moisture level that white sugar simply can’t compete with. I like to delve into the world of dark brown sugar for an even richer experience, but regular brown will still work just fine. You do you!
Granulated Sugar: Because we’re here for a good time, not a long time. Just a touch to complement the brown sugar and achieve that perfect cookie texture.
Vanilla Extract: I think there should be a law against using imitation vanilla extract. It’s like bringing a knockoff designer bag to a gala—it just doesn’t belong. Pure vanilla extract is worth the investment, and the aroma fills the house with the sweetest scent.
Eggs: A perfect binders that hold everything together. They also contribute to the chew factor that I adore in a cookie. Crack those babies into the bowl like you mean it, and don’t forget to give them a cheeky little whisk before they join the party.
Baking Soda: The little puff of love that gives our cookies their lift! Don’t skip this gem, or you’ll be left with flat cookies that might as well be hockey pucks. Nobody wants that!
Pinch of Salt: Seriously, a pinch goes a long way! It enhances all the sweetness and chocolate flavor and balances everything beautifully. If you’re not salty about this step, then are you really baking?
Chocolate Chips: Oh, my sweet, sweet chocolate chips. I usually go for a mix of semi-sweet and dark chocolate chips for that perfect flavor variety. If you’re feeling wild, mix it up with mint chocolate or butterscotch chips. Events are happening over here, people!
Marshmallows: I recommend mini marshmallows because they blend so seamlessly into the cookie dough. Plus, there’s something about biting into a cookie and finding pockets of marshmallow goodness that just makes life worth living. **Bonus points** if you can find some artisanal marshmallows—those gourmet options will turn a basic cookie into something delightful and whimsy.
Let’s Talk Health (or Not)
Is This Even Healthy? Let’s Discuss
Now, I could always pretend for a moment that these cookies are health food, right? Like, “Oh, they have flour, and um, eggs are packed with protein, so they must be healthy! Right?” Not so much. Sure, these cookies contain *some* decent ingredients, but let’s be real—cookies aren’t meant to be health food. I mean, if I wanted kale, I wouldn’t be here enthusiastically talking about marshmallow swirls, now, would I?
But let’s break it down. There’s butter, sugar, and pockets of sugary marshmallows, contributing to some serious sweet-tooth satisfaction. And yes, I sleep just fine at night knowing that every spoonful of chocolatey goodness might send me straight to cookie paradise.
Just keep this in mind: Moderation is key, my friends. Treat yourself with these babes after a long week. Or just because you successfully adulted for a whole day. Life is too short for bland cookies anyway!
Your Grocery List
Here’s What You’ll Need
– 2 cups of all-purpose flour
– 1/2 cup cocoa powder
– 1 cup unsalted butter, softened
– 1 cup brown sugar, packed
– 1/2 cup granulated sugar
– 2 teaspoons vanilla extract
– 1 large egg
– 1 teaspoon baking soda
– 1 pinch of salt
– 1 cup semi-sweet chocolate chips
– 1 cup dark chocolate chips
– 1 cup mini marshmallows
These quantities will make enough cookies for about 24 gloriously chewy, chocolatey treats. Unless you’ve got cookie thieves (also known as family members or roommates), in which case, you might want to double the batch.
The Actual Cooking Part
Okay, Let’s Make This
Now that we have the ingredients sorted, it’s time to roll up those sleeves and put on some music. I like to jam out to my baking playlist because nothing brings out my inner baking diva like a good beat. You should make some headspace in your heart for these cookies because they are literally life-changing.
1. Preheat your oven: Fire up the oven and set it to 350°F (180°C). If you’re like me, your oven might technically run a little hot. I can’t confirm this scientifically but let’s just say I’ve burnt one too many cookies to doubt it!
2. Gather that mixing bowl: In a large mixing bowl (the bigger, the better), cream together the softened butter, brown sugar, and granulated sugar until it’s light and fluffy. This creates the magic that will keep your cookies tender. If it looks like whipped cloud fluff, you’re doing it right!
3. Add in the eggs and vanilla: Crack that egg in like a champ, toss in the vanilla extract, and mix until combined. You want to see that glorious amalgamation happening here.
4. In a separate bowl: Sift together the flour, cocoa powder, baking soda, and salt. Why sift, you ask? Great question! It gets rid of lumps, and it incorporates air to make your cookies less dense. So don’t skip it unless you’re trying to create a flat earth cookie scenario!
5. Combine the dry mixture: Gradually add the dry ingredients to the wet mixture. Go slow—mix just until combined. Don’t be tempted to go overboard here; we aren’t creating bread dough, just cookie dough!
6. Stir in the chocolate chips: Toss in that beautiful mix of semi-sweet and dark chocolate chips. This is where the magic happens, and your dough starts looking more like dough and less like a science experiment gone wrong.
7. Marshmallow madness: Finally, fold in those mini marshmallows. Just go for it—be generous! This is your time to shine, and those fluffy little nuggets of sweetness will make all the difference.
8. Shape your cookies: Use a cookie scoop or spoon to drop dollops of cookie dough onto a lined baking sheet. They should be about 2 inches apart because these beauties are going to spread out like it’s the 1970s disco dance floor.
9. Bake: Slide the baking sheet into your preheated oven and bake for about 10-12 minutes. When the edges look firm but the center still looks a little gooey, you’re done! Don’t panic if this looks messy—it’s supposed to.
10. Let them cool (if you can wait): Allow the cookies to cool on the baking sheet for a few minutes before transferring them to a wire rack. I mean, we can’t dive in right away—or can we?
Side Notes & Sassy Hacks
Bonus Tips You Didn’t Ask For
– For those who like to change things up, try adding nuts! Walnuts or pecans can add a lovely crunch to your cookies.
– If you’ve got leftover dough (which, let’s be real, often doesn’t happen), you can chill it and use it later—or freeze it for future baking adventures. Just wrap it well, and you’ll have fresh cookies on standby!
– Want a gourmet touch to impress friends? Stuff a whole marshmallow inside the cookie before baking. The marshmallow will ooze out as it bakes, creating a delicious surprise center.
– Need them gluten-free? Substitute the all-purpose flour with a gluten-free blend. It’s 2023—joining the gluten-free club is easier than ever!
Final Words of (Culinary) Wisdom
If you try this recipe, do me a favor—tag me in your cookie creations or just holler at me from the corners of the digital universe. I can’t wait to bask in the glory of your cookie success! And if these cookies can bring a smidgen of happiness into your life, then my work here is done. So go forth, my cookie-loving friends, and remember: life is short. Always eat dessert first! Happy baking!