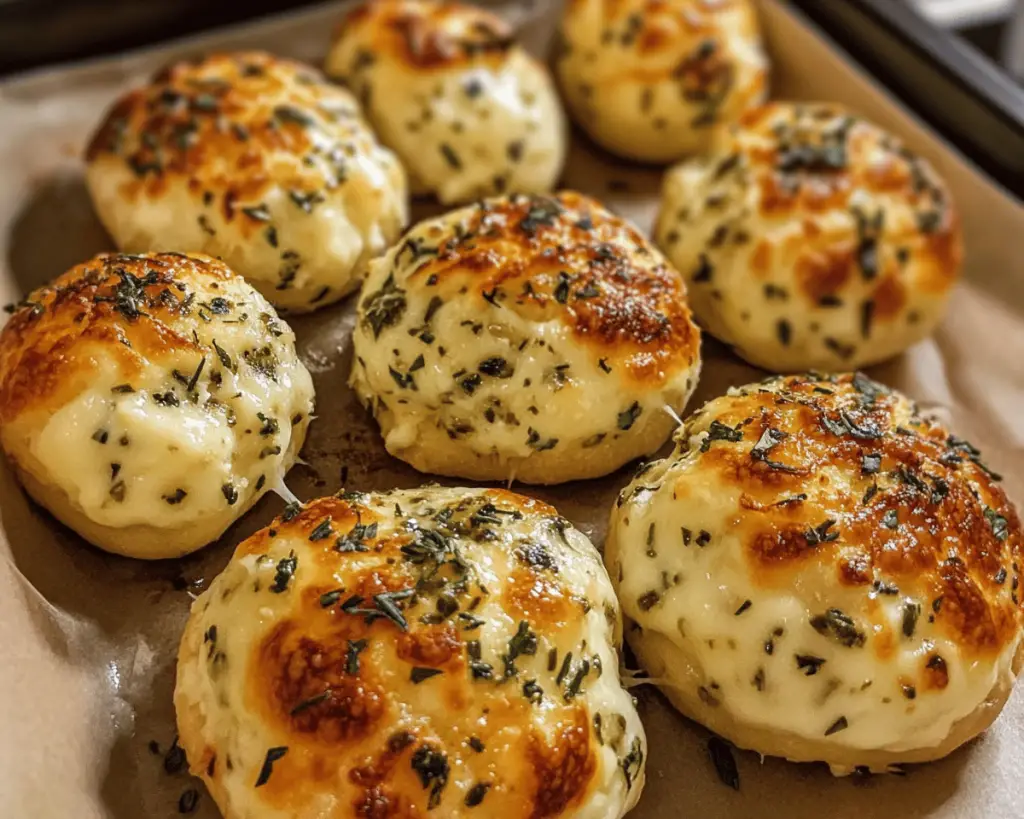
There’s something about a good cheese bomb that just screams comfort to me. I’ll take you back a few years to one of those chilly evenings, where you’re bundled up in your favorite blanket, flipping through old family photos while the home feels alive with the aromas of something magical happening in the oven. It was on one of those nights that I accidentally discovered these delightful little Garlic Herb Cheese Bombs.
Honestly, I had some leftover dough from a different project (I can’t even remember what anymore!) and a fridge full of half-used ingredients. You know how it goes—you’re not really trying to make anything special, but before you know it, life throws a curveball, and you find yourself creating something surprisingly divine. As I mixed up some minced garlic, fresh herbs, and a pile of cheese, I felt a little spark of mischief. What if I wrapped that gooey goodness in dough and baked it to perfection? Oh boy, am I glad I did! Each little bite was a cheesy explosion of flavor—my taste buds danced while my heart fluttered with delight.
Now, every time I make these, it reminds me of that evening—and it’s not just about the food; it’s about the joy of creativity, the warmth of home, and the memories we build around our kitchens. So, if you’re in the mood for a snack that brings warmth, laughter, and just a dash of heart, I can’t recommend these enough.
**What Goes Into Garlic Herb Cheese Bombs?**
Now let’s dig into the details of what makes these little guys so irresistible. Each ingredient has a role to play; they come together to create cheesy bliss, and here’s the breakdown:
– **Dough:** I usually go for **store-bought pizza dough**, as it saves time and yields wonderful results. But let me tell you, if you’re feeling adventurous, making your own dough can still bring out that unmatched love for cooking. I’ve tried both, and each way has its own charm. A little something to ponder: if you make it yourself, you can give it a little twist like adding garlic powder right into the dough!
– **Mozzarella Cheese:** I like to use **fresh mozzarella**. You know the type that’s so soft that it folds over itself like a warm hug? Yes, please! The melty goodness that comes from this is heavenly, and if you can find it in balls, that’s even better because you can cut them into just the right sizes. Feel free to use shredded mozzarella if you’re in a pinch, but I highly recommend the fresh stuff for that wonderful stretch when you take a bite.
– **Cream Cheese:** Here’s where the magic uniquely lives. **Cream cheese** adds that rich, tangy flavor that pairs beautifully with everything else. You can go for plain cream cheese, but sometimes I sneak in a flavored option—like garlic & herb cream cheese for an extra boost.
– **Butter:** We can’t forget about the **unsalted butter**. It’s a staple in my kitchen and brings some richness that perfectly complements the garlic and herbs. Plus, we’ll brush them with butter right before they bake, which means extra flavor and crispiness—who doesn’t love that golden, crispy exterior?
– **Garlic:** As the name suggests, **fresh garlic** is a must in this recipe. The sweet, savory aroma as it cooks is simply divine! If you’re like me, a slow roast makes it even better. I’ll crush the cloves and let them sauté a bit to mellow the sharpness—basically transforming them into nuggets of sunshine.
– **Fresh Herbs:** I love using a medley of **parsley and basil**, but feel free to get creative! Maybe you have some oregano sitting at the back of the spice cupboard that’s begging for attention. Use what you love, just give it a good chop. The right herbs will perfume your kitchen; it’ll feel like you’ve stepped into a cozy Italian bistro.
– **Parmesan Cheese:** A sprinkle of **grated Parmesan** right before they go in the oven elevates the flavors and adds a lovely crunch on top of that cheesiness.
– **Salt and Pepper:** I always add a pinch of **salt** and a dash of **black pepper** to balance all the richness and bring it all together, but you can adjust to your own taste.
**Is Garlic Herb Cheese Bombs Actually Good for You?**
Here’s the thing: Let’s be real. These little bites are a treat—they’re not health food. They are stuffed with cheese, buttery dough, and goodness knows how much garlic! But you know what? Sometimes, it’s absolutely worth it to indulge a little. I mean, life is all about balance, right?
These bombs are definitely not the sort of thing you want to live on, but they can be a part of a lovely family gathering or a cozy movie night. I find joy in sharing these with friends and family. Just know that, while they might be on the richer side, each little bite is rich in flavor and love. If you’re looking for a healthy twist, consider serving a fresh salad alongside; greens can even help balance the indulgence with a light crunch and freshness to complement the cheesy bites.
**Here’s What You’ll Need**
– **1 pound** of store-bought pizza dough (or homemade if you’re feeling adventurous)
– **1 cup** of **fresh mozzarella cheese** (cut into small cubes)
– **4 oz** of **cream cheese** (softened)
– **3 tbsp** of **unsalted butter** (melted, plus more for brushing)
– **3 cloves** of **garlic** (minced)
– **2 tbsp** of **fresh parsley** (chopped)
– **2 tbsp** of **fresh basil** (chopped)
– **1/4 cup** of **grated Parmesan cheese**
– **Salt and pepper** to taste
**How to Make Garlic Herb Cheese Bombs Step-by-Step**
Okay, let’s get down to the nitty-gritty of making these dream bites! Grab your apron—I have no idea why, but mine has this flour smudge from last week. I think it adds character.
1. **Preheat Your Oven:** Start by preheating your oven to 375°F (190°C). This sets the stage for the magic to happen.
2. **Prep the Dough:** If you’re using store-bought dough, let it sit out for about 20-30 minutes to allow it to rise a bit. It’s like giving it a little pep talk; trust me, it’ll make it so much easier to work with.
3. **Prepare the Cheese Filling:** In a bowl, mix the **cream cheese**, **mozzarella**, minced **garlic**, **parsley**, and **basil**. Give it a good stir. This is the moment when you can taste a little; I mean, why not? Just remember, it’s probably hot enough to burn the roof of your mouth—status quo in my kitchen!
4. **Divide the Dough:** On a lightly floured surface, roll out the dough to prevent it from sticking. Then cut it into small, even pieces—about 2×2 inches should do the trick. I love a fun variety of sizes—it adds charm, you know?
5. **Assemble the Bombs:** Take a piece of dough, flatten it out a bit, and then add a spoonful of the cheese filling. Fold the edges of the dough over to seal it. This is always the most delightful part of making the bombs. You’ll have some that look a little rough around the edges, and some that look like they were crafted by a master chef—perfection isn’t the goal here, my friend.
6. **Brush with Butter:** Arrange your cheese bombs on a baking sheet lined with parchment paper. Brush the tops with melted **butter**; this step is crucial for that lovely golden color!
7. **Top with Parmesan & Season:** Sprinkle a generous amount of **Parmesan cheese** on top and add a little pinch of salt and pepper as well.
8. **Bake:** Slide those little beauties into the oven and let them bake for about 15-18 minutes or until they’re golden brown and bubbly. As they bake, the smell wafts through your home and will have everyone gravitating to the kitchen like moths to a flame.
9. **Serve It Up:** Once they come out of the oven, let them cool for a few minutes (as hard as that may be!). They are perfect served warm, and I love to dip them in a little marinara sauce or a robust garlic aioli.
**Little Extras I’ve Learned Along the Way**
Now that you’ve gone through the steps, let’s chat about some little tidbits I’ve picked up along the way. You know, those tips that turn a good recipe into a great one!
– **Make Ahead:** You can prep these little gems ahead of time! Assemble them, place them on the baking sheet, then cover and refrigerate until you’re ready to bake. Just make sure to let them come to room temperature before popping them in the oven.
– **Frozen Dreams:** If you want to stock up for those “I need a cheesy snack” days, these can also be frozen. Assemble, freeze them on a baking sheet, and when solid, transfer to a Ziploc bag. Bake straight from the freezer—just add an extra couple of minutes to the baking time.
– **Flavor Swaps:** Swap out the herbs based on your mood! I love adding a little **rosemary** for a more rustic flavor, or even throw in some red pepper flakes for a spicy twist. I once experimented with adding caramelized onions—chef’s kiss perfect!
– **Dipping Sauces:** While I adore marinara, those little bombs also pair beautifully with a creamy ranch dressing or even a spicy buffalo sauce if you’re feeling zippy!
– **Kids in the Kitchen:** If you’ve got kiddos running around, this is the perfect recipe to let them jump in! They’ll love rolling up the cheese bombs, and trust me, the mess just means they’ve had fun!
This recipe means a lot to me. It’s not just food; it’s about family gathered around the table, happiness, and sharing moments. As we come together to savor these Garlic Herb Cheese Bombs, we’re also sharing laughter, stories, and—let’s be honest—a few happy dance moves as we plow through cheesy bites ideal for any occasion.
I’d absolutely love to hear about your experiences with this recipe, especially any creative twists you might add. Let me know if you give it a try—I can’t wait to share in the joy of these cheesy bliss bites with you!