Prep time: 15 minutes
Cook time: 40 minutes
Total time: 55 minutes
Servings: 12 servings
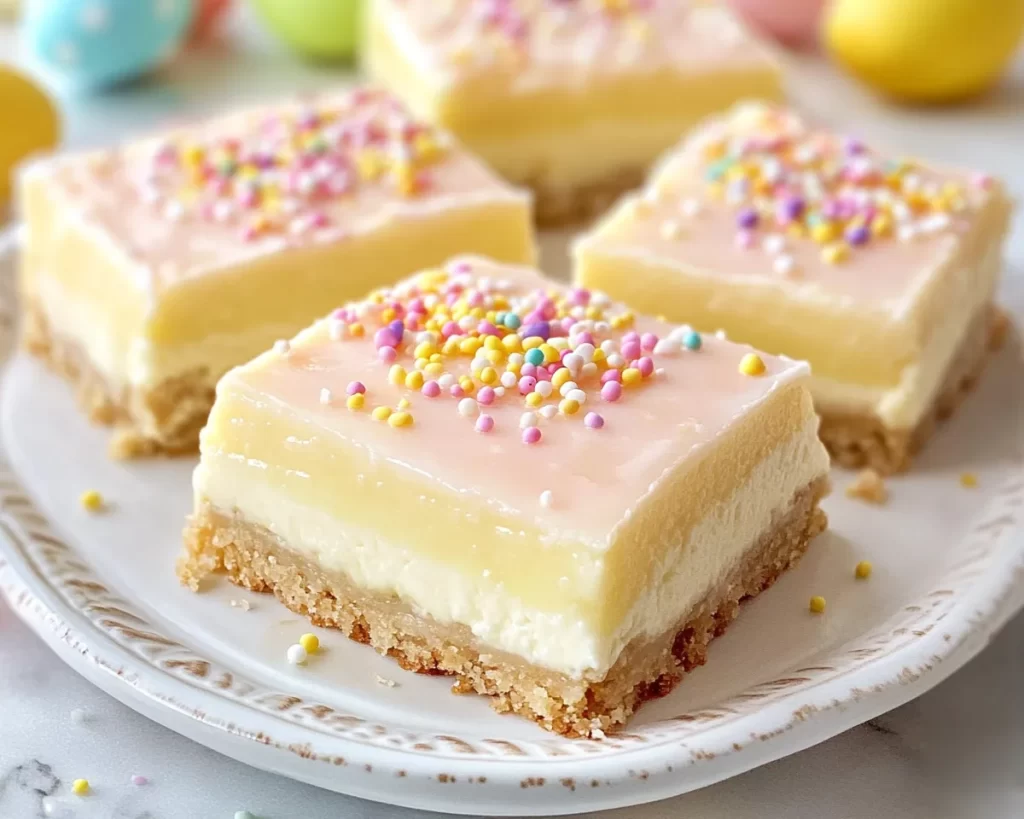
Do you find yourself craving something light and zesty that can brighten up any occasion? Enter Easter Lemon Cheesecake Bars, the perfect dessert to grace your table this spring. These delightful bars meld the creamy richness of cheesecake with a fresh, citrusy lemon flavor that’s both invigorating and comforting. Imagine the smooth texture of cheesecake combined with a sweet, buttery crust, topped with a lemony glaze that dances on your taste buds. Not only are they pleasing to the palate, but they’re also eye-catching, thanks to their sunny yellow color, making them an ideal treat for Easter gatherings.
In this article, you’ll discover just how easy it is to create these luscious lemon cheesecake bars from scratch. You’ll learn about the essential ingredients to use, step-by-step instructions that ensure your success, and creative variations that cater to diverse tastes. No matter your skill level in the kitchen, you’ll feel confident preparing this dessert that is sure to impress family and friends.
What Is Easter Lemon Cheesecake Bars?
Easter Lemon Cheesecake Bars are a delightful dessert that has become a beloved staple during the spring season, particularly around Easter. The origins of similar recipes can be traced back to traditional cheesecake, but the addition of lemon gives it a refreshing twist that perfectly complements the lighter moods of spring. The texture of these bars is simply irresistible—a smooth and creamy filling resting atop a crunchy, buttery crust that crumbles beautifully when you take a bite.
Ultimately, these bars combine various flavors and textures into a single dessert, making them both sophisticated and appealing to all ages. The bright acidity from the lemons cuts through the richness of the cream cheese filling, creating a well-balanced treat that’s not overly sweet. These characteristics make Easter Lemon Cheesecake Bars an excellent choice for festive gatherings, potlucks, or simply as a sweet ending to a family dinner.
Why You’ll Love This
You’ll love this recipe for several reasons, starting with its unique combination of flavors. The tangy lemon cuts through the richness, making these bars feel both indulgent and light at the same time. This dessert is not only a showstopper in taste but also incredibly easy to make, requiring minimal kitchen skills while delivering maximum enjoyment.
Additionally, the ingredients are generally affordable and can often be found in your pantry or local grocery store. If you find yourself short on time, these bars can be prepared ahead of time and stored in the refrigerator, saving you time and making them perfect for busy parents or anyone who juggles a packed schedule.
This dessert is also versatile. Whether you are celebrating a holiday like Easter, a special birthday, or simply want a sweet treat to enjoy with your family, these cheesecake bars will not disappoint. One misconception is that cheesecakes are too complicated or time-consuming to make. However, with the step-by-step guide provided, even beginner cooks will find this dessert achievable and rewarding.
Ingredients You’ll Need
- For the crust:
Graham cracker crumbs – These provide a sweet and crunchy base for your bars, balancing out the creaminess of the filling. Feel free to substitute with digestive biscuits if needed. - Granulated sugar – This sweetens the crust and filling, enhancing overall flavor. You could use coconut sugar as a healthier alternative.
- Unsalted butter – Melted butter helps bind the crust ingredients together and adds richness. Make sure it’s unsalted for better control over the overall saltiness of the dish.
- For the cheesecake filling:
Cream cheese – The star ingredient that gives the cheesecake its rich and creamy texture. Ensure it is at room temperature for easy mixing. - Granulated sugar – Used again in the filling to balance the tartness of the lemon juice and zest.
- Fresh lemon juice – Offers that bright, zesty flavor we all love in lemon desserts. Use freshly squeezed juice for the best taste, as bottled varieties may lack the same potency.
- Lemon zest – Enhances the lemon flavor and adds a slight bitterness that rounds out the sweetness. Make sure to zest only the bright yellow part of the skin.
- Eggs – Helps set the filling as it bakes. Room temperature eggs incorporate better, leading to a smoother filling.
- Vanilla extract – Adds depth of flavor and enhances the overall taste of the cheesecake.
To ensure the best results, be mindful of the quality and freshness of the ingredients you choose. This attention to detail makes a significant difference in flavor and texture.
How to Make
- Create the crust: Start by preheating your oven to 350°F (175°C). In a medium mixing bowl, combine the graham cracker crumbs with granulated sugar and melted butter. Use a fork or your hands to mix until the crumbs resemble wet sand. This mixture will form the base of your cheesecake and provide that delightful crunch. Once well combined, press the mixture firmly into the bottom of a greased 9×9-inch baking dish. Make sure it’s even so that your bars bake uniformly. Bake the crust for 10 minutes, or until golden. Remove from the oven and let it cool while you prepare the filling.
- Prepare the cheesecake filling: In a large mixing bowl, beat the softened cream cheese with an electric mixer until smooth and creamy. This will take about 2-3 minutes. Make sure there are no lumps, as you want a silky filling. Then, add the granulated sugar and mix until integrated. Follow this by adding the freshly squeezed lemon juice, lemon zest, eggs, and vanilla extract. Beat again until everything is well combined. The filling should be smooth and homogeneous. Avoid overmixing at this stage, as it can introduce air bubbles, which may lead to cracks during baking.
- Combine and bake: Pour the cheesecake filling over the pre-baked crust, smoothing it out with a spatula. Bake the dessert in the preheated oven for 25-30 minutes, or until the edges are set and the center is slightly jiggly. This slight jiggle is normal as the bars will firm up once cooled. Keep an eye on them during the last few minutes to avoid over-baking, which can lead to a dry texture. Once baked, turn off the oven and let the bars cool inside the oven for about 10 minutes.
- Chill: Remove the bars from the oven and allow them to cool at room temperature for about 45 minutes to an hour. Once cooled, cover the baking dish with plastic wrap and refrigerate for at least 4 hours or overnight. Chilling not only helps the bars set fully but also enhances the flavors, making every bite even more delightful.
- Serve: Once chilled, it’s time for the fun part—serving! Cut the bars into squares or rectangles, depending on your preferred size. For an added touch, you can dust the top with powdered sugar or drizzle some lemon glaze over it. Garnish with fresh berry fruits or mint leaves for a beautiful presentation that can impress your guests. Then, take a moment to relish in the aromas and flavors before indulging!
Variations & Substitutions
Chocolate Lemon Cheesecake Bars: If you’re a chocolate lover, try integrating some cocoa powder into the crust or even adding chocolate ganache atop the finished bars. This variation will create an indulgent treat that balances the tartness of lemon with the richness of chocolate. Use dark chocolate for a bolder flavor, or milk chocolate for a sweeter finish. The cocoa powder can be mixed with graham cracker crumbs at a 1:4 ratio (one part cocoa to four parts crumbs) for a balanced crust.
Gluten-Free Option: For those who follow a gluten-free diet, you can easily substitute the graham cracker crumbs with gluten-free graham cracker alternatives or even almond flour for the crust. The texture may vary slightly, but you’ll still achieve a delicious result. Ensure that your cream cheese and any other necessary ingredients are also gluten-free certified.
No-Bake Lemon Cheesecake Bars: If you wish to skip the baking process altogether, this variation is for you. Prepare a similar crust and filling mixture, but opt for a no-bake version by simply refrigerating the bars until set. You can stabilize the filling with gelatin or whipped cream to achieve the desired texture. Just keep in mind that the no-bake version may have a different texture, slightly creamy instead of firm.
Vegan Lemon Cheesecake Bars: To make these bars vegan-friendly, replace cream cheese with vegan cream cheese and use silken tofu blended with lemon juice and zest for the filling. Substitute eggs with flaxseed meal or agar-agar for binding. Always check the labels of the ingredients you choose to ensure they meet your dietary preferences. This version may require experimentation, so be prepared to adjust sugar levels based on taste.
Common Mistakes to Avoid
A few common mistakes can lead to less-than-perfect Easter Lemon Cheesecake Bars. One critical mistake is not allowing the cream cheese to soften before mixing. If it’s still cold, you’ll end up with a lumpy filling without the smooth texture we all desire. Additionally, be cautious about over-baking the bars. If you allow them to bake too long, the cheesecake filling can crack and dry out. Aim for a slight jiggle in the center when you take them out of the oven.
Another potential pitfall is not chilling the bars adequately. Skipping the chill time will result in a filling that is too loose, making it difficult to cut and serve cleanly. Lastly, taking shortcuts with the ingredients, like using bottled lemon juice instead of fresh juice, can compromise the flavors. Always choose fresh ingredients for the best taste.
Storage, Freezing & Reheating Tips
For maximum freshness and flavor retention, store your Easter Lemon Cheesecake Bars in an airtight container in the refrigerator. They will keep well for about 5-7 days. If you want to prepare them in advance, consider making a double batch and freezing some for later. To freeze, wrap the bars tightly in plastic wrap and place them in an airtight container or resealable freezer bag. They will maintain their quality for up to 3 months.
When it comes to reheating, it’s generally unnecessary as these bars are best served chilled. However, if you prefer them warm, you can allow them to sit at room temperature for about 15 minutes before serving. Just be cautious not to overexpose them to warmth as they might lose their structured texture.
Frequently Asked Questions
Can I make these bars ahead of time?
Absolutely! In fact, making them a day in advance is recommended. This not only helps the flavors develop but also allows for easier cutting and serving. Just make sure to refrigerate them well covered to maintain their freshness.
What can I serve with these cheesecake bars?
These delicious bars pair beautifully with a variety of accompaniments. You could serve them with fresh berries, whipped cream, or even a light lemon glaze drizzled on top. A sprinkle of mint leaves can also add a great touch for garnish.
How do I know when my cheesecake bars are done?
The best way to check for doneness is to look at the edges; they should be set while the center maintains a slight jiggle. Overbaking can lead to cracks and a dry texture, so keep a close eye during the final minutes of baking.
Can I use flavored yogurt instead of cream cheese?
While flavored yogurt can create a unique twist, it won’t provide the rich creamy texture that traditional cream cheese offers. If you’re looking for a healthier alternative, opt for low-fat or reduced-fat cream cheese instead.
What should I do if my filling is lumpy?
If your filling is lumpy, it may be due to cold cream cheese. Always ensure that your cream cheese is at room temperature before mixing. If lumps are present, you can use a hand mixer or blender to smooth it out before adding the remaining ingredients.
Conclusion:
Easter Lemon Cheesecake Bars are a show-stopping dessert that effortlessly combines tangy and sweet, creamy and crunchy. Whether for a holiday gathering or a cozy weekend treat, these bars are sure to please everyone at your table. Don’t hesitate to try your variations or share them with friends and family. Let the beautiful flavors inspire your own creativity in the kitchen, and remember—homemade desserts carry a touch of love that makes them all the more special. Enjoy your baking journey!