Prep time: 20 minutes
Cook time: 10 minutes
Total time: 30 minutes
Servings: 24 cookies
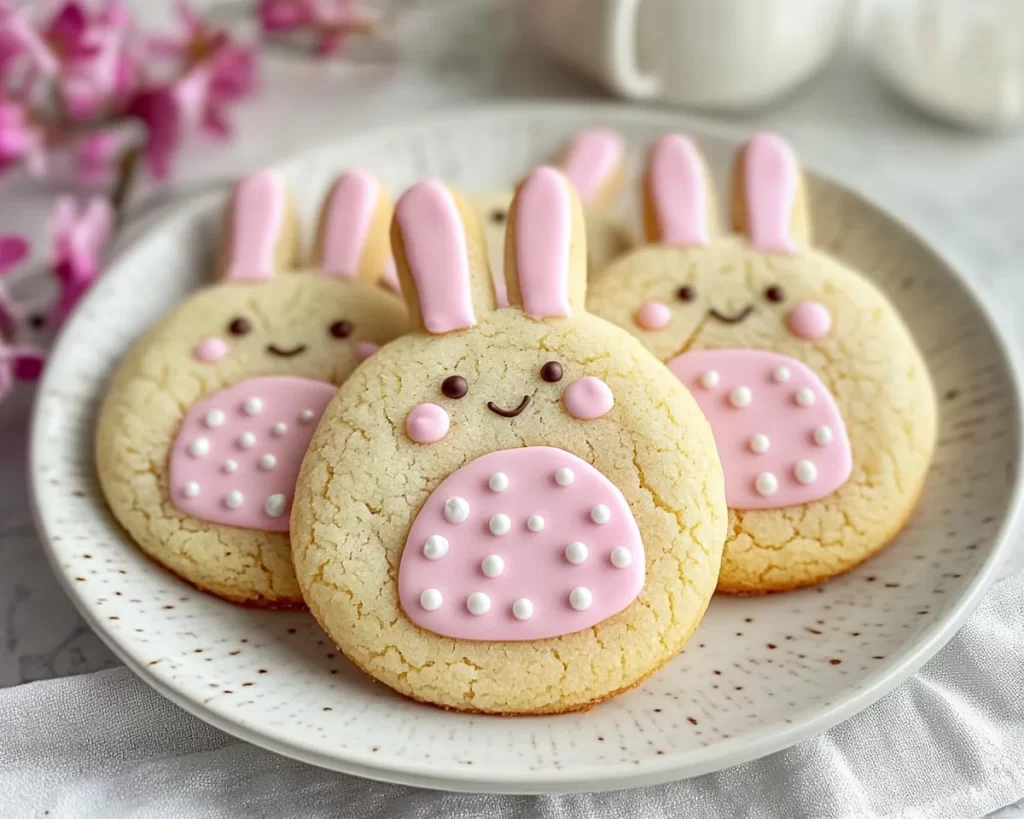
Easter is a wonderful time filled with joy, celebration, and, of course, sweet treats. One delightful way to make this holiday special is by baking **Easter Bunny Sugar Cookies**. These cookies are not just any ordinary cookies; they are a canvas for creativity, featuring cute bunny shapes and vibrant icing that will bring smiles to both kids and adults alike. Imagine the aroma of freshly baked cookies wafting through your home as you gather with family and friends. In this article, you will learn everything you need to know about creating these delectable cookies, including essential tips, variations, and answers to frequently asked questions.
What Is Easter Bunny Sugar Cookies?
**Easter Bunny Sugar Cookies** are festive treats typically made with a sweet and buttery sugar cookie dough. Originating from traditional sugar cookies, these delightful confections are specifically shaped like bunnies for the Easter holiday. When baked, they acquire a crisp exterior that gives way to a tender, melt-in-your-mouth texture. The cookies are often brightly decorated with colorful icing, sprinkles, or edible glitter, adding a playful touch to your Easter celebrations.
The flavor of Easter Bunny Sugar Cookies is wonderfully sweet, making them a perfect treat for all ages. The base sugar cookie dough can be easily flavored with vanilla, almond, or even lemon zest, depending on your taste preferences. As you decorate, the creative possibilities are endless; you can use pastel colors to reflect the spring season, making these cookies not just delicious, but visually appealing as well.
With their whimsical shapes and flavors, these cookies are more than just dessert; they are a delightful experience that brings loved ones together. Whether you are hosting an Easter brunch or simply indulging your sweet tooth, these cookies are sure to be a hit.
Why You’ll Love This
Easter Bunny Sugar Cookies are beloved for several reasons. **First and foremost**, they are incredibly delicious! The combination of sweet and buttery flavors, along with the fun of decorating, makes them an irresistible treat. You can also customize them to fit your taste—add a hint of citrus zest for a refreshing twist, or use extracts like almond for added depth of flavor.
**Furthermore**, they are surprisingly easy to make, even for beginners. You don’t need to be a baking expert to whip up a batch of these festive cookies. With just a few simple ingredients and some basic kitchen tools, you can create beautiful cookies that will impress your family and friends.
**Cost is another benefit** of these cookies. Most of the ingredients are pantry staples, making this a budget-friendly dessert option. You will not only save money compared to store-bought cookies but will also gain the satisfaction of making them from scratch.
Lastly, these cookies are versatile. They can be frosted, glazed, or sprinkled, allowing you to let your creative juices flow. If you have dietary restrictions in your family, you can easily substitute ingredients to cater to gluten-free or vegan diets, ensuring everyone can join in the fun.
Ingredients You’ll Need
- All-purpose Flour: 2 ¾ cups – This is the base of your cookie dough, providing structure and stability. You can substitute with gluten-free flour if needed.
- Baking Powder: 1 teaspoon – This leavening agent helps the cookies rise slightly, giving them a light texture.
- Salt: ½ teaspoon – A critical ingredient that enhances the sweetness of the cookies.
- Unsalted Butter: 1 cup (softened) – Softened butter ensures easy mixing and adds richness to the cookies. For a dairy-free version, use coconut oil.
- Sugar: 1 ½ cups – Granulated sugar sweetens the dough and contributes to a crisp exterior.
- Eggs: 1 large – Eggs bind the ingredients together, providing moisture and texture. You can substitute with a flax egg for a vegan version.
- Vanilla Extract: 2 teaspoons – Enhances sweetness and aroma. You may replace it with almond extract for a different flavor.
- Cardamom (optional): ½ teaspoon – Adds a warm, aromatic flavor that pairs beautifully with the sweetness of the cookies.
Understanding the role of each ingredient not only adds to the enjoyment of baking but also helps you make smart substitutions if necessary.
How to Make
- Prepare Your Oven and Baking Sheets: Preheat your oven to 350°F (175°C) and line your baking sheets with parchment paper. This prevents the cookies from sticking and promotes even baking.
- Mix Dry Ingredients: In a medium bowl, whisk together the all-purpose flour, baking powder, salt, and any optional spices like cardamom. Mixing these ingredients separately helps to ensure even distribution throughout the dough.
- Cream Butter and Sugar: In a large bowl, use an electric mixer to beat the softened butter and granulated sugar until it turns light and fluffy. This process usually takes about 3-4 minutes. It’s essential for creating a tender texture in the final cookies.
- Add Egg and Vanilla: Lower the mixer speed and add the egg and vanilla extract to the butter-sugar mixture. Continue mixing until well combined. The mixture may appear slightly curdled, but that’s normal and will come together when you add the dry ingredients.
- Combine Dry Ingredients: Gradually add the dry mixture to the wet mixture, mixing on low speed until just combined. Do not overmix; this can lead to tough cookies. You want a smooth dough, so stop mixing when no flour is visible.
- Chill the Dough: Cover the bowl with plastic wrap and refrigerate the dough for at least 30 minutes. Chilling helps the cookies maintain their shape while baking.
- Roll and Cut Shapes: Once chilled, roll out the dough on a floured surface to about ¼ inch thick. Use a bunny-shaped cookie cutter to cut out shapes, placing them on the prepared baking sheets.
- Bake the Cookies: Bake in the preheated oven for 8-10 minutes, or until the edges just start to turn golden. Keep an eye on them to avoid overbaking, as they continue to cook a bit on the baking sheet after being taken out of the oven.
- Cool the Cookies: Allow the cookies to cool on the baking sheet for 5 minutes before transferring them to a wire rack. This step ensures they firm up and are easier to handle.
- Decorate: Once fully cooled, decorate with icing and sprinkles. Don’t be shy; let your creativity shine as you decorate each cookie uniquely!
By following these steps, even kitchen novices can create a batch of delightful Easter Bunny Sugar Cookies that will impress everyone.
Variations & Substitutions
Gluten-Free Variation: To make a gluten-free version of your Easter Bunny Sugar Cookies, simply substitute all-purpose flour with a gluten-free flour blend. Look for one that contains xanthan gum to help with binding and texture. The flavor may vary slightly, but you’ll still achieve a delicious cookie that everyone can enjoy.
Citrus Sugar Cookies: For a refreshing twist, add the zest of one lemon or orange to your dough. This will brighten up the flavor profile and give your cookies a zesty kick. Pair this with a lemon or orange glaze after baking for a fully rounded citrus experience.
Vegan Variation: To create a vegan version of the cookies, replace the egg with a flax egg. Combine 1 tablespoon of ground flaxseed with 2.5 tablespoons of water and let it sit for a few minutes to thicken. Additionally, use vegan butter or coconut oil in place of regular butter. The cookies will be just as delightful and suitable for a wider audience.
Chocolate-Dipped Cookies: For a rich twist, melt some chocolate and dip half of each cookie into it. This tastes heavenly and adds a touch of elegance to your cookies. You can use dark, milk, or even white chocolate for dipping and then sprinkle with fun toppings like crushed nuts or sprinkles before the chocolate hardens.
Decorative Icing Tips: If you want to elevate your cookie decorating game, consider using royal icing instead of standard icing. Royal icing dries hard and can be used for more intricate designs. You can even color your icing with gel food coloring for vibrant hues that reflect the spirit of Easter.
Common Mistakes to Avoid
One common mistake is overmixing the dough. When you add the dry ingredients to the wet ones, mix until just combined. Overmixing can lead to tough cookies due to the development of gluten. Remember, you want a tender, crumbly texture that melts in your mouth, not something chewy.
Another issue many bakers face is not chilling the dough long enough. Chilling is a crucial step that helps the cookies maintain their shape; if you skip this, the cookies will spread too much and lose their bunny shapes. Be patient and allow yourself the full chilling time recommended in the instructions.
Finally, be mindful of baking time. Each oven is different, so check your cookies a minute or two before the suggested time. The cookies should be just set and slightly golden around the edges. If you wait until they look done on top, you risk overbaking and creating a hard texture instead of the desired softness.
Storage, Freezing & Reheating Tips
To properly store your Easter Bunny Sugar Cookies, allow them to cool completely before transferring them to an airtight container. If stacked, place parchment paper between layers to keep them from sticking. Stored this way, they can last for up to a week at room temperature, retaining their soft texture and flavors.
For longer storage, you can freeze the cookies. Place them in a single layer on a baking sheet and freeze until solid. Then, transfer them to a freezer-safe container or a zip-top bag, removing as much air as possible. They can stay fresh in the freezer for up to three months. When ready to eat, simply let them thaw at room temperature or warm them slightly in the microwave for a few seconds.
For decoratively iced cookies, it’s best to freeze them before icing, as the icing may become damp or melt when thawed. However, if you prefer iced cookies in the freezer, try to freeze them in a single layer and separate them with parchment.
Frequently Asked Questions
Can I make these cookies ahead of time?
Yes! You can prepare the dough a day or two in advance and keep it in the refrigerator. You can also freeze the unbaked dough for up to three months. Simply thaw in the fridge before rolling and baking.
What type of icing is best for decorating?
Royal icing is ideal for detailed decorations as it dries hard. However, if you prefer a simple glaze, confectioner’s sugar mixed with a little milk and vanilla extract will work perfectly too!
Can I use different shapes instead of bunnies?
Absolutely! Get creative with your cookie cutters. You can use any shape that fits the Easter theme, such as eggs, flowers, or chicks. The flavor and dough remain the same.
What’s the best way to transport decorated cookies?
To transport your cookies, place them in a single layer in a sturdy container, ensuring they don’t touch to avoid any damage. If you plan to stack them, use parchment paper between layers to prevent sticking.
Are there any dietary restrictions I should consider?
Yes, keep in mind that traditional sugar cookies contain gluten and dairy. However, as discussed, you can easily make gluten-free or vegan versions for those with dietary restrictions, ensuring everyone can enjoy them at your Easter gathering.
Conclusion:
Easter Bunny Sugar Cookies are more than just a delicious treat; they are a fun and interactive way to celebrate the holiday with family and friends. Each step is manageable, making it a perfect choice for beginner bakers and seasoned pros alike. With tips for variations and decorative options, your cookies can be as unique as your creativity allows. Don’t hesitate to customize this recipe further; after all, cooking is about bringing joy to your kitchen. Try out this recipe, share your delightful creations, and enjoy the smiles they bring. Happy baking!