Prep time: 30 minutes Cook time: 25 minutes Total time: 55 minutes Servings: 12
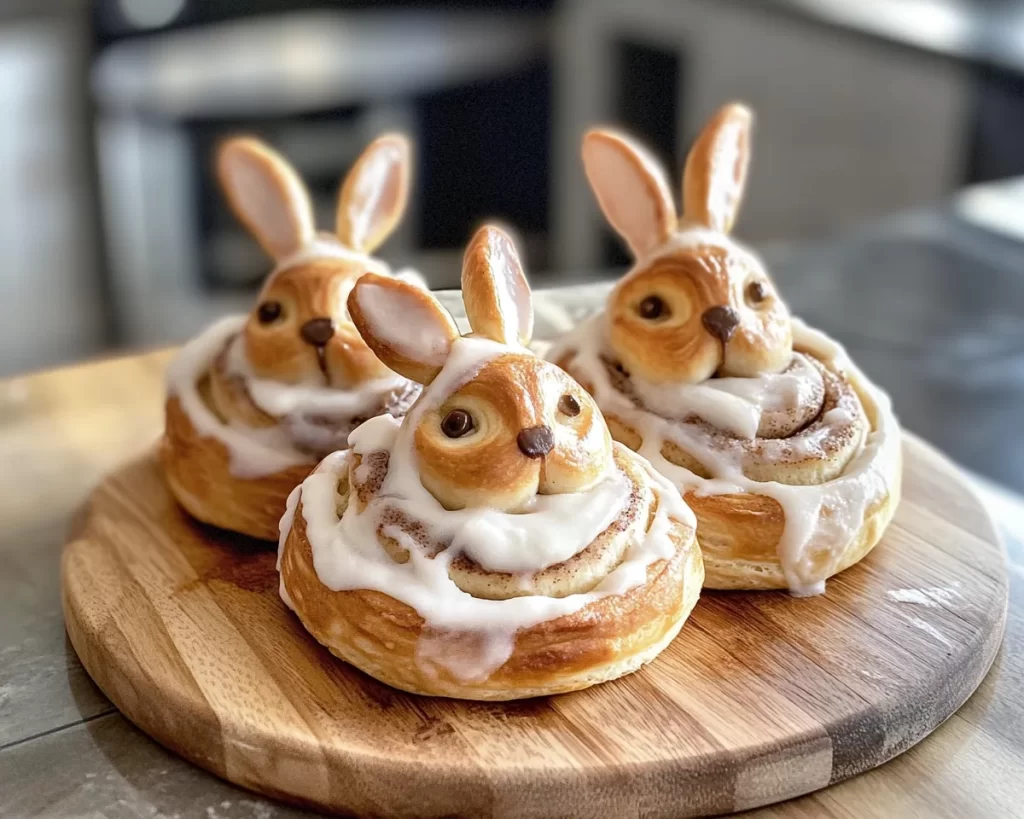
Easter is around the corner, and what better way to celebrate than with some delightful Easter Bunny Cinnamon Rolls? These fluffy, sweet rolls are not just a treat for your taste buds but also a feast for the eyes. Picture cinnamon-sugar-filled dough shaped like bunnies, bringing joy to your breakfast table. The moment you pull them from the oven, the warm aroma of cinnamon fills your kitchen, evoking memories of family gatherings and festive celebrations. In this article, you will learn how to create these adorable rolls, filled with tips, variations, and even some common pitfalls to avoid. Let this recipe become a cherished part of your Easter tradition!
What Is Easter Bunny Cinnamon Rolls?
Easter Bunny Cinnamon Rolls are a whimsical twist on the classic cinnamon roll, traditionally enjoyed for breakfast or brunch. Originating from the classic rolled dough recipes passed down through generations, these rolls take on a playful shape that resembles rabbits, making them ideal for the Easter holiday. The dough is soft and fluffy, with just the right amount of chewiness, and each roll is enveloped in a fragrant, sweet cinnamon filling. Topped with a vanilla glaze and adorned with edible decorations, these rolls not only satisfy your sweet tooth but also add a touch of festivity to any gathering.
The texture is light yet rich, thanks to the creaminess of the ingredients used. You will find that the inside has a delightful swirl of cinnamon and sugar, creating pockets of flavor with every bite. The flavor profile is aromatic and sweet, perfectly balancing the richness of the dough and the spiciness of the cinnamon. It’s a treat that appeals to kids and adults alike, providing that extra touch of joy that only comes with baking something special for a loved one.
Why You’ll Love This
This recipe for Easter Bunny Cinnamon Rolls is incredibly easy to follow, making it perfect for both beginners and experienced bakers. The joyful aesthetics of the bunny shape are sure to bring smiles to your table and make any Easter celebration feel extra special. Not only are they delightful to look at, but they are also cost-effective, utilizing basic pantry staples such as flour, sugar, and cinnamon. Baking them at home allows you to control the ingredients, giving you the freedom to adapt the recipe to your dietary requirements or preferences.
A common misconception is that cinnamon rolls are challenging to make at home, but this recipe is foolproof! By taking your time and following the steps closely, you’ll realize that you can easily achieve bakery-quality rolls right in your kitchen. For those who enjoy experimenting, the variations and substitutions discussed later on will inspire you to customize the recipe according to your taste, ensuring that every batch is a reflection of your creativity.
Ingredients You’ll Need
- All-purpose flour: The base of the dough. This provides structure and lightness. You can substitute with gluten-free flour if necessary.
- Granulated sugar: Sweetens the dough and the filling. Brown sugar can be used for a more caramel-like flavor.
- Active dry yeast: Essential for leavening the dough and creating that fluffy texture. Ensure it’s fresh for the best results.
- Milk: Adds moisture and richness. Whole milk is preferable, but alternatives like almond or oat milk can be used.
- Butter: Contributes to the dough’s richness. Use unsalted butter to control the saltiness.
- Cinnamon: The star of the filling! Use fresh ground cinnamon for a more vibrant flavor.
- Egg: Adds richness and helps with binding. For a vegan option, you can use a flax egg.
- Salt: Essential for flavor enhancement. Never skip this ingredient!
- Vanilla extract: Enhances flavor in both the dough and glaze. Use pure vanilla extract for the best results.
- Powdered sugar: Used for the sweet glaze. It provides that sugary finish once the rolls are baked.
How to Make
- Begin by activating the yeast. In a bowl, combine warm milk (about 110°F/43°C) with 1 tablespoon of granulated sugar and the active dry yeast. Stir and let it sit for about 5–10 minutes until it becomes frothy. This step is crucial because it ensures your yeast is alive and ready to work its magic in the dough.
- While the yeast is activating, melt the butter in a saucepan over low heat. Once melted, remove from heat and let cool slightly. In a separate large mixing bowl, combine 1/4 cup of sugar, 1 teaspoon of salt, and 1 teaspoon of vanilla extract. Slowly mix in the melted butter, followed by the beaten egg. Stir until well combined.
- Add the yeast mixture to the butter mixture and stir well. Gradually incorporate about 3 to 4 cups of all-purpose flour, one cup at a time, until the dough begins to pull away from the edges of the bowl, forming a soft, pliable dough. You may not need all the flour, so pay attention to the dough’s consistency as you add flour.
- Turn the dough out onto a lightly floured surface. Knead the dough for about 5–7 minutes, until it’s smooth and elastic. If the dough sticks to your hands, sprinkle a little more flour on the surface as needed. This kneading step is essential for developing gluten, which gives the rolls that irresistible chewy texture.
- Shape the dough into a ball and place it in a greased bowl, covering it with a clean kitchen towel. Allow the dough to rise in a warm place for about 1–2 hours, or until it doubles in size. This slow rise is key for developing flavor and texture.
- Once risen, punch down the dough to release air bubbles, then roll it out on a floured surface into a rectangle measuring about 15×20 inches. Spread softened butter over the surface of the dough, leaving a small border at the edges.
- Evenly sprinkle the cinnamon and remaining sugar mixture over the buttered dough, ensuring it reaches all corners. This filling is what gives the rolls their signature flavor.
- Starting from the long edge, tightly roll the dough into a log. Pinch the seams to seal, then slice the log into 12 equal pieces. Each piece should be roughly 1.5 inches thick. Place these on a greased baking sheet or in a greased 9×13-inch pan, allowing some space between each roll for further rising.
- Cover the rolls again with a towel and let them rise for another 30–45 minutes in a warm spot. During this time, preheat your oven to 375°F (190°C) so it’s ready for the rolls once they’ve risen.
- Once the rolls have puffed up, bake them in the preheated oven for 20–25 minutes, or until they are golden brown. You want to keep an eye on them to avoid over-baking, as they can quickly turn from perfect to overly brown. The moment your kitchen fills with that delightful smell, you’ll know they’re close!
- While they’re baking, whip up the glaze by mixing powdered sugar with a bit of milk and vanilla extract. Adjust the thickness by adding more sugar or milk until you reach a pourable consistency.
- Once the rolls have baked and cooled slightly, drizzle your homemade glaze generously over them. You can also sprinkle with colorful sprinkles to make them even more festive. Enjoy your beautiful and delicious Easter Bunny Cinnamon Rolls!
Variations & Substitutions
Chocolate Chip Bunny Rolls: If you’re a chocolate lover, consider adding chocolate chips to your filling. Just sprinkle them along with the cinnamon and sugar mixture. They melt beautifully during baking, creating gooey pockets of chocolate that blend perfectly with the sweet dough. This variation is especially loved by kids and adds a touch of indulgence to the already delightful rolls.
Pecan Crunch Bunny Rolls: For a nutty twist, finely chop some pecans and add them to the filling mix. This will not only give a delightful crunch but also complement the cinnamon flavor harmoniously. This variation appeals to those who enjoy a bit of texture in their baked goods and makes the rolls feel even more gourmet.
Vegan Bunny Rolls: To create a vegan version, replace the egg with a flax egg (1 tablespoon ground flaxseed mixed with 2.5 tablespoons water), use almond or oat milk instead of dairy milk, and substitute the butter with coconut oil or vegan butter. The outcome will still be soft and fluffy, proving that you don’t need animal products to achieve a delightful pastry.
Gluten-Free Bunny Rolls: For those on a gluten-free diet, you can use a gluten-free flour blend in place of regular flour. Just make sure to look for one that has xanthan gum or add it in as needed for texture. This variation allows everyone to enjoy these festive rolls without compromising taste or fun.
Spiced Pumpkin Bunny Rolls: For a seasonal spin during the fall months, incorporate pumpkin puree in your dough, adjusting the liquid content accordingly. Add spices like nutmeg or ginger to the filling for an autumn-inspired treat. The pumpkin keeps the rolls moist and adds a unique flavor that everyone will love.
Common Mistakes to Avoid
One common mistake is adding too much flour during the kneading process. It can lead to dry rolls that lack fluffiness. Use just enough flour to keep the dough from sticking. A soft, slightly tacky dough is an indication that you’re on the right track.
Another pitfall is not allowing the dough to rise sufficiently. Rushing this step can result in dense, chewy rolls instead of light and airy pastries. Make sure to give your dough plenty of time to rise in a warm environment.
Overbaking is a frequent issue, especially with items like cinnamon rolls. Keep an eye on the oven and perform the toothpick test. If it comes out clean, the rolls are done, but if it pulls away from the edges and feels dry, they are overbaked.
Lastly, for those using toppings or glazes, adding them too soon after baking can cause them to melt right off. Let your rolls cool slightly before drizzling with glaze to achieve a beautiful finish.
Storage, Freezing & Reheating Tips
To store leftover Easter Bunny Cinnamon Rolls, place them in an airtight container at room temperature for up to 2 days. If you want to keep them longer, consider freezing them. Allow the rolls to cool completely, then wrap them tightly in plastic wrap and aluminum foil before placing them in an airtight container. They can be stored in the freezer for up to 2 months without losing too much quality.
When you’re ready to enjoy your frozen rolls, simply remove them from the freezer and let them thaw in the refrigerator overnight. To reheat, place them in a preheated oven at 350°F (175°C) for about 10-15 minutes, until warmed through. You can also warm them in the microwave, but be cautious not to overheat, as this can make them tough. If you like, once reheated, drizzle them again with glaze for that fresh-baked feel.
To maintain food safety, always remember to refrigerate any rolls that contain perishable fillings or toppings. Keeping them in a cool environment will help preserve their quality and taste.
Frequently Asked Questions
Can I prepare the dough the night before? Yes, you can make the dough in advance! After the first rise, cover it tightly and refrigerate it. The next morning, let it come back to room temperature and proceed with shaping and baking. This method allows for even better flavor development.
Can I use whole wheat flour instead of all-purpose flour? Absolutely! Whole wheat flour can be used for a healthier version. However, the rolls may turn out denser, so consider mixing it with all-purpose flour for a lighter texture, aiming for a 50/50 ratio.
What if my dough doesn’t rise? If your dough fails to rise, it could be due to inactive yeast. Always check the expiration date on your yeast before use, and make sure you’re using warm (not hot) water or milk to activate it. If the water is too hot, it can kill the yeast, compromising the dough’s ability to rise.
How can I make the glaze thicker or thinner? If your glaze is too thick, simply stir in a little more milk, one teaspoon at a time, until you reach your desired consistency. Conversely, if it’s too thin, add a bit more powdered sugar until it thickens up.
Is it necessary to use a glaze? While the glaze adds a sweet finishing touch, it is entirely optional. You can enjoy these cinnamon rolls plain or dust them with some powdered sugar for a lighter option without compromising their delightful taste.
Conclusion:
Easter Bunny Cinnamon Rolls are not only delicious but also a fun and engaging way to bring joy to your holiday celebrations. From the soft, fluffy texture to the sweet, spiced aroma, these rolls are sure to win hearts and become a beloved tradition in your home. I encourage you to try your hand at this delightful recipe, customize it with your favorite ingredients, and share it with family and friends. Remember, the best part about baking is the joy it brings to those you love, so get in the kitchen and start creating your own Easter memories!