Prep time: 10 minutes
Cook time: 45 minutes
Total time: 55 minutes
Servings: 4
Caramelized onions are a kitchen staple that often take a back seat in recipes, but they can truly elevate a dish. Whether you’re tossing them into a comforting pasta, layering them on a gourmet burger, or stirring them into a savory soup, deep golden caramelized onions deliver a phenomenal depth of flavor. Imagine taking a bite and tasting that sweet, rich, and buttery goodness melting into your dish, enhancing the overall taste experience.
This recipe for Deep Golden Caramelized Onions the Right Way brings you a foolproof method to achieve that perfect balance of sweetness and texture without the risk of burning or overcooking. By the end, you’ll learn the nuances of cooking onions to perfection, and you’ll pick up a wealth of tips on variations you can try. So grab your skillet and let’s transform those humble onions into a caramelized delight!
What Is Deep Golden Caramelized Onions the Right Way?
When we talk about **deep golden caramelized onions**, we’re referring to that beautiful transformation that onions undergo when cooked slowly over low heat. Originating from French cuisine, they are often associated with dishes like French onion soup, where their sweet, rich flavor is essential. The caramelization process affects the onions’ natural sugars, causing them to brown and develop a complex flavor profile.
In simple terms, caramelized onions are sweet, tender, and immensely flavorful. The process involves slowly cooking the onions until they turn a rich golden brown, highlighting a deep umami flavor that can elevate various dishes. But it’s not just about color—it’s about texture, aroma, and the depth of flavor that makes a simple dish truly exceptional. This technique will give you that melty, soft texture that contrasts beautifully with many dishes, making it a versatile ingredient in your kitchen arsenal.
Why You’ll Love This
There are numerous reasons why you’ll find this method for making deep golden caramelized onions appealing. Firstly, the *taste* is simply unparalleled—sweet, savory, and complex all at once. Investing the time to caramelize onions is absolutely worth it for the layers of flavor it adds to your meals. From sandwiches and salads to stews and casseroles, these onions can work wonders.
Another reason to love this recipe is its *ease*. With just a few ingredients and a little patience, you can create a gourmet ingredient right at home. This recipe emphasizes simplicity without sacrificing taste or quality, making it perfect for both novice and seasoned cooks alike. Plus, it’s a cost-effective way to enhance meals; onions are inexpensive, making this a budget-friendly option for family meals or meal prepping.
You’ll also appreciate the *health benefits*, as onions are rich in vitamins and antioxidants. Many home cooks often worry about the potential for burning or overcooking their onions. However, this method provides you with clear steps to avoid those common pitfalls, ensuring your onions turn out perfectly each time.
Ingredients You’ll Need
- Onions: The star ingredient! Yellow onions are commonly used for their sweetness, but you can also use red or white onions for different flavor profiles.
- Olive oil: Essential for sautéing the onions and helping to develop their flavors. Alternatively, you can use butter for added richness.
- Salt: Helps draw out the moisture from onions and enhances their natural sweetness.
- Balsamic vinegar (optional): For an extra layer of complexity and a hint of acidity that balances out the sweetness.
- Sugar (optional): Sometimes, a pinch can help speed up the caramelization process, particularly if your onions are less sweet.
Each ingredient contributes to the final texture and flavor. The onions are the primary source of that stunning sweetness, while olive oil brings everything together and allows for even cooking. Salt is a game-changer; it enhances flavor and aids in the caramelization process by drawing moisture from the onions. If you choose to add balsamic vinegar or sugar, these can help deepen the sweet notes, but they are not essential for achieving delicious caramelization.
How to Make
- Start by slicing your onions. Cut off both ends, then slice them in half from top to bottom. Lay each half flat on the cutting board and slice from end to end into thin half-moons. Aim for uniform slices to ensure even cooking.
- Heat your skillet over medium-low heat. Add a generous amount of olive oil or butter—about two tablespoons should do. Allow it to heat until it glistens but doesn’t smoke. This will help prevent the onions from sticking and burning.
- Once the oil is heated, add the sliced onions to the skillet. Using a wooden spoon, stir them gently to coat each piece with oil. Spread them out evenly in the pan to encourage even cooking.
- Sprinkle the onions with salt. This step is crucial as it enhances their natural sweetness and helps them release moisture. Continue to stir occasionally to ensure they don’t stick to the pan or burn.
- Now comes the waiting game—allow the onions to cook on low heat for about 30 to 45 minutes. This slow cooking time is key to developing that rich, deep color. As they cook, you’ll notice the onions starting to become translucent, then progressively darker and more fragrant.
- If you choose to add sugar or balsamic vinegar, introduce them into the pan in the last 10 minutes of cooking. This will enhance the caramelization process without overwhelming the natural flavors of the onions.
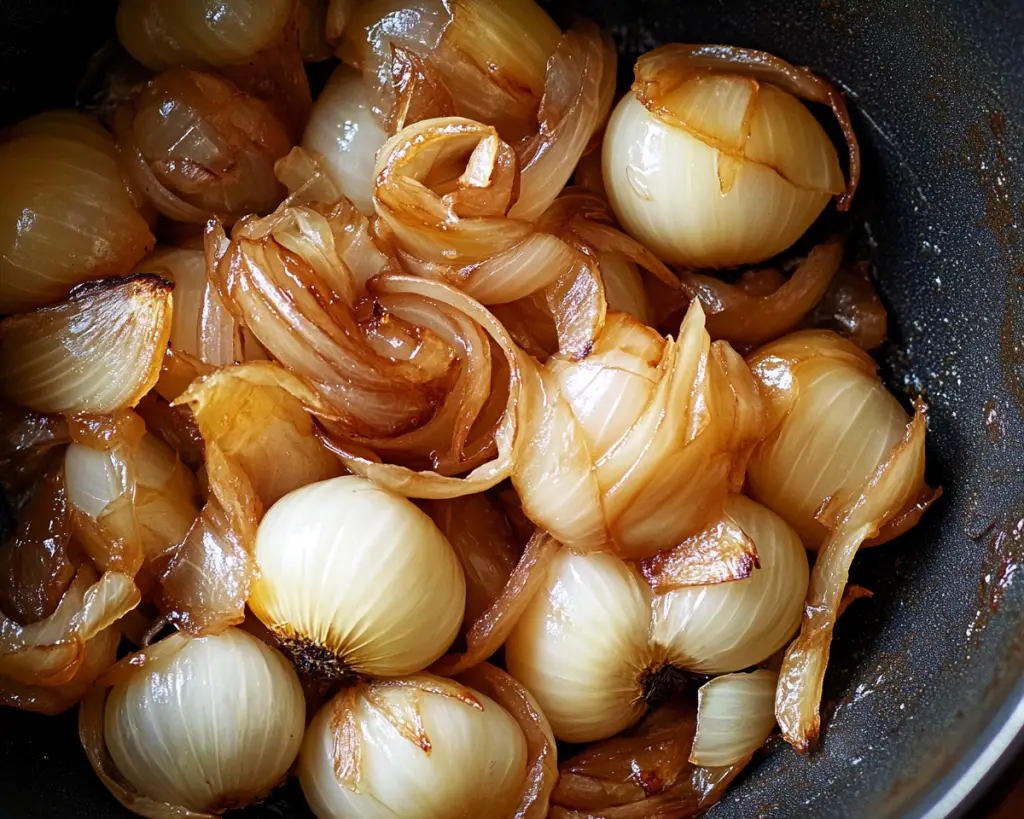
- Finally, when your onions reach a deep golden brown color and a sweet aroma fills your kitchen, they’re done! Taste them to ensure they are sweet and tender. If they aren’t quite there yet, give them a few more minutes.
The end result should be perfectly caramelized onions that are sweet, tender, and bursting with flavor. As you cook, take the time to savor the aroma that fills your kitchen; it’s a delightful sign that you’re on the right track.
Variations & Substitutions
Balsamic Glazed Variation: If you enjoy a slightly tangy twist to the sweetness of caramelized onions, consider adding balsamic vinegar earlier in the process. Just a tablespoon or two will impart a lovely acidity that balances the sweetness. This option is particularly good for topping grilled meats or mixing into savory sauces.
Red Wine Variation: For a depth of flavor that’s richer, consider using red wine instead of vinegar. As the onions caramelize, pour in a splash of your favorite red wine during the last 15 minutes of cooking. This adds an incredible depth and complexity, perfect for blending into a gourmet pasta or enhancing a stew.
Herbed Variation: Consider infusing your caramelized onions with fresh herbs like thyme or rosemary. Add them to the skillet during the last 5 to 10 minutes of cooking. The aromatic qualities of fresh herbs will lend a beautiful aroma and flavor, making them perfect for use in quiches or savory tarts.
Spiced Variation: If you’re looking to spice up your caramelized onions, experiment with warming spices like cumin or smoked paprika. Add a pinch during the cooking process to give your onions a flavorful twist. This is excellent if you’re integrating them into a spicy Mediterranean dish.
Vegan Butter Option: If you’re looking for a dairy-free alternative, simply switch out traditional butter for vegan butter or high-quality olive oil. You’ll still achieve rich flavor without compromising on taste, making it perfect for all your plant-based meals.
Each of these variations offers a unique flavor profile and enhances the final dish in different ways, giving you ample ways to customize your caramelized onions to suit your meals.
Common Mistakes to Avoid
One common mistake when making caramelized onions is cooking them too quickly. If you increase the heat to speed up the process, you risk burning the onions rather than caramelizing them. This will impart a bitter taste and ruin the natural sweetness you’re trying to achieve. Always cook them low and slow; patience is indeed a virtue in this case.
Another pitfall to avoid is overcrowding the pan. If your skillet is too crowded, the onions will steam instead of caramelize. Use a spacious skillet or cook them in batches if necessary. This allows them to spread out and ensures an even cook.
Sometimes home cooks forget to add a sprinkle of salt during cooking. This is crucial as it not only enhances flavor but also aids in releasing moisture from the onions. Skipping this can result in dry, burned onions instead of the desired tender texture.
Lastly, avoid skipping the tasting step towards the end. Your onions’ sweetness can vary based on their freshness and type, so tasting them will guide you on whether they need a touch of sugar or vinegar to reach that perfect balance.
Storage, Freezing & Reheating Tips
Caramelized onions can be conveniently stored in an airtight container in the refrigerator for up to one week. Just make sure they have cooled completely before sealing to avoid any moisture buildup, which can lead to spoilage.
If you find yourself with an excess of caramelized onions, they can be frozen for longer storage—up to three months! Simply portion them into freezer-safe bags or containers. When labeling, include the date for your records, ensuring you use them within a reasonable timeframe.
To reheat, simply thaw them overnight in the refrigerator and then warm them in a pan over low heat. You can add a splash of water or oil to prevent them from drying out as they heat. These onions will still maintain a lovely texture, making it easy to top your dishes without hints of freezer burn.
Food safety is paramount here; always check for any off smells or textures before consuming. Using portion sizes for freezing can help keep your onion stash fresh and ready for culinary delights.
Frequently Asked Questions
Can I use different types of onions for caramelizing?
Absolutely! While yellow onions are the most common choice for caramelization due to their balanced flavor, you can also experiment with red or white onions. Red onions will offer a slightly sharper taste, while white onions can be milder, though they may have less sweetness.
How can I tell when my onions are done cooking?
Your onions should reach a deep golden brown color and have a sweet aroma. A good way to test is by tasting them; they should be soft, tender, and sweet. If they’re still crunchy or have a strong bite, give them a little more time.
Can I make caramelized onions in advance?
Yes! Caramelized onions can be made in advance and stored in the refrigerator for up to a week or frozen for longer-term storage. This makes it easy to add a gourmet touch to your meals without the hassle of starting from scratch.
Do I need to add sugar when making caramelized onions?
Sugar is not necessary, but adding a little can help enhance the sweetness of your onions, especially if they are not very sweet to start. Consider your taste preferences; some cooks prefer to let the natural sugars develop fully without any additional sweeteners.
What dishes can I use caramelized onions in?
The possibilities are endless! Caramelized onions are perfect for topping burgers, pizzas, and sandwiches, or added to soups, stews, pasta, and even salads. Their versatility makes them a fantastic addition to almost any savory dish.
Conclusion:
This recipe for Deep Golden Caramelized Onions the Right Way is your ticket to elevating your culinary creations to a whole new level. The process may take some time, but the results are well worth the effort. With the rich and complex flavors you can achieve, you’ll find yourself incorporating these delightful caramelized onions into everything from family meals to special occasions.
I encourage you to try this recipe, customize it with your own twists or explore the variations mentioned. Share your creations with family and friends, and watch how a simple kitchen staple can transform every meal. Happy cooking!