Prep time: 30 minutes
Cook time: 50 minutes
Total time: 1 hour 20 minutes
Servings: 8
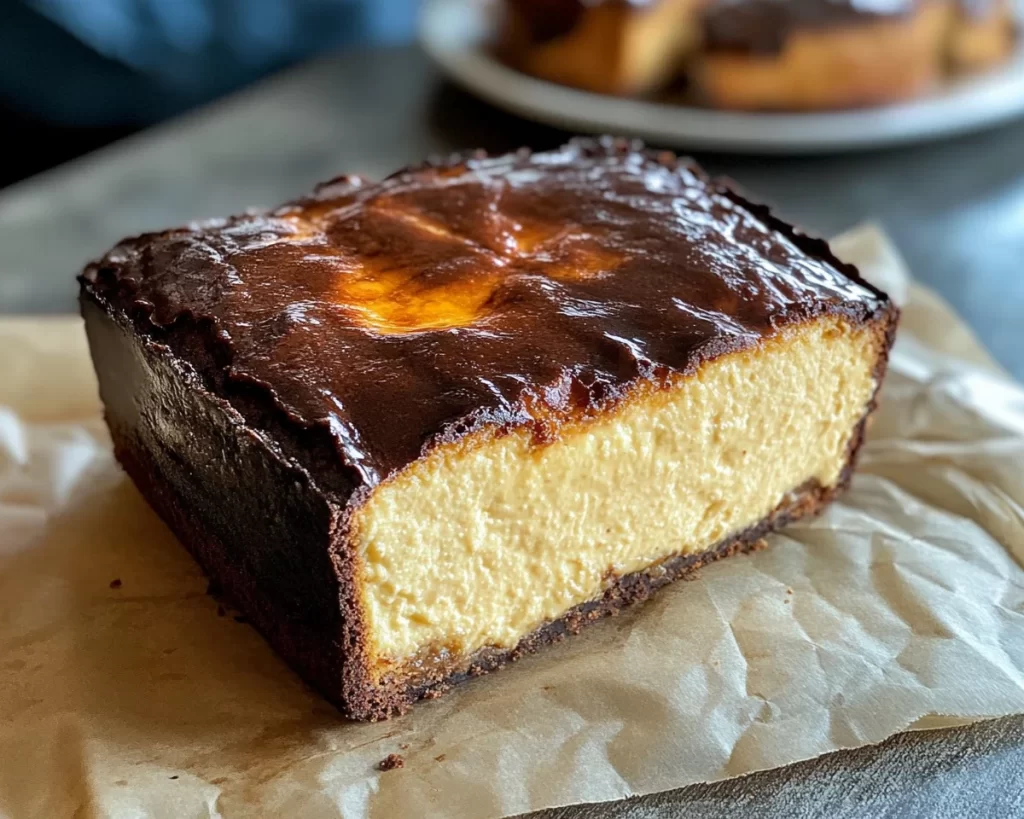
Have you ever experienced the **incredible joy of biting into a slice of cheesecake** that boasts a perfectly burnt exterior? The creamy, luscious interior paired with a caramelized top forms a rich symphony of flavors that lingers on the palate. If this sounds delightful, you’re in for a treat with the **Decadent Burnt Basque Cheesecake Loaf Recipe**.
This recipe marries traditional cheesecake elements with the ease of a loaf, making it accessible for even the busiest home cooks. As a **busy parent** or someone on the go, I understand the struggle of balancing time and culinary aspirations. That’s why I’m excited to share this recipe, which guarantees a **decadent experience** with minimal effort. Get ready to impress at gatherings or enjoy a personal slice of heaven at home!
You’ll learn how to craft this delightful loaf, complete with **tips, variations** for customizing to your taste, and **explanations of common mistakes** to ensure your baking session is a success.
What Is Decadent Burnt Basque Cheesecake Loaf Recipe?
The **Decadent Burnt Basque Cheesecake**, hailing from the Basque Country in Spain, has gained worldwide acclaim for its unique texture and rich flavor. The traditional version features a strikingly burnt exterior that contrasts beautifully with the **smooth, creamy interior**. This loaf adaptation allows for easy slicing and serving, making it perfect for gatherings or cozy evenings at home.
The **flavor profile** of this cheesecake is extremely rich and indulgent, thanks to the combination of cream cheese, heavy cream, and sugar. The **caramelization** of the outer layer introduces a hint of bitterness that complements the sweetness of the filling. You might find yourself asking how something so simple can deliver such profound flavors—a magic only baking can concoct!
Baking this cheesecake loaf is a perfect option for both beginners and seasoned bakers alike. With its straightforward process and fewer ingredients than traditional desserts, you can immerse yourself in the pleasure of making something special for the ones you love.
Why You’ll Love This
There are numerous reasons to love the **Decadent Burnt Basque Cheesecake Loaf**. First and foremost, the **taste** is nothing short of divine. The creamy filling melts in your mouth, while the burnt edges provide a satisfying crunch that makes each bite a sensory delight.
In terms of **ease**, the loaf format simplifies the standard cheesecake recipe, requiring less fiddling with crusts or specific baking molds. This makes it perfect for those evenings when you crave something homemade without dedicating hours in the kitchen.
Moreover, this recipe suits various dietary preferences. You can easily make substitutions for specific ingredients based on your needs. For example, opting for a gluten-free flour can cater to your gluten-sensitive friends, while dairy-free alternatives can satisfy lactose intolerant guests.
Finally, **cost-effectiveness** is another bonus. Simple ingredients like cream cheese and sugar don’t break the bank, yet they yield a dessert that seems extravagant and decadent.
By honing in on these elements, you can avoid common misconceptions, like the idea that baking is always complicated or that desserts need to be expensive to be delicious. You’ll find that the **Decadent Burnt Basque Cheesecake Loaf** is not only achievable but downright enjoyable to make!
Ingredients You’ll Need
To create this **Decadent Burnt Basque Cheesecake Loaf**, you will need the following ingredients:
- 10 oz (280g) cream cheese – This is the base of your cheesecake and provides that signature creaminess. Look for high-fat cream cheese for the best results.
- 1 cup (200g) granulated sugar – Sweetness is key! Granulated sugar easily blends with the cream cheese, creating the ideal texture.
- 4 large eggs – Eggs will act as a binding agent, contributing to the structure of your cheesecake while adding richness.
- 1 cup (240ml) heavy cream – This ingredient delivers an **ultra-rich** consistency, resulting in a luscious mouthfeel.
- 1 tbsp vanilla extract – Vanilla adds depth of flavor; it enhances the sweetness and complements the cream cheese perfectly.
- 1 tbsp all-purpose flour – This aids in stabilizing the batter, ensuring a solid structure to your cheesecake.
- 2 tbsp lemon juice – A splash of acidity brightens the flavor, balancing the richness of the cheesecake.
- Pinch of salt – Enhances all the flavors and rounds out the overall taste of the loaf.
Feel free to use **organic or non-GMO ingredients** for a healthier option or to accommodate dietary restrictions. With the right ingredients in hand, you’re ready to dive into making this cheesecake loaf!
How to Make
Follow these straightforward steps to achieve the perfect **Decadent Burnt Basque Cheesecake Loaf**:
- Prepare Your Oven: Preheat your oven to 400°F (200°C). It’s crucial to have the oven properly heated before placing your cheesecake in it, as this helps achieve the characteristic burnt exterior.
- Line the Pan: Line a 9×5 inch loaf pan with parchment paper. Make sure the parchment overhangs the edges for easy removal later. This step is vital to prevent sticking and ensures easy clean-up.
- Mix Cream Cheese and Sugar: In a large mixing bowl, beat the cream cheese with a hand mixer on medium speed until smooth. Gradually add the granulated sugar, continuing to mix until the texture is completely creamy and devoid of lumps.
- Add Eggs: One at a time, incorporate the eggs, mixing well after each addition. This gradual mixing prevents the mixture from becoming too airy, which is essential for a dense cheesecake.
- Stir in Cream and Flavorings: Add the heavy cream, vanilla extract, lemon juice, and salt to the mixture. Mix until everything is combined; avoid overly beating the mixture at this stage as it can create unwanted bubbles.
- Incorporate the Flour: Finally, sift the flour into the mixture and fold it gently with a spatula until fully combined. You want to retain a smooth texture for that creamy filling.
- Pour and Bake: Pour the cheesecake batter into the prepared loaf pan. Bake in the preheated oven for about 50 minutes. The cheesecake will puff up and the top will turn a deep brown. A toothpick inserted into the center may still come out with some moist crumbs, which is perfect.
- Cool and Set: Remove the cheesecake from the oven and let it cool in the pan for about 15 minutes before lifting it out using the parchment overhang. Allow it to cool completely on a wire rack. It’s best served chilled, so refrigerate for at least 4 hours or overnight for the best texture.
Each step plays a role in creating that dream-like texture and flavor profile. The **aroma filling your kitchen** while this loaf bakes is nothing short of heavenly—just wait until you can finally enjoy a slice!
Variations & Substitutions
Chocolate Swirl Variation: Want to take your loaf to the next level? Adding a **chocolate swirl** can create a beautiful presentation and flavor combination. Simply melt 100g of dark chocolate and, before pouring the cheesecake batter into the pan, dollop spoonfuls of melted chocolate on top. Use a knife to swirl it together lightly.
This variation is perfect for chocolate lovers and will be a real showstopper at any gathering! The chocolate adds depth and a hint of bitterness that balances well with the sweetness of the cheesecake.
Dairy-Free Variation: If you or your guests are avoiding dairy, fear not! Substitute the cream cheese with **dairy-free cream cheese** and the heavy cream with coconut cream. This maintains the creaminess but changes the flavor profile slightly to a tropical flair.
Ensure you choose ingredients that are labeled dairy-free to keep it compliant. This variation is not just suitable for vegans but caters to those with lactose intolerance, allowing everyone to indulge.
Fruit-Topped Variation: For a fresh twist, top your cheesecake with fresh fruits like berries or sliced peaches. Not only does this add a pop of color, but it also provides a refreshing tartness that contrasts nicely with the sweet richness of the cheesecake.
Simply prepare your loaf as instructed, and once it’s cooled in the fridge, add your preferred fruit on top just before serving. This makes your dessert more visually appealing and brings in additional health benefits.
Each variation allows room for creativity, accommodating different dietary preferences while elevating your cheesecake experience.
Common Mistakes to Avoid
While the **Decadent Burnt Basque Cheesecake Loaf** may sound easy, a few pitfalls can hinder your success. One common mistake is using cold cream cheese directly from the fridge. Always allow it to come to room temperature for a smoother mixing process, resulting in fewer lumps.
Another misstep is overmixing the batter when incorporating the eggs. This can introduce unwanted air bubbles, leading to cracks in your cheesecake. Remember, the goal is a dense, creamy texture—be gentle when mixing!
Lastly, skipping the refrigeration step can lead to a loaf that doesn’t slice well. Cooling is essential for allowing the structure to firm up, making your slices clean and presentable.
By being mindful of these tips and tricks, you will elevate your cheesecake journey from good to **spectacular**!
Storage, Freezing & Reheating Tips
You’ve created a delectable cheesecake loaf, but how do you ensure it stays fresh? To store, wrap the cooled cheesecake tightly in plastic wrap or keep it in an airtight container in the refrigerator. It can last for up to a week, maintaining its creamy texture.
If you want to enjoy your cheesecake even longer, freezing is an option. Slice the cheesecake and wrap each piece individually in plastic wrap. Place the wrapped slices in a freezer-safe bag or container. When stored properly, it can last up to 3 months in the freezer.
To **reheat** (although this dessert is typically enjoyed chilled), let it thaw in the refrigerator overnight. You can also place individual slices in the microwave for about 10-15 seconds for a warm treat if desired, but enjoy it cold for the best texture.
Keeping food safety in mind is paramount. If your cheesecake has been at room temperature for more than 2 hours, it’s best to discard it. Be vigilant about cleanliness when storing to prevent contamination.
Frequently Asked Questions
Can I use lower-fat cream cheese?
Yes, you can use lower-fat cream cheese, but it might yield a loaf that’s less creamy. Higher-fat options provide the signature richness associated with this type of cheesecake.
Is it possible to make this dessert ahead of time?
Absolutely! This cheesecake can be prepared up to two days in advance. Just ensure to store it properly in the refrigerator, and remember, it tastes even better once the flavors meld together!
What is the best way to serve this cheesecake?
Serve the slice with a drizzle of your favorite sauce, such as chocolate syrup or berry compote. Complementing with a dollop of whipped cream can also add a fabulous touch.
Can I add spices like cinnamon or nutmeg?
Definitely! Adding spices can introduce an additional flavor depth. A pinch of cinnamon or nutmeg can enhance the richness and give it seasonal appeal, particularly in fall or winter.
Why did my loaf crack?
Cracking usually occurs due to overmixing the batter or inconsistencies in the oven temperature. Make sure to mix gently, and consider using an oven thermometer to ensure your baking temperatures are accurate.
Conclusion:
This **Decadent Burnt Basque Cheesecake Loaf Recipe** combines simplicity with sophistication, offering an indulgent dessert that can cater to numerous palates and preferences. With easy-to-follow instructions and room for variation, this cheesecake loaf is a versatile treat perfect for any occasion.
I encourage you to **experiment**, make it your own, and share your creations with friends and family. After all, nothing brings people together like a warm slice of cheesecake! Don’t hesitate—you’ll want to give this recipe a try today. Enjoy the process and relish the sweet rewards!