Prep time: 20 minutes
Cook time: 10 minutes
Total time: 30 minutes
Servings: 20 gummies
Creating healthy treats that your kids will actually want to eat can feel like a Herculean task, right? Homemade gummies might just be the solution you’ve been searching for. Not only are these delightful sweets a kid-favorite, but you can customize them with wholesome ingredients, making them much healthier than the store-bought options that are often loaded with refined sugars and artificial colors. Imagine serving a treat that not only satisfies a sweet tooth but also packs a nutritional punch. In this detailed recipe, I will guide you through making healthy homemade gummies that your kids will love, highlighting tips, variations, and even common mistakes to avoid along the way.
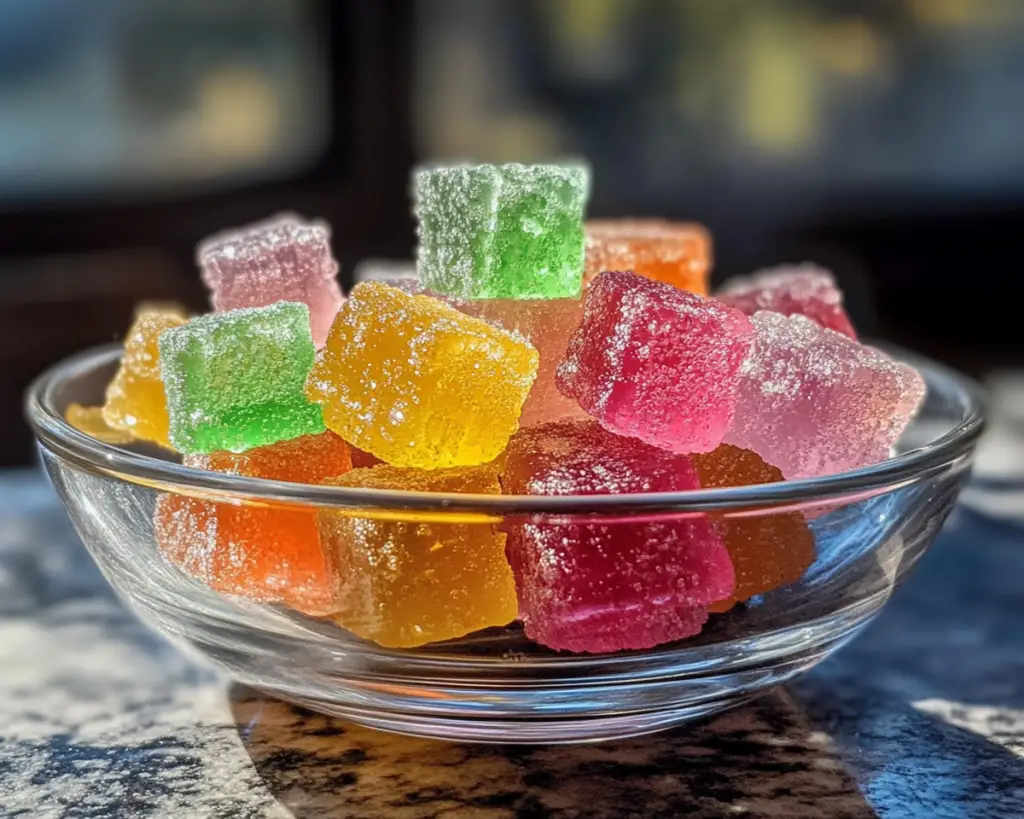
These gummies are not just fun and colorful; they offer an enjoyable blend of flavors that kids adore. Imagine using fruits like strawberries, blueberries, or even pineapple, combined with a little honey and gelatin for that chewy texture we all know and love. The minute these beauties come out of the molds, you’ll find that they disappear quickly. What’s even more exciting? You will learn how to tailor them to your family’s preferences and dietary needs, your child’s friends will keep coming back for more!
What Is Can You Make Healthy Homemade Gummies Kids Love So Much?
Healthy homemade gummies are chewy, flavorful treats made from natural ingredients, especially fruit juices and gelatin. They offer a delightful texture that kids find addictive, all while being relatively simple to prepare. The origin of homemade gummies can be traced back to playful kitchen experimentation, where the joy of cooking intersected with the desire to create healthier snack alternatives. Instead of resorting to store-bought candies that often have questionable ingredients, many parents have turned to homemade versions that can be made in the comfort of their own kitchens.
These gummies can take on any flavor your child desires, thanks to the versatility of fruit juices. The texture is unique, maintaining a chewiness that makes them not only satisfying to eat but also inviting to children. You can achieve various vibrant colors by using natural fruit purees, leaving out artificial dyes and sugars. The use of gelatin gives them that classic gummy candy mouthfeel, making them perfect for snack time or party treats.
Another appealing aspect of these homemade gummies is their customizable nature. You can experiment with different flavors, adding herbs or spices if you’re feeling adventurous. They are perfect for imaginative play with your kids, involving them in the entire cooking process—from squeezing the fresh juice to pouring the mixtures into molds.
Why You’ll Love This
There are numerous reasons why you will fall in love with this recipe. To start, the taste is undoubtedly a primary factor! These gummies burst with natural flavors, bringing a burst of sweetness without the guilt of added sugars. They are also incredibly easy to whip up; with basic ingredients and simple instructions, even a beginner in the kitchen can tackle this recipe successfully.
From a casual parent snack to a festive party treat, healthy homemade gummies are highly versatile. They can fit different occasions, making them a great addition to lunchboxes, birthday parties, or after-school snacks. Many parents assume that making gummies requires complicated processes or special ingredients, but this recipe aims to debunk that myth.
Cost-effectiveness cannot be overlooked either. By making gummies at home, you not only save money but also have control over the ingredients, ensuring everything is wholesome and suitable for your kids. Unlike commercial gummies, which may contain additives and preservatives, your homemade versions will be free from these unwanted components.
Ingredients You’ll Need
To make your healthy homemade gummies, you will need the following ingredients:
- Fruit Juice: Approximately two cups of your choice, such as orange, apple, or mixed berry. This will provide the primary flavor.
- Gelatin: About two tablespoons, preferably unflavored. This is the key component for creating the gummy texture.
- Honey or Maple Syrup: To taste, typically one to two tablespoons. This will add natural sweetness without refined sugars.
- Citric Acid: Optional, about one teaspoon. This can enhance the flavor and add a slight tartness that mirrors that of sour gummies.
- Optional Additions: Ingredients like turmeric (for color), chia seeds (for added nutrition), or even pureed spinach can be included for health benefits.
Now, let’s break down the ingredients further. The fruit juice is essential—the flavor and nutrition hinge on the quality of the juice you select. Freshly squeezed juice is best, but you can opt for 100% pure juice if time is a constraint. The gelatin is what gives gummies their chewy character, and opting for a high-quality brand can make a huge difference in texture. Honey or maple syrup is an ideal sweetener that allows for customization based on sweetness preferences. If you want to venture beyond traditional flavors, adding a bit of citric acid can mimic the taste of candies that kids love.
How to Make
Creating healthy homemade gummies is easier than you might think! Follow these steps for a delightful treat that you and your kids will adore.
- Prepare your molds: Start by selecting your molds—silicone molds are recommended for easy removal and a variety of shapes. Brush a little oil inside the molds to ensure the gummies come out smoothly when set.
- Mix the fruit juice and sweetener: In a saucepan over low heat, pour in the fruit juice of your choice. Stir in honey or maple syrup until completely dissolved. This step infuses sweetness into your base and ensures even distribution. Monitor the heat and avoid boiling, which can alter the flavor and texture.
- Bloom the gelatin: Sprinkle the gelatin over the juice mixture while stirring constantly to prevent clumping. This is a crucial step, as it allows the gelatin to dissolve effectively into the mix. Allow it to sit for about five minutes to “bloom,” where it expands in the liquid.
- Heat the mixture: Continue to gently heat the mixture while stirring until the gelatin is fully dissolved. Be patient during this step to avoid burning or boiling. Once you see a clear consistency without any lumps, the mixture is ready for the next step.
- Add any additional ingredients: If you want to incorporate flavors like citric acid or turmeric, now is the time. A pinch goes a long way for colors and tartness. Mix well and ensure everything is well combined.
- Poor into molds: Carefully pour the mixture into your prepared gummy molds. A small measuring cup or dropper can help make this process cleaner and more manageable.
- Let them set: Refrigerate the molds for at least two hours, although letting them sit overnight will yield the best texture. The longer they set, the firmer they will be!
- Unmold and store: Once set, gently remove the gummies from the molds, taking care not to break them. Store them in an airtight container in the fridge. They can last for up to two weeks—if they last that long!
As you go through these steps, you’ll notice the aroma of the fruit juice as it warms up. The transformation from liquid to gummy is an exciting process that both you and your kids can enjoy together. Plus, watching their anticipation grow as they wait for the gummies to set is half the fun!
Variations & Substitutions
Berry Blast Variation: For an exciting twist, consider using a combination of mixed berry juices such as raspberry, blueberry, and strawberry. This will not only give a more complex flavor but also a vibrant color that kids can’t resist. Just make sure the juices are unsweetened for healthier results.
Citrus Sunshine Version: For those who adore the zesty flavors of citrus, try a blend of lemon and orange juices. The tartness can be a delightful surprise paired with the sweetness of honey, making it ideal for kids who love fizzy and tangy treats. Remember, you can always add a touch of citric acid to intensify the flavor!
Veggie Infusion: To sneak in some extra nutrients, you might opt for a veggie-infused gummy. Consider blending fresh spinach or beet juice into your mixture. Both options can be quite neutral in flavor while providing vibrant color, and your kids will never guess they contain vegetables.
Gummy Bears with Probiotics: If you’d like to boost gut health, consider adding a powdered probiotic supplement to your gummy mixture. Just follow the manufacturer’s instructions for dosage, typically adding it right before pouring into molds.
Each variation not only offers a flavor change, but they also bring unique nutritional benefits, catering to different dietary preferences. Kids can play an active role in deciding the flavors they want, thus encouraging their engagement with healthy eating habits and the cooking process.
Common Mistakes to Avoid
Even simple recipes can have pitfalls, so it’s essential to be aware of what might go wrong. A common mistake is overheating the fruit juice mixture. Doing so can alter the flavors significantly and may affect the texture—ensure you keep the heat low and steady during preparation.
Another mistake is not properly blooming the gelatin. Skipping this step can lead to clumpy or unevenly textured gummies. Always allow your gelatin to bloom for the recommended time before heating to ensure it incorporates smoothly into the mixture.
Not using enough sweetener is another issue many face. If the gummies lack that balanced sweetness, it can result in a bland product. Remember that everyone’s sweetness preference varies, so adjust accordingly, especially when using more tart juices.
Finally, be cautious when pouring the mixture into molds. If you pour too quickly or from too high a distance, you may wind up with air bubbles, which can affect the final presentation. Pour slowly and use a dropper for more control when needed.
Storage, Freezing & Reheating Tips
Proper storage is vital for ensuring your homemade gummies maintain their freshness and flavor. Once you’ve successfully made your gummies, make sure to store them in an airtight container. This will prevent them from drying out or absorbing unwanted odors from the fridge.
Gummies tend to be best when eaten within two weeks, as they can lose their texture and flavor over time. If you want to extend their shelf-life, freezing is an option, but they may lose some texture when thawed. To freeze, lay them flat on a baking sheet first, then transfer them to a zip-top freezer bag, ensuring you remove as much air as possible. When ready to enjoy, simply thaw them in the fridge overnight.
Avoid freezing gummies that have any added coatings or sugar, as these won’t hold up well in the freezer. For re-heating, simply place them at room temperature to soften before consuming.
Frequently Asked Questions
Can I use powdered fruit instead of juice?
Absolutely! Powdered fruit can be an excellent alternative, especially if you cannot access fresh fruit juice. Just be mindful of the sweetness level and adjust the honey or maple syrup accordingly, since some powders may already contain additional sugars. Blending the powder with a bit of warm water can help in creating that pureed consistency.
What kind of gelatin should I use?
You can use either animal-based gelatin or vegan alternatives like agar-agar or pectin. Each type will impact the final texture. If opting for vegan alternatives, be sure to follow the manufacturer’s instructions for quantities and preparation methods, as they may differ from traditional gelatin.
Can I add vitamins or supplements?
Yes! If you’re looking to boost the nutritional profile of your gummies, adding vitamin powder is a fantastic way to do it. However, be careful to check the dosage recommended on the supplement packaging to avoid over-consumption.
Are these gummies safe for toddlers?
While homemade gummies are made from natural ingredients, caution should still be used. For toddlers, ensure that the gummies are appropriately sized to reduce choking hazards. Additionally, always supervise young children while they consume homemade treats.
How can I make them less sticky?
If you’re finding that your gummies are sticky, try dusting them with cornstarch or a little powdered sugar after they have been demolded. This can help absorb some moisture and provide a delightful finish, making them easier to handle and eat.
Conclusion:
Healthy homemade gummies offer not only a pathway to delicious snacks that kids adore but also an opportunity to engage them in cooking and making healthier choices. The flexibility in flavors, easy preparation, and the joy of customizing them to fit your family’s preferences make this recipe a favorite. I encourage you to try making these gummies, adapting them with various flavors, and discovering new combinations to share with your loved ones. You’ll find joy in the creative process while knowing you are providing a nutritious treat that everyone can enjoy, so start molding those yummy bites today!