Prep time: 30 minutes
Cook time: 0 minutes
Total time: 4 hours (includes chilling time)
Servings: 12-15
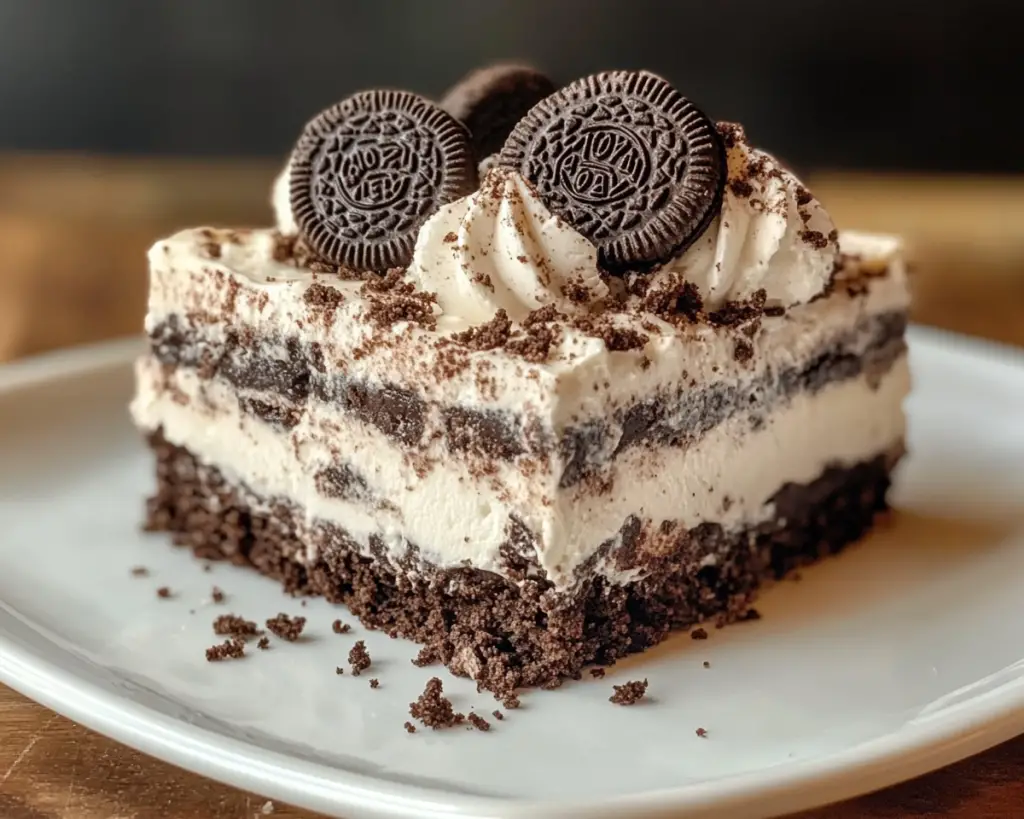
Indulging in a delightful dessert can evoke a sense of joy and nostalgia, especially when it comes to a rich and decadent treat like Creamy Oreo Dirt Cake. This easy no-bake dessert not only satisfies your sweet tooth, but it also brings back fond memories, whether it’s celebrations with family or a casual get-together with friends. The layers of creamy filling and crunchy Oreo crumbs represent the perfect balance of textures, making every bite a delightful adventure. In this article, we’ll explore how to make this tempting dessert while considering tips and variations you can try to customize it to your preferences.
With simple ingredients and a straightforward preparation process, this recipe guarantees satisfying results without asking much of your time. You’ll discover that making this cake is surprisingly quick and does not require an oven. Moreover, it’s an ideal choice for busy parents, novices in the kitchen, or anyone looking to whip up something delicious without breaking the bank. Get ready to bring home the warmth of this crowd-pleaser.
What Is Creamy Oreo Dirt Cake Recipe – Easy No-Bake Dessert Idea?
Creamy Oreo Dirt Cake is a timeless dessert that creatively uses the iconic Oreo cookie, combining its chocolatey crunch and rich cream filling with layers of smooth, creamy pudding. Originating from various home kitchens in the United States, this no-bake cake is often served at birthdays, picnics, and family gatherings, showcasing its versatility and appeal across different occasions.
The **texture** of this dessert is one of its standout features. You’ll experience the delightful contrast of crunchy crushed Oreos and the silky smoothness of the cream cheese and whipped cream filling. The flavor is reminiscent of chocolate ice cream, with the unmistakable taste of Oreos punctuating each bite. Whether you’re young or just young at heart, this dessert is sure to win over your taste buds like a comforting hug from your favorite childhood memories.
Beyond just flavor and texture, Creamy Oreo Dirt Cake is a canvas for creativity. You can easily alter the flavors or presentation to suit your style or to accommodate dietary preferences, and the recipe is forgiving enough to allow for some improvisation. With or without a proper baking setup, you can create this dish with ease, making it perfect for anyone in the kitchen.
Why You’ll Love This
You will love Creamy Oreo Dirt Cake for many reasons. Firstly, the **taste** is delightful; imagine the sweet, delectable amalgamation of chocolate cookies combined with a rich, silky filling that marries perfectly to tantalize your taste buds. Secondly, it is extremely easy to make. If you’re a novice in the kitchen or simply stretched for time, this no-bake treat can be prepared in just 30 minutes. You won’t have to worry about baking times or complicated techniques.
Additionally, this dessert is budget-friendly. You can serve a crowd without spending a fortune. The ingredients are generally affordable and easy to find. Furthermore, the dish is versatile — you can dress it up with various toppings such as whipped cream, chocolate shavings, or even gummy worms for a fun, festive touch.
People may think that no-bake desserts lack depth, but this is not the case here! The multiple layers of creamy filling and crunch provide a satisfying sensory experience that is anything but bland. Just ensure you allow adequate chilling time for the flavors to meld beautifully.
Ingredients You’ll Need
To prepare Creamy Oreo Dirt Cake, gather the following ingredients:
- Oreo cookies: About 24-30 cookies are needed. These will serve both as the base and topping. You can use standard chocolate Oreos or even try different flavors for a unique twist.
- Cream cheese: 8 ounces, softened. This will create a rich and creamy filling that blends beautifully with the other ingredients.
- Powdered sugar: 1 cup. This adds sweetness and also helps to thicken the filling.
- Whipped topping: 8 ounces, such as Cool Whip. This contributes to the light, airy texture of the dessert.
- Milk: 1 cup. Make sure it’s cold; this will be mixed with the instant pudding.
- Instant chocolate pudding mix: 1 package (3.9 ounces). This will add flavor and richness.
- Optional toppings: Additional Oreos, chocolate shavings, or gummy worms for a fun touch. You can customize these based on preference or theme.
Each ingredient plays a crucial role. The Oreo cookies lay down the cake’s foundation and provide a distinctive flavor. The cream cheese and whipped topping create a creamy texture that complements the crunchy layers while the powdered sugar enhances the sweetness. The instant pudding mix thickens the filling, allowing for a satisfying bite. Keep in mind that you can substitute different flavors of pudding or cookies to explore various taste combinations while keeping the basic structure intact.
How to Make
Follow these step-by-step instructions to create your Creamy Oreo Dirt Cake:
- First, finely crush the Oreo cookies. You can do this by placing them in a food processor or placing them in a zippered bag and using a rolling pin. Finely crushed cookies should resemble sand. Reserve about 1 cup of these crumbs for garnishing at the end.
- In a mixing bowl, combine the softened cream cheese and powdered sugar. Use an electric mixer to beat them together until the mixture is smooth and creamy. Take your time to ensure that there are no lumps remaining. This step is crucial for achieving a smooth filling.
- Next, add the whipped topping to the cream cheese mixture. Fold it in gently using a spatula to maintain the light texture of the whipped cream. Be careful not to overmix, as you want to keep that airy feeling.
- In another bowl, combine the milk and instant chocolate pudding mix. Whisk them together until the mixture thickens, typically about 2-3 minutes. You want it to reach a good consistency, so it holds together in the cake.
- Now it’s time to combine the pudding with the creamy mixture. Gently fold the pudding into the cream cheese mixture until evenly combined. This creates an irresistibly creamy filling.
- In a 9×13-inch dish, start layering your dessert. Begin with half of the crushed Oreo cookies at the bottom. Then, top with half of the creamy filling. Spread it evenly, allowing it to reach the corners of the dish.
- Repeat the layers with the remaining crushed Oreos and cream filling. Smooth the top with a spatula for a clean presentation.
- Finally, sprinkle the reserved Oreo crumbs on top as a final touch. Optionally, you can add other toppings like chocolate shavings or even gummy worms for a fun twist.
- Cover the dish with plastic wrap or foil and set it in the refrigerator for at least 4 hours, preferably overnight. This chilling time allows the flavors to meld beautifully, creating a guilt-free indulgence.
Once you’ve allowed the cake to set, it’s ready to slice and serve. Enjoy each creamy, crunchy bite of this heavenly dessert!
Variations & Substitutions
Chocolate Lovers’ Delight: For those who simply can’t get enough chocolate, consider adding melted chocolate or chocolate ganache to the filling. You can either substitute some of the milk with melted chocolate or drizzle it on top for an extra intense chocolate experience. Using chocolate-flavored pudding instead of standard chocolate can deepen the flavor profile.
Health-Conscious Option: If you’re looking for a lighter version, consider substituting the cream cheese and whipped topping with Greek yogurt. It gives the cake a tangy taste while slashing some calories. Use reduced-fat Oreos for the crust as well. You can also experiment with sugar substitutes if you’re adhering to strict dietary guidelines.
Fruity Layers: Introduce some fruit for a refreshing twist. Strawberry or raspberry preserves can be layered in between the Oreo layers. Alternatively, you can fold in chopped fruit, such as strawberries or blueberries, in the creamy mixture for a delightful surprise with every bite.
Cake Pops: Transform the dirt cake into fun cake pops! After preparing the dessert, instead of layering it in a dish, crumble it into a bowl and mix it with a little extra cream cheese. Form small balls and dip them in melted chocolate for a treat that’s perfect for parties or gatherings.
Vegan Delight: To create a vegan version, use vegan cream cheese and coconut whipped topping. Look for dairy-free Oreos to complete the vegan-friendly approach while still achieving that satisfying Oreo taste. The recipe will remain dairy-free while still delivering that dreamy texture.
These variations offer something for everyone. Feel free to mix and match based on dietary preferences, occasions, or seasonal ingredients.
Common Mistakes to Avoid
When making Creamy Oreo Dirt Cake, several common mistakes can detract from the final result. One frequent issue is not allowing the cake to chill adequately. Not giving it enough time in the fridge means that the layers may not set properly, leading to a runny mess. Always allow for proper chilling of at least 4 hours; overnight is ideal.
Another mistake is being too hasty when mixing the cream cheese and powdered sugar. Ensure that the cream cheese is at room temperature before you begin mixing. This ensures a smooth texture without lumps. Also, refrain from overmixing when combining the whipped topping and cream cheese mixture. This can deflate the whipped cream, making the filling overly dense rather than light and creamy.
Lastly, failing to properly crush the Oreos can impact the overall texture. Aim for very fine crumbs for better layering. If your crumbs are too chunky, they won’t adhere well to the filling, detracting from the luxurious experience.
Storage, Freezing & Reheating Tips
Creamy Oreo Dirt Cake can be stored in the refrigerator for up to 5 days. Be sure to cover it well to prevent any odors from the fridge affecting its flavor. If you want to prepare it ahead of time, it can be served as a delicious make-ahead dessert for parties or gatherings.
If you find yourself with leftover cake, this dessert can also be frozen for up to two months. Slice it into individual portions before freezing for easy serving later. When you’re ready to enjoy it again, simply transfer it to the refrigerator to thaw overnight. Reheating is not necessary, as the cake is best enjoyed chilled.
When freezing, avoid adding any fresh fruit toppings until just before serving, as freezing can affect their texture.
Frequently Asked Questions
Can I use low-fat cream cheese and whipped topping in this dessert?
Yes, you can absolutely use low-fat versions of cream cheese and whipped topping. While the texture may vary slightly, it still yields a tasty dessert that’s a bit healthier. Just ensure they are both softened before mixing to maintain a creamy consistency.
What if I made the cake a day in advance? Is that okay?
Absolutely! In fact, it is often recommended to prepare it a day before serving. This extra time allows the flavors to develop and meld together, resulting in a more delicious dessert. Just be sure to store it properly in the refrigerator.
Can I use a different type of cookie besides Oreos?
Certainly! Feel free to get creative! You can substitute with chocolate sandwich cookies, graham crackers, or even gluten-free cookies. Each option will bring its unique flavor profile while still delivering a delectable dessert.
Is this dessert suitable for a birthday party? Can I customize it for a theme?
Definitely! Creamy Oreo Dirt Cake makes for an excellent birthday party dessert. You can customize it by adding themed toppings such as sprinkles, fruit-based toppings, or even miniature toys for a fun feel when serving to kids. You can also create mini versions in cups for easy serving.
Can I make a gluten-free version of this cake?
Yes, you can create a gluten-free version by using gluten-free Oreo cookies. Many brands offer gluten-free options, so you won’t miss out on the delicious flavor. Combine them with gluten-free pudding for a delightful cake that accommodates dietary needs.
Conclusion:
Creamy Oreo Dirt Cake is a wonderfully simple yet indulgent dessert that you can whip up in no time. Its layers of crunchy Oreos and silky filling create an experience that encourages sharing and enjoyment among family and friends. Whether you choose to stick with the classic recipe or explore the fun variations discussed, you can make this dessert your own. Don’t hesitate to try it out, and remember that customizing it adds to the joy of cooking. Your next gathering fortresses delicious memories, so gather your loved ones and indulge in this exceptional treat. Happy baking!