Prep time: 30 minutes
Cook time: 50 minutes
Total time: 1 hour 20 minutes
Servings: 8
There’s something about the aroma of fresh cheesecake wafting through your home that brings comfort and joy. The creamy texture and rich flavor of a perfectly baked cheesecake can whisk you back to cherished memories of family gatherings or special occasions. Today, I’m sharing a remarkable recipe for a **Creamy Burnt Cheesecake**, a dessert that promises to impress with its unique flavor profile and surprisingly easy prep. Perfect for busy parents, newbies in the kitchen, or anyone simply looking to indulge their sweet tooth, this recipe balances simplicity with an extraordinary taste that’s bound to leave your guests impressed.
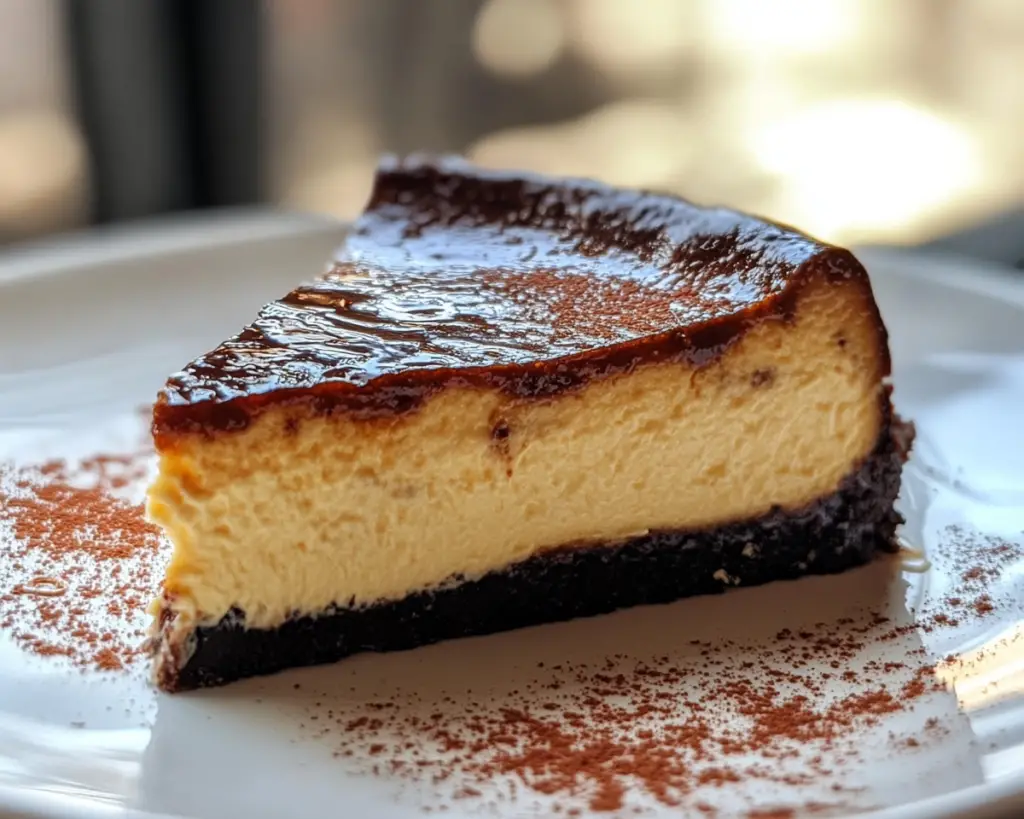
This cheesecake is special because of its delightful combination of a creamy interior with a beautifully charred top. Less of a cake and more a testament to culinary ease, it marries rich flavors with a textural contrast, ensuring each bite is a heavenly experience. As you follow along, you’ll discover how the flavors meld beautifully, creating a dish that can quickly become your go-to dessert. Trust me, once you master this **Creamy Burnt Cheesecake**, it will earn a permanent spot in your dessert rotation.
What Is Creamy Burnt Cheesecake Recipe – Best Easy Dessert for Sweet Treats?
The **Creamy Burnt Cheesecake** hails from the Basque region of Spain, specifically a restaurant called La Viña in San Sebastián, where it first gained popularity. Unlike traditional cheesecakes, which typically have a crust, this one allows the creamy filling to shine in all its glory. As it bakes, the top develops a rustic, burnt layer, which contrasts brilliantly with the smooth, silky interior. This burnt exterior isn’t a cooking flaw; it’s an intentional aspect, contributing a caramelized flavor that complements the sweetness of the cheesecake.
The texture of this cheesecake can be described as luxuriously smooth and velvety, a notable departure from the denser New York-style cheesecakes. When you take your first bite, you’ll experience an indulgent sweetness balanced by a hint of bitterness from the caramelization. Each mouthful melts in your mouth and leaves an unforgettable aftertaste lingering on your palate. The simplicity of the ingredients makes this recipe a favorite among home bakers, and it’s incredibly adaptable, so everyone can personalize it to their liking.
Why You’ll Love This
There are several reasons why this **Creamy Burnt Cheesecake** becomes a beloved staple. First and foremost, the taste is simply divine. The combination of cream cheese, sugar, eggs, and heavy cream creates an unforgettable flavor profile that’s unmatched. Secondly, the ease of preparation makes this a favorite among those who may not have extensive baking experience. You don’t need to worry about complicated techniques or stressful steps.
It’s also budget-friendly, as it relies on just a few simple ingredients you might already have on hand. And if you’re health-conscious, you can make adjustments, such as using low-fat cream cheese or substituting some sugar with natural sweeteners. Moreover, the cheesecake can be made ahead of time, making it perfect for busy weeknights or special occasions, reducing last-minute stress.
Commonly, people think that dessert has to be elaborate and time-consuming, but this cheesecake flips that notion upside down. The delightful taste and surprisingly easy method boost your confidence in the kitchen.
Ingredients You’ll Need
- 2 cups cream cheese: The star of the show; use full-fat cream cheese for the best results. Low-fat versions might alter the texture.
- 1 cup granulated sugar: Sweetens the cheesecake; feel free to use coconut or brown sugar for unique flavors.
- 3 large eggs: Provides structure and stability to the cheesecake; make sure they are at room temperature.
- 1/4 cup heavy cream: Adds richness and moisture; alternatively, you can use sour cream for a bit of tang.
- 1 teaspoon vanilla extract: Enhances overall flavor; stick to pure vanilla for a more robust aroma.
- Salt: A pinch helps balance the sweetness and enhances the overall flavor.
Each ingredient plays a critical role in crafting the creamy texture and rich flavor profile of the cheesecake. While all these ingredients are commonly available, they can also be adapted to accommodate dietary preferences without losing the fundamental essence of the dessert.
How to Make
To create this dreamy **Creamy Burnt Cheesecake**, follow these detailed steps.
- Preheat your oven: Start by preheating your oven to 400°F (200°C). A well-heated oven ensures even cooking and helps achieve that beautiful burnt top. While the oven is warming, you can prepare the batter.
- Prepare your mixing bowl: In a large mixing bowl, combine the cream cheese and granulated sugar. Using a hand mixer or stand mixer on medium speed, blend until it’s airy and creamy. Ensure there are no lumps; this step is crucial for a smooth cheesecake.
- Add eggs one at a time: Crack the eggs into the bowl, one at a time, blending well after each addition. This will help create an even mixture. Remember not to overmix; just blend until incorporated.
- Incorporate heavy cream: Slowly pour in the heavy cream and continue mixing until the batter is fully combined and creamy. This gives the cheesecake its rich flavor. Add in the vanilla extract and a pinch of salt, blending just until mixed.
- Prepare the baking dish: Line a 9-inch round springform pan with parchment paper. Allow the paper to hang over the sides so that removing the cheesecake is easier later on. This will also prevent it from sticking.
- Pour in the batter: Carefully pour the cheesecake mixture into the prepared pan. Gently tap the pan on the counter to remove any air bubbles trapped in the batter. Popping these bubbles will help achieve a smoother top.
- Bake: Place the cheesecake in the preheated oven and bake for about 50 minutes, or until the top is deeply browned and the center is slightly jiggly. Start checking around 40 minutes if your oven runs hot. Take it out and let it cool at room temperature.
- Chill: Once it has cooled to room temperature, refrigerate it for at least 4 hours, preferably overnight. This helps the flavors meld beautifully and gives a firmer texture for slicing.
- Serve: When ready to serve, carefully run a knife around the edge of the cheesecake before removing the sides of the springform pan. Slice and enjoy the creamy richness paired with its caramelized top. Enjoy!
Each step in the process ensures that you have a cheesecake that not only looks stunning but also tastes luxurious. The key is patience; letting it chill in the refrigerator allows flavors to develop wonderfully.
Variations & Substitutions
Chocolate Burnt Cheesecake: For a chocolate-infused version, swap out 1/4 cup of cream cheese for unsweetened cocoa powder. This creates a rich chocolate flavor that pairs beautifully with the burnt top. Additionally, consider folding in chocolate chips into the batter for added texture. Perfect for chocolate lovers wanting a twist on the classic.
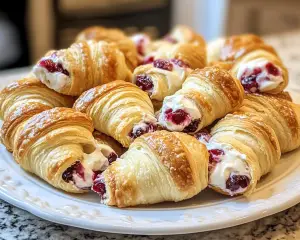
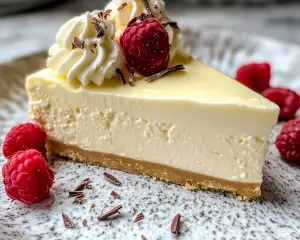
Fruit-Topped Burnt Cheesecake: Elevate your cheesecake with a layer of freshly sliced fruits like strawberries, raspberries, or blueberries. After chilling, add a beautiful topping of fruit to cut through the richness. This not only provides health benefits but looks stunning, making it an ideal dessert for gatherings.
Vegan Burnt Cheesecake: If you need a plant-based alternative, you can make a vegan version using soaked cashews blended with coconut cream and a sweetener of your choice. This variation maintains the creamy texture and can be flavored with a hint of lemon or vanilla for added zest.
Low-Carb Burnt Cheesecake: For those on a keto or low-carb diet, use a sugar substitute like erythritol in place of granulated sugar. Substituting full-fat cream cheese for a low-fat version may be tempting, but it could alter the texture, so exercise caution.
Each variation provides a unique twist while retaining the essence of the original recipe, making it versatile for different palate preferences.
Common Mistakes to Avoid
A few pitfalls can lead to less-than-perfect results when making a **Creamy Burnt Cheesecake**. One of the most common issues is overmixing the batter. Remember, once the eggs are added, you should mix just until combined. Overmixing can introduce too much air, leading to cracks in the finished product.
Another critical mistake is not allowing the cheesecake to cool properly. Patience is key; if you cut into it too soon, it won’t set correctly, causing it to be too runny. Always let it chill in the refrigerator for a minimum of 4 hours, allowing it to reach its ideal creamy texture.
Ensure that your oven is preheated and evenly heated throughout the baking time. Using an oven thermometer can really help gauge the accuracy. An uneven temperature can lead to improperly baked cheesecake.
Lastly, always line your baking pan with parchment paper to prevent sticking and ensure a beautiful removal once it’s ready to be served. Failing to do so could result in a messy presentation.
Storage, Freezing & Reheating Tips
To maintain the integrity of your **Creamy Burnt Cheesecake**, it’s important to follow proper storage practices. Store any leftovers in the refrigerator, tightly covered with plastic wrap or in an airtight container. It should stay fresh for up to 5 days. If you make the cheesecake ahead of time, it’s perfectly fine to keep it chilled for a day before serving.
If you want to store it for a longer period, consider freezing it. Wrap the cheesecake tightly in plastic wrap followed by aluminum foil. It can last in the freezer for up to a month without compromising flavor. When you’re ready to enjoy a frozen slice, allow it to thaw in the refrigerator overnight rather than at room temperature to prevent sogginess.
When it comes to reheating, many prefer to enjoy this cheesecake cold, straight from the fridge. However, if you’d prefer, you can gently warm it in a low oven setting or microwave in 10-second intervals, but be cautious not to overheat it.
Frequently Asked Questions
Can I double the recipe? Yes, absolutely! Doubling the recipe will yield two cheesecakes, but ensure that you adjust your baking time accordingly. Use two separate pans or a larger one if you have it available. Just keep an eye on the baking time to avoid overcooking.
Why does my cheesecake crack? Cracking often occurs due to overmixing or baking at too high a temperature. To minimize cracks, remember to mix gently after adding eggs and consider baking at a lower temperature if your oven runs hot.
Can I use light cream cheese? You can, but keep in mind that **light cream cheese** may alter the texture and creaminess of the cheesecake. If you’re looking for a healthier option, consider using a combination of cream cheese and Greek yogurt instead.
What’s the best way to serve this cheesecake? This cheesecake is delightful on its own, but you can enhance the experience by topping it with fresh fruit, whipped cream, or a drizzle of caramel or chocolate sauce. Each addition can elevate the flavors while maintaining the cheesecake’s integrity.
How do I know when my cheesecake is done? The cheesecake should have a lightly browned top with a slight jiggle in the center. It will continue to set as it cools. If it appears too loose and wobbly in the center, bake it a few additional minutes, but check frequently to avoid overcooking.
Conclusion:
This **Creamy Burnt Cheesecake** is not only a delightful dessert but also an easy recipe to master. With its rich flavor, elegant presentation, and comforting texture, it has all the elements that make it an irresistible treat. Encourage yourself to try this recipe, serve it to family and friends, or even customize it to showcase your personal flair. No matter how you choose to enjoy it, I assure you, this cheesecake will be a crowd-pleaser. Dive into the wonderful world of baking and let each slice warm your heart!