**Prep Time:** 15 minutes
**Cook Time:** 0 minutes
**Total Time:** 15 minutes
**Servings:** 16 bars
When you think of sweet treats, there are certain combinations that immediately come to mind, and peanut butter and chocolate are two classic flavors that resonate with so many. Buckeye Graham Cracker Bars are a delightful no-bake dessert that not only caters to the cravings of peanut butter lovers but also showcases a celebratory flair that’s hard to resist. Based on the iconic Buckeye candy from Ohio, these bars make the perfect indulgence for family gatherings, casual get-togethers, or simply when you want a quick and satisfying snack.
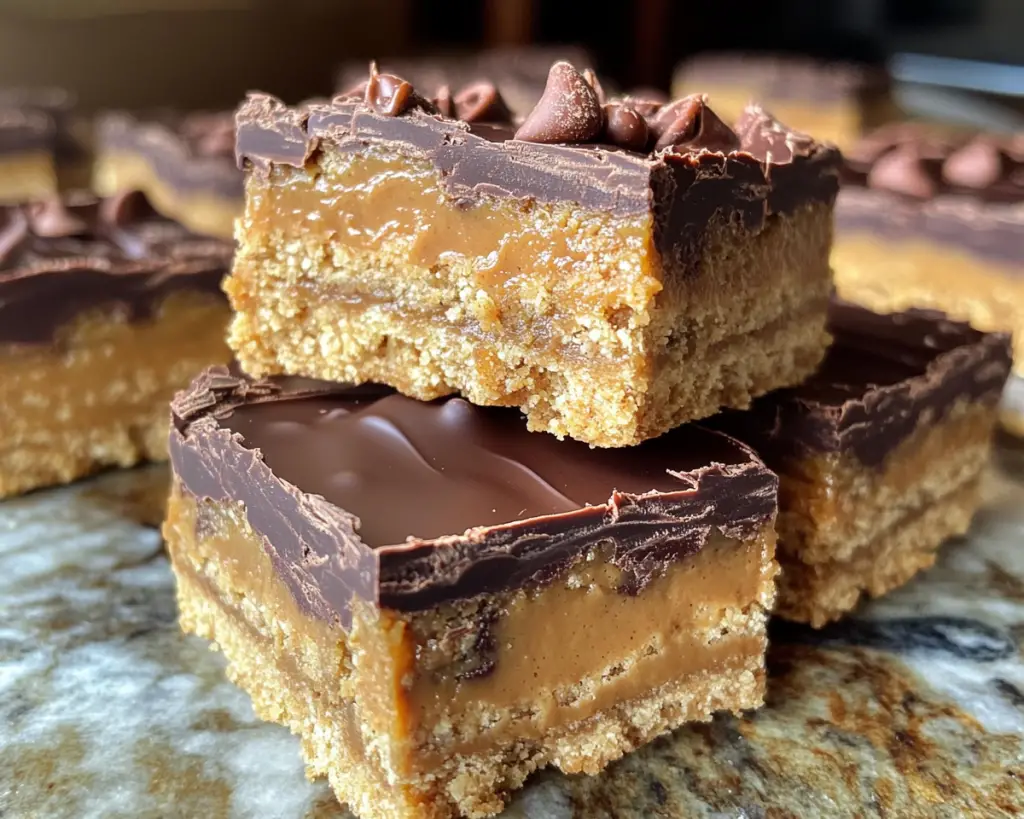
Imagine sinking your teeth into a crunchy graham cracker base topped with a luscious, creamy peanut butter mixture and coated with a rich chocolate layer. It’s a sequence of textures: the crispness of the graham crackers, the smooth, nutty filling, and the velvety chocolate that gives way as you bite down. Best of all, these bars are as easy to make as they are to indulge in.
In this article, I will guide you through every step of making these Easy Buckeye Graham Cracker Bars. You’ll discover tips on how to make the best flavor combinations, variations, and even crucial mistakes to avoid in this simple yet satisfying treat.
What Are Easy Buckeye Graham Cracker Bars?
Easy Buckeye Graham Cracker Bars are a deliciously simple dessert that combines the flavors of peanut butter and chocolate in a format that’s quick to prepare and highly satisfying. The base consists of graham crackers, which provide a subtle sweetness and a nice crunch. These are layered with a creamy peanut butter filling, made primarily from peanut butter, powdered sugar, and butter, resulting in a rich and smooth texture. The bars are then topped with a smooth layer of melted chocolate that firmly sets as it cools, creating a satisfying shell that complements the softness of the peanut butter layer underneath.
Originating from the Buckeye candy tradition, which showcases a similar flavor profile, these bars take a more straightforward approach, offering an easy-to-prepare version that doesn’t require any baking. The name Buckeye comes from the nuts of the Aesculus glabra tree, resembling the candy in color and size. This delightful dessert captures the essence of those classic candies while using everyday ingredients readily available in most pantries.
In essence, these bars offer a converging celebration of two beloved flavors that evoke nostalgic memories of childhood and comfort. Whether you are preparing them for a party or treating yourself after a long day, these bars are sure to bring smiles and satisfaction.
Why You’ll Love These Easy Buckeye Graham Cracker Bars
There are countless reasons to love Easy Buckeye Graham Cracker Bars, but here are a few key highlights:
– **Taste Explosion:** The combination of rich, creamy peanut butter and smooth chocolate offers a sensational flavor experience that many people adore. It’s an irresistible partnership that works brilliantly in this no-bake format.
– **Simplicity:** These bars are incredibly easy to prepare. With no baking required, you can whip them up in about 15 minutes, making them perfect for busy parents or those who want a quick dessert solution.
– **Cost-Effective:** The ingredients for these bars are relatively inexpensive. Grahams, peanut butter, butter, powdered sugar, and chocolate chips are pantry staples for many, making these bars an economical yet delightful treat.
– **Versatility:** You can customize these bars to suit dietary preferences. Whether you are gluten-free, vegan, or simply want to switch up the flavors, there are numerous ways to enjoy these bars while keeping them delicious.
– **No-Fuss Clean-Up:** Because this recipe doesn’t require cooking, clean-up is a breeze! Just a few mixing bowls and pans make for minimal hassle.
– **Impressive Presentation:** Although they are simple to make, these bars present beautifully. They can be cut into neat squares, making them perfect for serving at events or sharing with friends and family.
By combining ease, taste, and presentation, these Easy Buckeye Graham Cracker Bars tick all the boxes for a delightful homemade treat that everyone will appreciate.
Ingredients You’ll Need
To create your own Easy Buckeye Graham Cracker Bars, you will need the following ingredients:
– **Graham Crackers (9 sheets):** The base layer gives a satisfying crunch and a slightly sweet flavor. You can substitute gluten-free graham crackers if you’re avoiding gluten.
– **Creamy Peanut Butter (1 cup):** The star of this dessert, creamy peanut butter forms the foundation of the filling. Opt for a natural brand without added sugars for a cleaner taste.
– **Powdered Sugar (1 cup):** This sweetener not only flavors the filling but also gives it a thick, creamy texture. If desired, you can use a sugar substitute for a lower-calorie version.
– **Unsalted Butter (½ cup, softened):** This adds a creamy richness to the peanut butter layer. For a dairy-free alternative, use coconut oil.
– **Semi-Sweet Chocolate Chips (1 cup):** Used for the top layer, these create a glossy finish and an additional layer of sweetness. You can also opt for dark chocolate for a richer taste or milk chocolate for a sweeter palate.
– **Vanilla Extract (1 teaspoon):** This optional ingredient elevates the flavor profile of the peanut butter filling, making it even more scrumptious.
– **Sea Salt (pinch):** A touch of salt enhances the flavor of both chocolate and peanut butter, balancing the sweetness perfectly.
Each ingredient plays a crucial role in creating that luscious flavor we’ve all come to love. Feel free to explore alternatives for any specific dietary needs.
How to Make Easy Buckeye Graham Cracker Bars
Creating these delightful bars is as easy as following these simple steps:
1. **Prepare Your Pan:** Start by greasing a 9×9-inch square baking dish or line it with parchment paper, leaving some overhang to make removal easier later. This will prevent sticking and ensure easy lifting of your bars later on.
2. **Crush the Graham Crackers:** Place the graham crackers in a large mixing bowl or a gallon-sized zip-top bag. Use a rolling pin, or a food processor if available, to crush them into fine crumbs. You’ll want about 1 and ½ cups of crumbs. Keep a few larger pieces aside if you like a bit of texture in your crust.
3. **Mix the Base:** In a separate bowl, combine the crushed graham crackers with 3 tablespoons of melted butter (reserve the remaining butter for later) and a pinch of sea salt. Mix until the crumbs are fully coated and starting to clump together. The mixture should hold together when pressed between your fingers.
4. **Press the Crust:** Pour the crumb mixture into the prepared baking dish, and press it firmly into an even layer at the bottom. You can use the back of a measuring cup or your hands to make sure it’s compact. This step is crucial for a sturdy base.
5. **Make the Peanut Butter Filling:** In another bowl, blend the creamy peanut butter, the remaining softened butter, and powdered sugar. If using vanilla extract, add it in as well. Mix until you achieve a smooth and creamy consistency, making sure all the ingredients are evenly incorporated.
6. **Spread the Filling:** Using a spatula, evenly spread the peanut butter mixture over the crust. Make sure to smooth it out evenly for an inviting presentation. Press it down a bit to ensure it adheres well to the graham cracker base.
7. **Melt the Chocolate:** In a microwave-safe dish, melt the chocolate chips. Start by microwaving at 30-second intervals, stirring in between until the chocolate is completely melted and smooth. Be careful not to overheat the chocolate, as it can seize.
8. **Coat the Bars:** Pour the melted chocolate over the peanut butter layer and spread it evenly to cover the entire surface. Use the spatula to create an even chocolate layer that looks glossy and inviting.
9. **Chill and Set:** Place the dish in the refrigerator for at least 2 hours or until the chocolate is firm. Chilling allows the layers to set correctly and makes cutting the bars much easier.
10. **Cut and Serve:** Once set, use the overhanging parchment paper to lift the bars out. Cut them into squares or rectangles, and enjoy your homemade treat!
Feel free to share this recipe with family and friends or keep it all to yourself — we won’t judge!
5 Variations & Substitutions
Making Easy Buckeye Graham Cracker Bars is a delicious endeavor, but don’t hesitate to put your personal twist on them! Here are five variations and substitutions to consider:
1. **Nut Butter Swap:** If you’re allergic to peanuts or simply prefer other nut butters, you can easily swap peanut butter for almond butter, cashew butter, or even sunflower seed butter for a nut-free option. Each nut butter will impart a different flavor and consistency, but will still yield delicious results.
2. **Vegan Version:** For a vegan version of these bars, use plant-based butter instead of regular butter and choose dark chocolate chips without dairy. Opt for organic powdered sugar to ensure it’s vegan-friendly. The overall taste remains rich and flavorful while catering to various dietary restrictions.
3. **Chocolate Drizzle:** For an extra touch of elegance, consider adding a chocolate drizzle on top of your set bars. Use a small amount of melted chocolate and a fork to create a zig-zag pattern over the chocolate layer for a beautiful finishing touch that enhances both the look and flavor.
4. **Crunchy Texture:** For those who enjoy a bit of crunch, mix some mini chocolate chips or chopped nuts (like walnuts or pecans) into the peanut butter layer. This will add not only texture but also an additional flavor dimension that makes each bite satisfying.
5. **Flavored Chocolate:** Switch up the regular semi-sweet chocolate chips with flavored choices like dark chocolate, white chocolate, or even mint chocolate for a refreshing twist. Altering the chocolate coating can completely change the personality of the bars while still maintaining that beloved peanut butter flavor.
These variations allow for creativity in the kitchen while keeping the core of the recipe intact, making it easier to accommodate everyone’s tastes.
Common Mistakes to Avoid
While making Easy Buckeye Graham Cracker Bars is relatively simple, a few common pitfalls can lead to unsatisfactory results:
– **Overheating the Chocolate:** When melting chocolate, it’s crucial to do so in short intervals. **Overheating the chocolate can cause it to seize**, resulting in a grainy texture. When melting, use lower power settings in the microwave and stir frequently to keep the heat evenly distributed.
– **Using Insufficiently Softened Butter:** If you don’t allow your butter to soften before mixing it into the peanut butter layer, you risk ending up with lumps. **Microwaving butter can help** but be cautious — a second too long could melt it completely. Ideally, let it sit at room temperature for at least 30-60 minutes before you begin.
– **Not Pressing the Crust Firmly Enough:** A loosely packed crust may crumble when you cut the bars. Don’t shy away from using your hands or a flat-bottomed object to pack the base firmly into the dish. **A solid crust will help support the heavier peanut butter layer on top.**
– **Skipping the Chill Time:** While it can be tempting to dig in right away, **allowing the bars to chill is crucial**. This helps set the chocolate and allows the flavors to meld beautifully. Without properly chilling, the bars may become messy and difficult to cut.
– **Cutting Too Soon:** Trying to cut the bars before they have fully set is a common mistake. Allow them to chill thoroughly — extending beyond 2 hours may be necessary depending on the thickness of your chocolate layer. Waiting will yield cleaner cuts and a more visually appealing presentation.
By keeping these tips in mind, you can successfully prepare these scrumptious bars without any hiccups!
Storage, Freezing & Reheating Tips
To ensure your Easy Buckeye Graham Cracker Bars remain fresh and delicious, follow these storage and freezing guidelines:
– **Storage:** Keep the bars stored in an airtight container to maintain their freshness. They can be simply stored at room temperature for 2-3 days, or you can refrigerate them for up to one week. Make sure to separate layers with wax paper if stacking them to avoid stickiness.
– **Freezing:** For longer storage, you can freeze the bars. Wrap them tightly in plastic wrap and then place them in an airtight container or freezer-safe bag. They can last in the freezer for up to 2 months. When ready to enjoy, simply remove them from the freezer and let them thaw on the counter for about 30 minutes before serving.
– **Reheating:** While these bars are best enjoyed chilled or at room temperature, you may gently warm them in a microwave for just a few seconds if you prefer a slightly gooey core. Be careful not to overheat, as this could melt the chocolate completely.
By following these tips, you can prolong the enjoyment of these delightful treats well beyond the initial preparation.
Frequently Asked Questions
**1. Can I make these bars gluten-free?**
Absolutely! You can use gluten-free graham crackers as a substitute for regular ones. Many brands now offer gluten-free options that maintain similar taste and texture, ensuring that the bars remain delicious for those with gluten sensitivities.
**2. Can I use crunchy peanut butter instead of creamy?**
Yes, you can certainly use crunchy peanut butter! It will add a delightful texture to the filling, making these bars even more interesting. The flavor remains unchanged, and you may find that you enjoy the added crunch with the smooth chocolate layer on top.
**3. How do I know when the chocolate is melted enough?**
The chocolate should be completely melted but just warm, not hot. Stirring frequently while microwaving ensures you keep a check on its consistency. If you see a few lumps remaining, stir continuously until it becomes smooth.
**4. Can I use a different type of chocolate?**
Definitely! You can switch out semi-sweet chocolate for milk chocolate, dark chocolate, or even white chocolate, depending on your flavor preference. Each type of chocolate will bring a different sweetness level, balancing with the peanut butter filling in unique ways.
**5. How can I make these bars more festive?**
To give these bars a festive touch, consider drizzling them with colored chocolate melts for special occasions or holidays. Adding a sprinkle of sea salt or crushed nuts on top can also enhance the presentation and flavor.
In conclusion, Easy Buckeye Graham Cracker Bars are a delightful treat that combines the rich flavors of peanut butter and chocolate in a beautifully simple package. Whether you’re serving them to guests, packing them in lunchboxes, or simply enjoying them with your favorite beverage, they deliver comfort and joy. Don’t be afraid to customize with your favorite variations, and remember that the best part of homemade treats is the love and creativity you pour into making them. Give this recipe a try, and get ready to savor every delectable bite! If you liked this recipe, feel free to explore other quick and easy dessert recipes that keep the good times rolling. Happy baking!