### Prep Time
15 minutes
### Cook Time
0 minutes
### Total Time
15 minutes
### Servings
8 servings
When it comes to dessert, nothing hits the spot quite like a creamy, indulgent pie. If you’re a fan of peanut butter and chocolate, you’re in for a treat with this easy No Bake Peanut Butter Pie with Oreo Crust! This pie is perfect for busy parents, last-minute gatherings, or anyone looking for a quick yet delicious treat. You’ll love how simple it is to whip up, and the flavors are absolutely divine.
Imagine a velvety peanut butter filling resting atop a crunchy oreo crust that adds the perfect contrast in texture. This dessert not only showcases a classic flavor combination but is also utterly satisfying. By the end of this article, you’ll have everything you need to recreate this delightful pie, including tips, variations, and answers to frequently asked questions. So, let’s dive in!
What Is Easy No Bake Peanut Butter Pie with Oreo Crust?
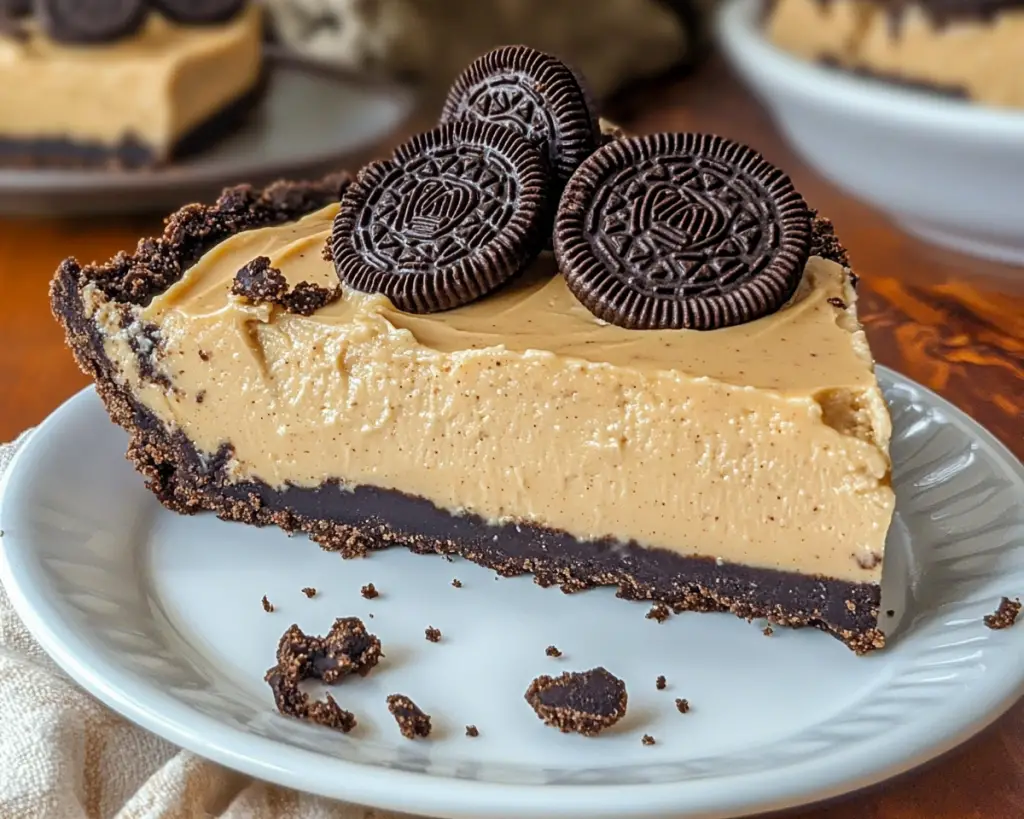
Easy No Bake Peanut Butter Pie with Oreo Crust is a luscious and creamy dessert that captures the essence of what we love about peanut butter and chocolate. Originating from the era of no-bake desserts that gained popularity in the 1970s, this pie has become a favorite for many due to its creamy texture and easy preparation.
The star of this pie is the **peanut butter filling**, which is made from a mixture of cream cheese, powdered sugar, and creamy peanut butter. This creamy combination results in a rich flavor that melts in your mouth. The crust, made from crushed **Oreo cookies**, offers a delightful contrast with its crunchy texture and hints of chocolate. Overall, the dessert is remarkably easy to make—a true gem for both novice and experienced bakers alike.
There’s something wonderfully nostalgic about this pie, as it often graces dessert tables during holidays and family gatherings. Not only does it offer a decadent flavor experience, but it’s also a fantastic way to satisfy your sweet tooth without turning on the oven.
Why You’ll Love This Easy No Bake Peanut Butter Pie with Oreo Crust
There are countless reasons to love this No Bake Peanut Butter Pie with Oreo Crust. First and foremost, it’s incredibly easy to prepare. In just **15 minutes** (with no cooking involved), you can have a luscious pie ready to chill in the fridge. This is especially ideal for busy parents and anyone looking to take a shortcut without sacrificing flavor.
The taste is another aspect. The creamy, nutty peanut butter filling complements the chocolatey Oreo crust, creating a balance that is hard to resist. The combination of **textures**—from the smooth filling to the crunchy base—adds to the overall eating experience.
You’ll also appreciate the versatility of this dessert. It’s suitable for various occasions—from birthday parties to summer cookouts and festive holiday celebrations. Plus, it can be easily customized to fit dietary restrictions or preferences, making it a go-to recipe for any gathering.
On top of that, it’s cost-effective! Most of the ingredients are pantry staples, which means you won’t have to splurge on anything too fancy. Instead, you can whip up an impressive dessert that will leave your guests raving about your culinary skills!
Ingredients You’ll Need
For making this No Bake Peanut Butter Pie with Oreo Crust, you will need the following ingredients:
– **Oreo Cookies (18 cookies)**: The base of your crust, crushed to create a deliciously crunchy foundation.
– **Unsalted Butter (1/4 cup)**: Melted butter helps bind the crushed cookies together to form the crust.
– **Cream Cheese (8 oz, softened)**: Provides creaminess to the filling and a slight tang that balances the sweetness of the pie.
– **Creamy Peanut Butter (1 cup)**: The star ingredient that infuses the filling with rich peanut flavor.
– **Powdered Sugar (1/2 cup)**: Adds sweetness and helps stabilize the filling.
– **Cool Whip or Whipped Topping (8 oz)**: Lightens the filling and adds a fluffy texture.
– **Chopped Peanuts (optional, for garnish)**: Adds an extra crunch and enhances the peanut flavor.
Each ingredient plays a vital role in the overall flavor and structure of the pie. If you need substitutes or variations, don’t worry—I’ll cover those in detail later.
How to Make Easy No Bake Peanut Butter Pie with Oreo Crust
This pie is a breeze to make. Just follow these easy step-by-step instructions:
1. **Prepare the Oreo Crust**
Start by crushing the **Oreo cookies**. You can do this by placing them in a food processor or placing them in a zip-top bag and crushing them with a rolling pin. You want fine crumbs, so they pack well into the pie dish. Once crushed, transfer the crumbs to a mixing bowl, and pour in the **melted butter**. Stir until the mixture resembles wet sand, then press it firmly into the bottom and up the sides of a 9-inch pie dish. Use a flat-bottomed glass to help pack it down evenly. Once it’s evenly packed, place the crust in the refrigerator to chill while you prepare the filling.
2. **Make the Peanut Butter Filling**
In a large mixing bowl, combine the softened **cream cheese** and the **creamier peanut butter**. Using a hand mixer or a whisk, blend them together until smooth and creamy. Gradually add the **powdered sugar**, mixing until combined and the sugar is fully incorporated. You want the filling to be sweet but not overly so, so feel free to taste and adjust as needed.
3. **Incorporate the Whipped Topping**
Next, gently fold in the **Cool Whip** or whipped topping. This lightens the filling, creating a creamy yet airy texture that feels delightful on your palate. Mix until there are no visible streaks of whipped topping left. Be careful not to overmix, as this can deflate the airy quality you want in the filling.
4. **Assemble the Pie**
Retrieve the Oreo crust from the refrigerator, and spread the peanut butter filling evenly over the crust. Use a spatula to smooth the top, which will help it look polished and inviting. If you’d like, you can sprinkle some chopped peanuts over the top for an extra garnish that adds both flavor and a professional finish.
5. **Chill the Pie**
Cover the pie with plastic wrap and place it in the refrigerator for at least **4 hours**, though overnight is preferable. The chilling time allows the filling to set properly and makes it easier to slice later.
6. **Serve and Enjoy**
Once the pie has chilled and is set, cut it into slices and serve it up with additional Cool Whip on top if desired. Enjoy the rich flavors and creamy texture!
5 Variations & Substitutions
1. **Chocolate Peanut Butter Pie**
For a twist on the classic flavor, consider adding melted chocolate to the peanut butter filling. Simply melt about **1 cup of semi-sweet chocolate chips** in the microwave or over a double boiler and allow it to cool slightly before adding it to the cream cheese and peanut butter mixture. This variation enhances the richness and adds a decadent chocolate layer that pairs wonderfully with the Oreo crust.
2. **Nut-Free Version**
If you have nut allergies, you can substitute the **creamy peanut butter** with **sunflower seed butter** or **soy nut butter**. The flavor will be slightly different, but the texture will remain creamy and delicious. This way, everyone can enjoy a slice without fear of allergens.
3. **Vegan Peanut Butter Pie**
To create a vegan version of this recipe, use **vegan cream cheese** and **coconut whipped cream** in place of Cool Whip. Instead of butter, you can use melted coconut oil. Ensure all other ingredients used are also labeled vegan. The result is just as creamy and fulfilling while adhering to a vegan diet.
4. **Mint Chocolate Variation**
For a refreshing twist, add a **few drops of peppermint extract** to the peanut butter filling. This will give a delightful mint flavor that pairs well with the chocolatey Oreo crust. You can also garnish with crushed mint candies or chocolate mint cookies for a festive look.
5. **S’mores Peanut Butter Pie**
Elevate your pie by integrating mini marshmallows and graham cracker crumbs into the filling, effectively transforming it into a peanut butter s’mores treat. Layer the filling with additional crushed graham crackers and mini marshmallows before it sets. The result? A delightful twist that echoes summer campfires!
Common Mistakes to Avoid
Although this No Bake Peanut Butter Pie is simple to prepare, there are a few common mistakes that can be easily avoided:
– **Not chilling long enough**: A common error is cutting the pie before it has had sufficient time to set. Ensure that you chill your pie for at least 4 hours, ideally overnight for the best results. This allows the filling to firm up and makes slicing easier.
– **Using unsweetened peanut butter**: Opting for unsweetened nut butters can yield a less flavorful result. Stick with creamy peanut butter that has a bit of sweetness to balance against the cream cheese and powdered sugar in the filling.
– **Overmixing the filling**: When combining the whipped topping with the peanut butter and cream cheese mixture, be careful not to overmix. This can deflate the filling and result in a denser pie than intended. Mix just until combined.
– **Forgetting to soften the cream cheese**: Using cold cream cheese will lead to lumps in your filling. Always remember to take it out ahead of time and allow it to soften before mixing.
– **Not packing the crust properly**: If the Oreo crust isn’t packed evenly and firmly, it might crumble when you slice the pie. Ensure you use a flat-bottomed glass or measuring cup to pack it tightly into the pie dish.
Storage, Freezing & Reheating Tips
Proper storage is key to enjoying your No Bake Peanut Butter Pie at its best. Here are some guidelines:
– **Refrigeration**: After your pie has been set, cover it tightly with plastic wrap or aluminum foil. It can last in the refrigerator for up to **5 days**, making it an excellent make-ahead dessert option.
– **Freezing**: You can also freeze your peanut butter pie for longer storage. Wrap it tightly in plastic wrap and then in aluminum foil to prevent freezer burn. In the freezer, it can last for up to **two months**. When you’re ready to enjoy it, transfer it to the refrigerator to thaw overnight or for a few hours before serving.
– **Serving after freezing**: Keep in mind that the texture may change slightly after freezing. It will still be delicious, but the filling might be slightly denser. Allow it to sit at room temperature for about 10 minutes before slicing to make it easier to cut.
– **Food safety**: For best practices, ensure that your ingredients are stored at appropriate temperatures and that you check the expiration dates, especially for dairy items like cream cheese and whipped topping.
Frequently Asked Questions
1. **Can I make this pie ahead of time?**
Absolutely! This no-bake pie is perfect for making in advance. In fact, it tastes even better when it has time to sit and the flavors meld together. You can prepare it a day or two ahead of time, just ensure to keep it properly covered in the refrigerator until serving.
2. **What can I serve with this pie?**
You can enhance your pie experience by serving it with a drizzle of chocolate syrup or a dollop of extra Cool Whip. Additionally, some fresh fruits like sliced bananas or strawberries make a lovely garnish that adds a pop of color and freshness.
3. **What if I don’t have an 9-inch pie dish?**
If you don’t have a 9-inch pie dish, you can use smaller ramekins or a square baking dish instead. Just be aware that the serving size will vary depending on the dish you choose. Just know that the chilling time might be slightly different, so adjust accordingly.
4. **Is this pie gluten-free?**
Traditional Oreos contain gluten, but you can easily make this pie gluten-free by substituting the Oreo crust with gluten-free chocolate wafer cookies or gluten-free graham crackers. Just make sure to double-check that your peanut butter and whipped topping are also gluten-free.
5. **Can I use natural peanut butter?**
Yes, but keep in mind that natural peanut butter may separate, and its taste can be different from conventional creamy peanut butter. If you’re using natural peanut butter, give it a good stir to mix the oils back in before measuring. You might also want to adjust the amount of powdered sugar to taste, as natural peanut butter can be less sweet.
In conclusion, the Easy No Bake Peanut Butter Pie with Oreo Crust is a dessert anyone can master. It captures the essence of comfort food while being easy enough for beginner cooks to make. With its rich peanut buttery flavor, enticing texture, and customizable nature, it’s bound to be a hit at your next gathering. So, gather your ingredients, give it a try, and don’t forget to share with your friends and family—you might just find it becomes their new favorite too!
Happy baking! And remember, delicious desserts don’t have to be complicated. Enjoy the sweet journey!