Let’s Get Real
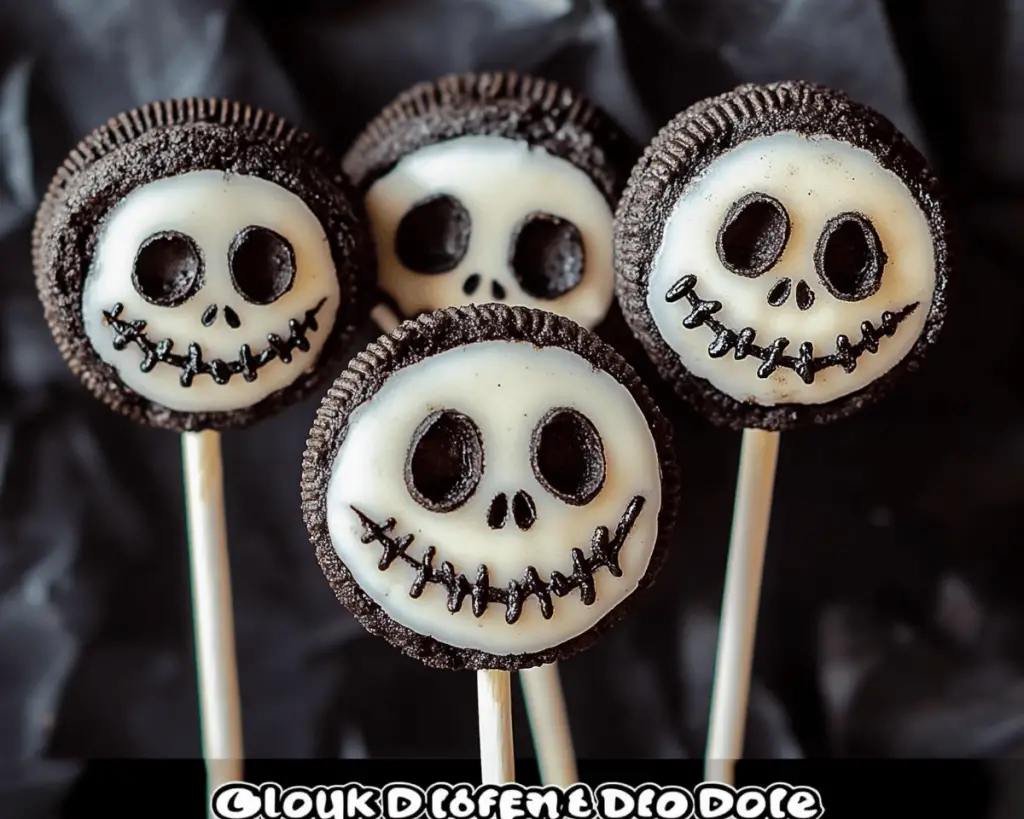
So, let’s talk about Halloween. It’s that magical time of year when it’s socially acceptable to wear costumes, eat candy for breakfast, and consume pumpkin-flavored everything without judgment. I mean, I saw pumpkin spice toothpaste the other day, and honestly, I’m intrigued. But what I really want to chat about today are Jack Skellington Oreo Pops. Yes, my friends, those cute little treats inspired by the Pumpkin King himself!
I can’t help but reminisce about the first time I saw “The Nightmare Before Christmas.” I was a kid, still sorted firmly into Team Ho-Hum, and I could not wrap my head around the fact that someone had made a movie that looked like a fever dream of candy and Halloween wonderland. I was convinced all the characters were way cooler than I could ever be, and here I was on the couch, about to make the biggest mistake of my life. I fell asleep on the couch halfway through! Real cliffhanger material, right? But the spell was cast, and I’ve loved Jack and the crew ever since. Now, years later, I can’t stop recreating that magical world in my kitchen.
With Halloween creeping up faster than my toddler when he spots candy in the pantry, I decided it was high time I made some Jack Skellington Oreo Pops! They’re simple, spooky, and entirely delightful. I mean, who doesn’t want to consume a classic Oreo dressed up like a character from their favorite childhood animated movie? Exactly. Now sit tight while I spill all the secrets to making these incredibly fun treats, and don’t let anyone tell you you’re too old to enjoy them.
Ingredients, Unfiltered
What’s Really in Jack Skellington Oreo Pops
Let’s break this down because we all know that the ingredients are half the fun (and sifting through them is an exercise in chaos coordination).
Oreo Cookies: Because, duh! These are the star of the show. I’m all about the classic Oreo, but feel free to go wild with the Halloween-themed versions or even double-stuffed if you want to go full sugar rush (because why not leave a little imprint of dental regret?).
White Candy Melts: These beauties are what you’ll be draping over those Oreos like a cozy, sweet blanket. They melt like dreams and cover your cookies in creamy goodness. Just don’t confuse them with regular chocolate — trust me, your pops will end up looking like a tragic Picasso painting if you do.
Black Food Coloring: Because Jack Skellington doesn’t mess around with gray. You gotta bring the drama! This is what gives those pops the killer look that’ll have all the Insta-fam swooning. I mean, let’s get real; who doesn’t want a food item that looks like it rolled off the cover of a gothic fairy tale?
Popsicle Sticks: You could use lollipop sticks, too, but who are we kidding? If I’m in a crafty mood, I’m going with whatever is lying around, ready to save the day! Also, I won’t shame you if you use chopsticks. Use what makes your heart sing!
Edible Eyes: Talk about a horror show highlight! I use fondant eyeballs, but you could also use mini chocolate chips or even just pipe some icing if you’re feeling too fancy.
Let’s Talk Health (or Not)
Is This Even Healthy? Let’s Discuss
Okay, let’s face reality here: these are not going to be appearing in a health magazine anytime soon. But does that mean I care? Nope! Living the “life is too short” mantra, I assure you that the bliss of creating and consuming Jack Skellington Oreo Pops far outweighs any thoughts of calorie counting. Yes, there’s sugar. Yes, you might get a sugar buzz. But good vibes come from chocolate-covered Oreos, and my happiness is worth a few extra sugars, thank you very much. If it’s a cheat day, do it with pride!
Your Grocery List
Here’s What You’ll Need
– 1 standard pack of Oreo cookies (about 14 cookies for those counting)
– 1 cup white candy melts
– Black food coloring (this is the key to achieving Jack’s signature look)
– Popsicle sticks (about 12, math not included)
– Edible eyes (you can find these at your local crafts store – or you can DIY it. In which case, good luck!)
– Optional sprinkles for a spooky touch (because sprinkles make everything better)
This batch can feed about 12 people or one very determined individual who has chosen to binge through their comic collection with a side of Oreo Pops. No judgment here!
The Actual Cooking Part
Okay, Let’s Make This
Alright, my Halloween kitchen warriors, step one: get that machinery going! You’ll want to start by lining a baking sheet with parchment paper because we don’t want a sticky situation on our hands (that was a pun, and I’m proud of it).
1. **Melt Your Candy Melts:** Place the white candy melts in a microwave-safe bowl and microwave them in 30-second intervals, stirring in between until smooth. Look at it. So nice and creamy! You’ll be tempted just to dive in with a spoon. But resist! This is for the Oreos!
2. **Dunk the Oreos:** Take each Oreo (do it gently, my friend; they’re frail gems!) and dip them into the melted candy, coating them as evenly as possible. I like to use a fork to ensure I’m not losing half my Oreo bliss in the chocolate pool. Life is too short for half Oreos!
3. **Stick ‘Em Up:** After dipping, pop a popsicle stick in the center of the Oreo. This is what’s going to keep your pops from being a messy failure. You want them standing tall, proudly displaying their Halloween spirit. Trust the stick!
4. **Cool It Down:** Place the dipped Oreos on your lined baking sheet and let them cool in the freezer for about 10-15 minutes until the coating is set. This is where the magic happens!
5. **Get Black with It:** Once the Oreo pops are set, melt a small amount of white candy and pour it into a piping bag (or a makeshift one with a Ziploc bag if you’re feeling creative). Add in a few drops of black food coloring to get that spooky shade we’re looking for! You want to channel your inner Tim Burton while decorating, so aim for a whimsical but slightly creepy vibe.
6. **Decorate Your Pops:** Pipe the black detailing on the pops to create Jack’s trademark smile and eyes. Go wild! Just don’t overthink it, or you’ll end up with a smile that looks more like a frown.
7. **Add Edible Eyes:** Once you’re done with the piping and it’s still wet, stick the edible eyes on to complete them. They will look all kinds of charming and bizarre, just like Jack himself!
8. **Let Them Set:** Pop the finished pops back in the fridge for another 10 minutes to firm everything up.
And voila! Your Jack Skellington Oreo Pops are ready to be devoured!
Side Notes & Sassy Hacks
Bonus Tips You Didn’t Ask For
– **Substitutions Galore:** If you wanna jazz things up, feel free to use different flavored Oreos (like mint, for the brave!). Mint Jack? Why not!
– **Chill Before You Fill:** If you’re doing this with kids, chill the Oreo pops in the fridge instead of the freezer. Kids and the freezer don’t mix well, said every parent ever.
– **Fancy Pants:** If you don’t have edible eyes, you can pipe little dots of black icing (but save this step for when nobody’s around — it gets messy, and the kitchen is a battlefield).
– **Storing the Pops:** If you have any left (which is doubtful), you can store them in an airtight container in the fridge for up to a week. But honestly, they probably won’t last that long.
Final Words of (Culinary) Wisdom
So there you have it, folks! Whether you’re hosting a Halloween bash or just looking for a fun way to get into the spooky spirit, Jack Skellington Oreo Pops are your ticket to sugary, ghostly heaven. If you try them, tag me on social media, or just send me a mental high-five! After all, nothing says “I’m an adult” like indulging in childhood snacks, and besides, we all deserve a little ultra-cute chaos in our lives. Now, go on and make some pops that’ll thrill and chill your Halloween season—bye-bye boring snacks!


