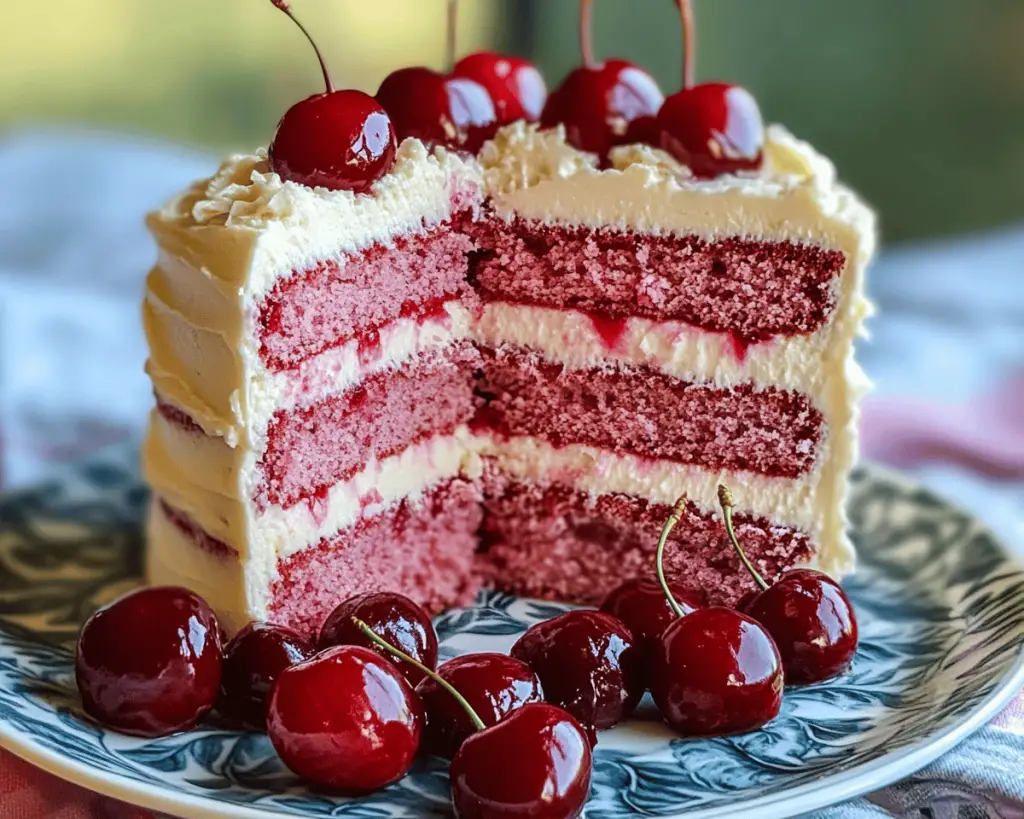
Oh my goodness, let me tell you about my absolute obsession with Cherry Layer Cake! This delightful dessert isn’t just a cake; it’s a time machine that transports me back to childhood birthday parties filled with laughter, family, and the sweet aroma of baked goods. I remember my mom would whip this up for special occasions, and I’d hover near the kitchen, practically drooling, while she decorated it with fluffy, creamy frosting. The cherries on top always felt like the crown jewels!
What makes this cake so special is not just its beautiful layers of moist cake and perfectly sweet cherry cream cheese frosting but the ability to brighten any occasion. Whether it’s a summer barbecue or a cozy holiday gathering, this cake has a magical way of stealing the spotlight. So, buckle up, my friend, because we’re about to embark on a baking adventure that will fill your kitchen with joy and your heart with delicious memories!
What’s in Cherry Layer Cake?
All-purpose flour: The base of our cake, giving it structure while still being light and fluffy. I prefer using a good quality brand like King Arthur Flour for the best results.
Sugar: We use granulated sugar to add sweetness and help the cake rise.
Baking powder and baking soda: These guys are crucial for making our cake light and fluffy. Just the right amount of leavening will lead to a beautifully risen cake.
Butter: Unsalted butter is a must! I love the richness it brings, and I always use it at room temperature for easy mixing.
Milk: Whole milk gives the cake moisture and richness. However, if you’re looking for a lighter version, you can use low-fat milk.
Eggs: They play a vital role in binding our ingredients together while adding moisture.
Vanilla extract: A splash of this adds warmth and depth of flavor, elevating our cherry cake experience.
Cherry pie filling: This will be the fantastic star of our cake! Sweet, tangy, and bursting with cherry flavor, I like to use a high-quality canned filling or homemade if I can – totally worth it!
Cream cheese: The key ingredient in our frosting that adds that silky smooth texture and tangy sweetness.
Powdered sugar: A light dusting of this magic powder sweetens our cream cheese frosting to perfection!
Cherries for topping: Fresh or maraschino cherries make the perfect finishing touch on each cake layer, not to mention they’re oh-so-pretty!
Is Cherry Layer Cake Good for You?
Well, let’s be honest—this cake isn’t exactly a health food, but it sure does have some lovely qualities!
Cherries: These little gems are packed with antioxidants and are known to have anti-inflammatory properties. They are also a good source of vitamin C. So, in theory, our cherry layer cake could be a bit of a wellness treat!
Butter: While it’s rich in saturated fats, it can be enjoyed in moderation. It’s a much better option than margarine or processed spreads!
On the flip side, the sugar and cream cheese in this recipe can add up in calories, so I wouldn’t recommend making this cake a daily indulgence. It’s best enjoyed on special occasions, savoring every bite while reminiscing about cherished memories.
Ingredients List
– 2 ½ cups all-purpose flour
– 2 ½ cups granulated sugar
– 1 tablespoon baking powder
– 1 teaspoon baking soda
– 1 cup unsalted butter, softened
– 1 cup whole milk
– 5 large eggs
– 2 teaspoons vanilla extract
– 1 can (21 oz) cherry pie filling
– 8 oz cream cheese, softened
– 4 cups powdered sugar
– Fresh or maraschino cherries for topping
This recipe will serve 12 generous slices of pure cherry bliss!
How to Make Cherry Layer Cake?
1. Preheat your oven to 350°F (175°C) and grease three 9-inch round cake pans. You can also line them with parchment paper for easy removal!
2. In a large mixing bowl, combine the flour, sugar, baking powder, and baking soda. Mix together until well blended.
3. Add the softened butter, milk, eggs, and vanilla extract to the dry ingredients. Beat with an electric mixer on medium speed until smooth and creamy—about 2-3 minutes.
4. Gently fold in the cherry pie filling. Don’t worry about over-mixing; it’s okay to leave some chunks of cherries!
5. Divide the batter evenly among the three prepared pans. Bake for 25-30 minutes, or until a toothpick inserted into the center comes out clean.
6. Once baked, let the cakes cool in the pans for about 10 minutes before transferring them to wire racks to cool completely.
7. For the frosting, beat the softened cream cheese until smooth. Gradually add the powdered sugar and mix until well combined. If it’s too thick, you can add a splash of milk to reach your desired consistency.
8. When the cake layers have cooled completely, spread a generous amount of frosting on the top of one layer, add the second layer, and repeat.
9. Finally, cover the entire cake with the remaining cream cheese frosting and top with fresh or maraschino cherries.
10. Slice, serve, and enjoy the symphony of flavors and textures!
Cherry Cake Bliss: Tips & Tricks
– For extra cherry flavor, you can drizzle some of the cherry pie filling on top of the frosted cake or even layer some between the cake layers.
– If you want to make this a more indulgent dessert, try adding a chocolate layer to the cake as well – chocolate and cherry are a match made in heaven!
– For a fun twist, consider adding nuts to your frosting for a crunchy texture – toasted almonds or walnuts would be fantastic!
I hope you’re as excited to make this Cherry Layer Cake as I am! It’s a celebration in every bite, a hug on a plate, and the cherry on top of any gathering. I’d love to hear how it turns out for you, so give it a shot and let me know your favorite memories and toppings! Happy baking!