Prep time: 20 minutes
Cook time: 30 minutes
Total time: 50 minutes
Servings: 8-10 servings
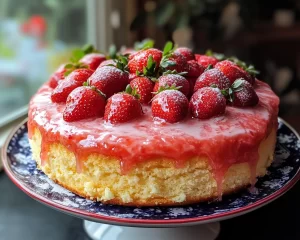
Indulging in a slice of cake filled with nostalgia is one of the most comforting things you can do. The very thought of a light and airy *vanilla spring cake drizzled with a strawberry glaze* immediately elicits a sense of joy and warmth. This recipe is special not only because it happens to be a delectable treat but also because it captures the essence of spring with fresh strawberries and a fluffy cake, making it perfect for celebrations, brunches, or simply an afternoon pick-me-up. By the time you finish this article, you’ll learn everything you need to whip up this delightful dessert, from the ingredients to common mistakes to avoid, plus some creative variations to try.
What Is Spring Cake: Vanilla Spring Cake with Strawberry Glaze?
The concept of *spring cake* calls forth images of fresh blooms and sunny days. Originating from the tradition of celebrating the end of winter, this cake is a delightful representation of the season. It typically embodies a light lemony or vanilla flavor, making it refreshing on the palate. The texture is soft and fluffy, inviting you to take that satisfying first bite. The *strawberry glaze* adds a luscious sweetness, creating a delightful contrast to the cake’s lightness.
In this recipe, the *vanilla cake* shines through its simplicity while harmonizing beautifully with the bright, vibrant strawberry glaze. This dessert fits perfectly into various occasions, be it a family gathering or a casual weekday treat. The combination of the vanilla and strawberry not only enhances the taste but also makes for a visually appealing dish, with its pink glaze complementing the soft yellow of the cake.
Why You’ll Love This
This *vanilla spring cake with strawberry glaze* isn’t just a feast for the eyes; it’s equally pleasing to your taste buds. One of the key benefits is its versatility; you can enjoy it as a light dessert, a sweet breakfast, or a delightful snack with your afternoon tea. The ingredients are simple and generally inexpensive, making this cake a budget-friendly option for home bakers.
Moreover, this recipe is beginner-friendly. You need not be a baking expert to create it; the steps are straightforward, and with the right guidance, you’ll find yourself enjoying the baking process. A common misconception is that cakes need to be complicated; this recipe strips that notion away. It proves that you can create a bakery-quality dessert in the comfort of your own home.
Let’s not forget the health factor; while cake may not be considered a health food, this version incorporates fresh strawberries, which are rich in antioxidants and vitamins. Their addition not only enhances the flavor but also brings a hint of fresh fruitiness that elevates this cake from merely sweet to *refreshingly delicious*.
Ingredients You’ll Need
- 2 cups all-purpose flour: This forms the cake’s structure. For a gluten-free option, consider substituting with a 1:1 gluten-free flour blend.
- 1 cup granulated sugar: This sweetens the cake and also helps in the browning process during baking.
- 1/2 cup unsalted butter: Bring this to room temperature for easy creaming. This ingredient adds richness to the cake.
- 3 large eggs: These contribute moisture and binding, also helping the cake rise.
- 1 cup milk: Using whole milk gives a richer taste; however, you can use almond milk for a dairy-free version.
- 1 tbsp vanilla extract: This enhances the overall flavor profile. Opt for pure vanilla extract for the best taste.
- 1 tbsp baking powder: This acts as the leavening agent, ensuring the cake rises beautifully.
- Pinch of salt: This balances the sweetness and enhances the flavors.
- 2 cups fresh strawberries: Rinse and slice to make the glaze. You can substitute with other berries, like raspberries, for different flavors.
- 1/2 cup powdered sugar: This will be incorporated into the glaze. It offers a smooth texture when mixed with the strawberries.
Each ingredient plays a crucial role in achieving the perfect cake. Understanding their purpose can boost your confidence while baking. For instance, ensure your butter is at room temperature to create a smooth batter, and be gentle when mixing to keep the cake’s light texture intact.
How to Make
1. **Preheat your oven:** Start by preheating your oven to 350°F (175°C). This is essential as you want the cake to bake evenly. Grease and flour two 9-inch round cake pans, ensuring easy release after baking.
2. **Cream the butter and sugar:** In a large mixing bowl, use an electric mixer to cream together the unsalted butter and granulated sugar. Aim for a light and fluffy mixture, which usually takes about 3-5 minutes. This step is crucial, as incorporating air helps in achieving that desired *fluffy texture*.
3. **Add eggs one at a time:** Beat in the eggs one by one, mixing thoroughly after each addition. This is important to ensure a well-incorporated batter. Don’t rush this step; taking your time allows for a homogenous mix.
4. **Mix in milk and vanilla:** Gradually add the milk and vanilla extract to the egg mixture and continue mixing. The batter will become smoother and more cohesive. Make sure to scrape down the sides of the bowl to incorporate all ingredients.
5. **Combine dry ingredients:** In another bowl, whisk together the flour, baking powder, and salt. Gradually incorporate this mixture into the wet ingredients, mixing just until combined. Overmixing can lead to a denser cake, so stop as soon as the flour is visible.
6. **Bake the cakes:** Pour the batter evenly into the prepared cake pans and smooth the tops with a spatula. Bake in your preheated oven for 25-30 minutes or until a toothpick inserted into the center comes out clean. The aroma that fills your kitchen during baking is simply divine!
7. **Cool the cakes:** Once baked, remove the cakes from the oven and let them cool in the pans for about 10 minutes. Then, turn them out onto a wire rack to cool completely. This step is crucial; ensuring that the cakes are completely cool will allow for easier glazing.
8. **Prepare the strawberry glaze:** While your cakes cool, it’s time to prepare the glaze. In a medium saucepan over medium heat, combine sliced strawberries, powdered sugar, and a splash of water. Cook and stir until the strawberries break down and create a luscious sauce. Remove from heat and allow it to cool slightly.
9. **Assemble the cake:** Once the cakes are completely cool, place one layer on a serving plate. Spoon a portion of the strawberry glaze over the top, allowing it to drizzle down the sides. Place the second layer on top and repeat the process, generously coating the top and allowing it to cascade down the sides for that beautiful presentation.
10. **Serve and enjoy:** Cut into slices and serve this wonderful dessert. The result is a slice of cake that’s as satisfying to look at as it is to eat. Enjoy every bite, and don’t forget to take a moment to appreciate your handiwork.
Variations & Substitutions
Chocolate Spring Cake: For a twist on the classic recipe, consider adding cocoa powder to the mix to create a *chocolate spring cake*. Substitute 1/2 cup of flour with unsweetened cocoa powder. This variation appeals to chocolate lovers and offers a deliciously rich alternative. Serve with a chocolate glaze made from melted chocolate and cream for an extra treat.
Lemon Zest Addition: If you want a zesty kick, add the zest of one lemon to your batter. This variation provides a refreshing citrus flavor that complements the strawberries beautifully. The added *tartness* can brighten the overall profile of the cake, making it perfect for summertime gatherings.
Dairy-Free Version: To make this cake dairy-free, substitute *butter* with coconut oil and use almond or oat milk in place of regular milk. The cake will retain its deliciousness while accommodating those with dietary restrictions. Ensure to use dairy-free powdered sugar for the glaze to maintain the integrity of this dessert.
Mixed Berry Glaze: Why stop at strawberries? Blend in raspberries or blueberries into your glaze for a mixed berry delight. This not only adds flavor complexity but also a beautiful splash of color. The combined flavors of these berries can elevate the cake to a new level of deliciousness.
Layered Fruit Addition: Enhance your cake by incorporating a layer of fresh fruits between the cake layers. Adding sliced strawberries or peaches creates texture and makes the cake even more visually appealing. This variation is perfect for summer parties, offering a light and fruity surprise in every bite.
Common Mistakes to Avoid
Baking can certainly be a science, and there are common pitfalls to be aware of. One of the biggest mistakes is **overmixing the batter**, which can lead to a tough texture rather than the desired lightness. Mix just until incorporated, and use gentle motions to fold in dry ingredients.
Another common issue is **incorrect oven temperature**. Always preheat your oven and use an oven thermometer to verify that it’s at the right temperature. Cakes that bake at too high a temperature may rise rapidly and then collapse, resulting in a dense product.
Not allowing the cakes to cool completely can lead to a disastrous glazing experience. If the glaze is poured over a warm cake, it may melt and run off, rather than adhering beautifully to the surface.
Lastly, ensure you **measure your ingredients accurately**. Baking is a precise craft, and slight variations can influence the final outcome significantly. Invest in a good set of measuring cups and spoons, and be mindful of how you measure flour; spoon it into the cup and level it off with a knife for accuracy.
Storage, Freezing & Reheating Tips
To preserve the freshness of your *vanilla spring cake with strawberry glaze*, it’s crucial to store it correctly. If you have leftover cake, place it in an airtight container at room temperature for up to 2-3 days. For longer storage, you can refrigerate it; just know that refrigeration may cause the cake to dry out slightly.
If you wish to freeze the cake, wrap individual slices tightly in plastic wrap and then place them in a freezer-safe container. This method will keep the cake fresh for up to three months. When you’re ready to enjoy a slice, simply thaw it in the refrigerator overnight or let it sit at room temperature for a few hours.
When it comes to reheating, avoid using the microwave, as it may result in a rubbery texture. Instead, place slices in an oven preheated to 350°F (175°C) for about 10 minutes until warmed through. This approach will help restore the cake to its delightful, fresh-from-the-oven taste.
Frequently Asked Questions
Can I use frozen strawberries for the glaze? Yes, you can use frozen strawberries as a substitute for fresh ones. Just make sure to thaw and drain any excess moisture before cooking them down into a glaze. The flavor will still be delicious, although fresh strawberries may have a brighter taste.
What can I substitute for milk in this recipe? If you’re looking to avoid dairy, consider using almond milk or any non-dairy milk as a substitute. Almond milk offers a subtle nuttiness that complements the cake nicely. Just ensure that the alternative milk you choose is unsweetened to control the cake’s sweetness.
Can I make this in advance for an event? Absolutely! You can bake the cake a day or two beforehand. Just ensure to store it properly to maintain its freshness. You can glaze the cake shortly before serving to achieve optimal flavor and presentation.
Is this cake suitable for kids? Definitely! This cake boasts a light texture and delightful flavors that appeal to both kids and adults. The fresh strawberry glaze also adds a fun and vibrant touch that children usually love. It’s a great way to introduce them to the joys of baking.
How can I tell when the cake is done baking? A toothpick inserted into the center of the cake is the best test for doneness. When it comes out clean or with a few moist crumbs attached, your cake is ready. If it comes out wet with batter, continue baking and check again in a few minutes.
Conclusion:
This *vanilla spring cake with strawberry glaze* is not just a dessert; it’s a celebration of flavor, texture, and season. The simplicity of the ingredients makes it accessible while allowing anyone from beginner bakers to experienced chefs to create something truly special. Whether you choose to stick with the classic recipe or experiment with unique variations, each bite offers a taste of spring’s freshness that you and your loved ones will appreciate. So roll up your sleeves and give this recipe a try, and don’t hesitate to customize it to fit your taste preferences. Happy baking!