Prep time: 30 minutes
Cook time: 20 minutes
Total time: 50 minutes
Servings: 8 mini cakes
Indulging in the delights of spring isn’t just about the blooming flowers and fresh air; it’s about the *extraordinary flavors* and *colorful treats* that evoke the essence of the season. Imagine a light, fluffy cake layered with aromatic vanilla frosting, glistening berries, and the *sweet fragrance* that wafts through your kitchen. This is what Spring Baking: Mini Vanilla Berry Layer Cakes embodies. These cakes are not only visually captivating but also *deliciously satisfying*, making them perfect for any gathering or simply to brighten your day.
As you dive into this recipe, you’ll discover how easy it is to create these picturesque mini layer cakes, *ideal for both novice bakers and seasoned pros*. We’ll cover every detail, from choosing the right berries to achieving that *perfect frosting texture*. Once you finish this delightful baking journey, you’ll find yourself equipped with tips and variations, empowering you to customize this recipe to match your tastebuds. Let’s get started!
What Is Spring Baking: Mini Vanilla Berry Layer Cakes (Easy + Pretty)?
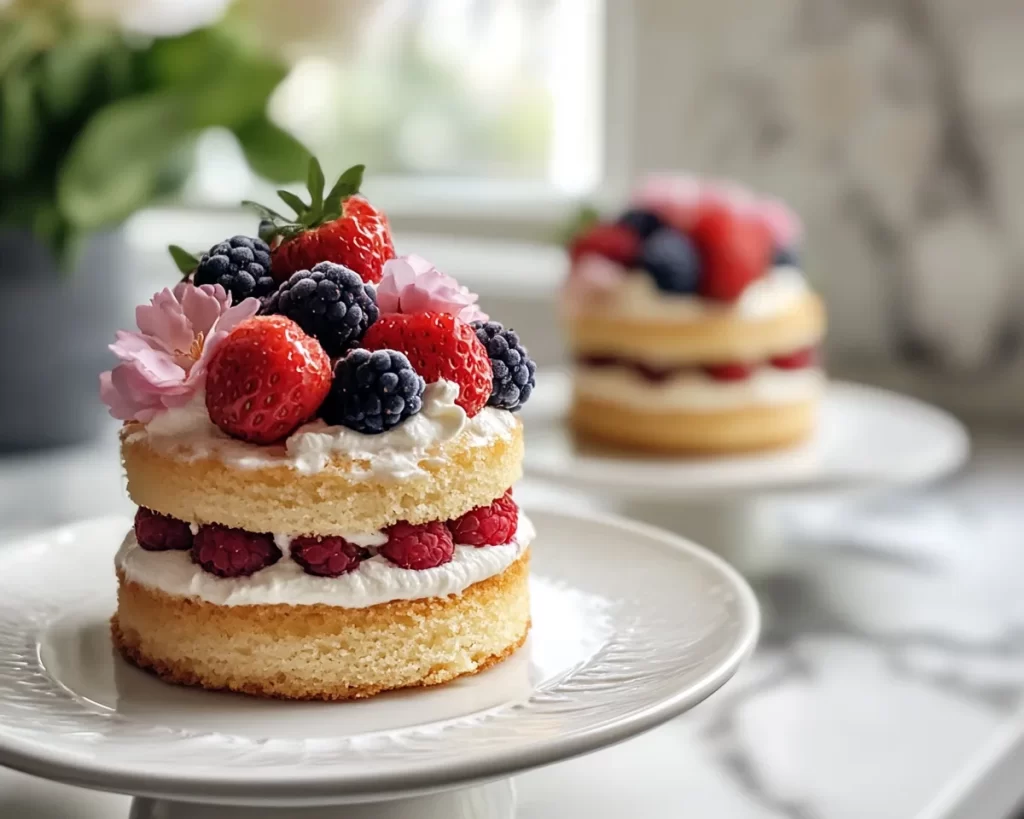
Spring Baking: Mini Vanilla Berry Layer Cakes are delightful creations that celebrate the essence of spring through both flavor and visual appeal. The origin of layer cakes goes back to the 19th century when bakers began using *whipped cream and fruits* to fill their cakes, making them not only *tasty* but also attractive. The key feature here is the layering technique, which gives each cake its *charming height and structure*. These mini layers are typically made with *vanilla-flavored sponge cake*, leading to a gentle sweetness complemented perfectly by the *tartness of fresh berries*.
The flavors blend seamlessly; when you take a bite, the *light, airy texture* of the cake combines with the richness of the vanilla and the *burst of fresh fruit*, creating a mouthwatering experience. This dish is perfect for spring celebrations, including birthday parties, bridal showers, or garden picnics. Furthermore, the visual appeal can’t be overstated; the colorful berries layered with frosting against a backdrop of pastel-colored cake are sure to earn oohs and aahs from your guests.
Beyond just being a delicious dessert, these cakes also leave room for creativity. You can vary the types of berries used or even experiment with different flavors. The beauty of this recipe is that it not only invites you to bake but also encourages you to express yourself through your creations.
Why You’ll Love This
There are countless reasons to adore these Mini Vanilla Berry Layer Cakes. First off, they shower your palate with *incredible flavors*, blending the soft, sweet cake with the *tart berries* — a combination that feels refreshing and divine. Not only are they delightful to taste, but they also appeal visually with their multi-layered design. This makes them a stunning centerpiece for any dessert table, earning you compliments from friends and family.
Another significant benefit of this recipe is its simplicity. Unlike traditional multi-layer cakes that can be intimidating, these miniature versions are straightforward and forgiving. Anyone ranging from busy parents trying to whip up a quick dessert to beginners looking for a fun baking project will find this recipe accessible and rewarding. Plus, it’s an economical option, making use of seasonal fruits that are often less pricey in spring, allowing you to indulge without breaking the bank.
You might be under the impression that making layered cakes is a daunting task, but this recipe proves otherwise. With clear instructions and a few essential tips, you’ll soon find that creating these beautiful cakes is well within your reach. Another advantage is their versatility. From *vegan options* to gluten-free flour substitutes, there’s a variation for everyone. You can easily tailor these little cakes to fit *various dietary preferences*, ensuring everyone can enjoy one.
Ingredients You’ll Need
To create these luscious mini vanilla berry layer cakes, gather the following ingredients:
- All-purpose flour: Provides the structure. You can substitute with gluten-free flour for a gluten-free version.
- Baking powder: Helps the cakes rise. Ensure that your baking powder is fresh for the best results.
- Salt: Enhances the flavors of the cake and frosting.
- Unsalted butter: Adds richness. Use room temperature butter for easier mixing.
- Sugar: Sweetens the cake. You can use coconut sugar for a healthier version.
- Eggs: Provide moisture and binding. You can replace them with flax eggs for a vegan option.
- Vanilla extract: The star flavor of the cake, contributing to its fragrant aroma.
- Milk: Ensures the cake remains moist. Almond milk can serve as a dairy-free substitute.
- Berry mix (strawberries, blueberries, raspberries): Adds color and texture. Fresh or frozen berries work perfectly.
- Heavy cream: For the rich frosting. You may opt for coconut cream for a vegan alternative.
- Powdered sugar: Sweetens the frosting and helps achieve the right consistency.
Each ingredient plays a crucial role in determining the cake’s flavor, texture, and overall success. As you’re selecting your berries, feel free to mix types according to your preference. Fresh berries not only taste better but also create a vibrant look that encapsulates spring.
How to Make
To craft these delightful mini layer cakes, follow these simple yet effective steps:
- Preheat your oven: Begin by preheating your oven to 350°F (175°C). Prepare your baking pans by greasing and lining them with parchment paper. This will help in removing the cakes later without hassle.
- Combine dry ingredients: In a bowl, whisk together the all-purpose flour, baking powder, and salt. This step ensures that the leavening is evenly distributed throughout the flour, which prevents uneven rising.
- Get your wet ingredients ready: In a separate large bowl, cream the room temperature butter and sugar together until light and fluffy, about 3-4 minutes. This aerates the mixture and contributes to a lighter cake.
- Add eggs and vanilla: Beat in the eggs, one at a time, ensuring each is fully incorporated before adding the next. Stir in the vanilla extract, giving the batter a lovely fragrant lift.
- Combine and mix: Gradually add the dry ingredients to the wet mixture, alternating with the milk. Mix just until combined. Overmixing can lead to dense cakes, so stop as soon as you no longer see dry flour.
- Pour and bake: Divide the batter evenly between your prepared pans, smoothing the tops. Bake in the preheated oven for about 15-20 minutes or until a toothpick inserted into the center comes out clean. Keep an eye on them towards the end; you don’t want them to overbake!
- Cool the cakes: Once baked, let the cakes cool in their pans for about 5-10 minutes before transferring them to a wire rack to cool completely. This prevents them from becoming soggy.
- Prepare the frosting: While the cakes cool, whip up the heavy cream and powdered sugar in a mixing bowl until stiff peaks form. This frosting should be thick enough to hold its shape while still being spreadable.
- Assemble your cakes: Once cool, slice each cake in half horizontally to create two layers. Spread a layer of frosting on the bottom half of the cake, followed by a layer of berries. Replace the top layer and spread more frosting on top, decorating with additional berries for visual appeal.
- Chill and serve: For best results, chill the assembled cakes in the refrigerator for about 30 minutes before serving. This helps the frosting to set and makes the layers easier to cut.
Each step is designed to build flavor and achieve that beautiful layered effect. Remember that being patient, especially when cooling the cakes and whipping the frosting, will pay off in terms of texture and taste.
Variations & Substitutions
Gluten-Free Option: If you or someone you’re baking for has gluten sensitivities, easily convert this recipe by substituting the all-purpose flour with a 1:1 gluten-free flour mix. Many brands now offer convenient blends that behave similarly to traditional flour, ensuring you still get that fluffy cake texture without the gluten.
Vegan Mini Layer Cakes: You can transform this recipe into a vegan delight by replacing the eggs with flax eggs (mix 1 tablespoon of ground flaxseeds with 3 tablespoons of water per egg, letting it sit until it thickens). Use coconut cream or vegan butter instead of the heavy cream and unsalted butter, and swap the milk with almond or oat milk. The result will be just as appealing and delicious.
Chocolate Layer Cakes: If you’re a chocolate lover, consider adding cocoa powder to the batter. Replace a quarter cup of flour with unsweetened cocoa powder for a rich, chocolate version. Pair it with strawberries and chocolate frosting for a delightful twist that chocolate enthusiasts will adore.
Berry Varieties: Get creative with your berry selections! Try using *seasonal fruits* like peaches, cherries, or even mango, combining them with mascarpone cheese for an elegant touch. Each fruit adds its unique flavor and beauty, allowing you to craft an array of mini cakes for any occasion.
Citrus Infusion: For an extra zest of flavor, consider adding lemon or orange zest to the cake batter. This will brighten up the vanilla flavor and add a refreshing taste profile that pairs beautifully with your berries.
Common Mistakes to Avoid
While making these mini layer cakes may seem straightforward, there are a few common pitfalls to watch out for. Overmixing the batter is one – while it might seem tempting to ensure everything is well combined, doing so can lead to dense cakes. Once your ingredients are mixed just until combined, stop!
Another mistake is not letting the cakes cool sufficiently before frosting. If the cakes are even slightly warm, the frosting may melt right off, leaving you with a gooey mess.
Make sure to check your baking powder is fresh! Using expired baking powder may lead to cakes that don’t rise properly.
Lastly, allow the cakes to chill before serving. This step is crucial for stabilizing the frosting and ensuring that the layers hold up when you cut into your beautiful creation.
Storage, Freezing & Reheating Tips
Proper storage is essential for maintaining the quality of these delectable mini cakes. If you have any leftovers, store them in an airtight container in the refrigerator for up to 3 days. This keeps the cakes fresh while preventing any odors from other foods from affecting their delicate flavors.
If you want to freeze them, it’s best to freeze the cakes before frosting them. Wrap each cake layer in plastic wrap and place them in a freezer-safe bag. You can freeze them for up to 3 months. When you’re ready to enjoy them, simply let the cakes thaw in the refrigerator overnight before assembling and frosting as directed.
When it comes to reheating, if you do prefer warm cake, microwave individual slices for about 10-15 seconds. Just be careful not to overheat, as it can make the cake dry.
Frequently Asked Questions
Can I use frozen berries in this recipe?
Absolutely! Frozen berries work just as well as fresh ones. They can add a beautiful color and flavor when thawed. Just remember to drain any excess moisture before using them in your cake.
What can I use instead of heavy cream for the frosting?
If heavy cream isn’t available, *coconut cream* is a fantastic vegan alternative that will still give you that rich, satisfying texture. Choose full-fat coconut milk, refrigerate it overnight, and scoop out the cream for the frosting.
How do I know when my cakes are done baking?
The best way to check for doneness is to insert a toothpick into the center of the cake. If it comes out clean or with a few crumbs attached, they are ready.
What will happen if I skip the chilling step before frosting?
Skipping the chilling step means the cakes may be too soft, which can cause the frosting to slide off or become a melty mess. It’s crucial to allow them to chill to achieve the desired layered look and structure.
Can I make these mini cakes in advance for a party?
Certainly! You can bake the cakes ahead of time and freeze the layers, then frost them the day you plan to serve them. This allows you to focus on enjoying your time with guests instead of being in the kitchen baking.
Conclusion:
These Spring Baking: Mini Vanilla Berry Layer Cakes are not just a recipe; they are a celebration of flavor, color, and creativity. They embody the joy of baking, providing opportunities to customize and adapt based on personal preference or dietary needs. By following the easy steps outlined, you’ll create a dessert that is sure to impress everyone.
Don’t hesitate to share this recipe with friends or family; they will appreciate your thoughtfulness. So gather your ingredients, channel your inner baker, and enjoy the delightful experience of crafting these charming cakes. Whether for a special occasion or just because, these mini vanilla berry layer cakes promise to bring joy and flavor to your table!