Prep time: 30 minutes
Cook time: 25 minutes
Total time: 2 hours
Servings: 12
Imagine a delightful celebration booming with laughter, bright flowers, and the delightful aroma of fresh strawberries wafting through the air. This scenario is what every birthday party dreams of, and at the heart of it all is a stunning masterpiece—Spring Birthday Cake: Strawberry Vanilla Layer Cake. This cake isn’t just an ordinary dessert; it’s a symbol of joy, a burst of colors, and a testament to seasonal freshness.
As you savor each slice, you’ll find the moist vanilla layers harmonizing perfectly with the sweet bursts of strawberries. It’s not merely a recipe; it encapsulates memories of joyous occasions spent with loved ones, making it an essential part of any birthday celebration.
Throughout this article, you will learn how to make your Spring Birthday Cake a masterpiece, from mixing the batter to layering it just right, ensuring every bite is a taste of paradise. Whether you’re a busy parent searching for a memorable dessert or a beginner wanting to impress your friends, this recipe comes with tips, variations, and essential steps to elevate your baking experience.
What Is Spring Birthday Cake: Strawberry Vanilla Layer Cake?
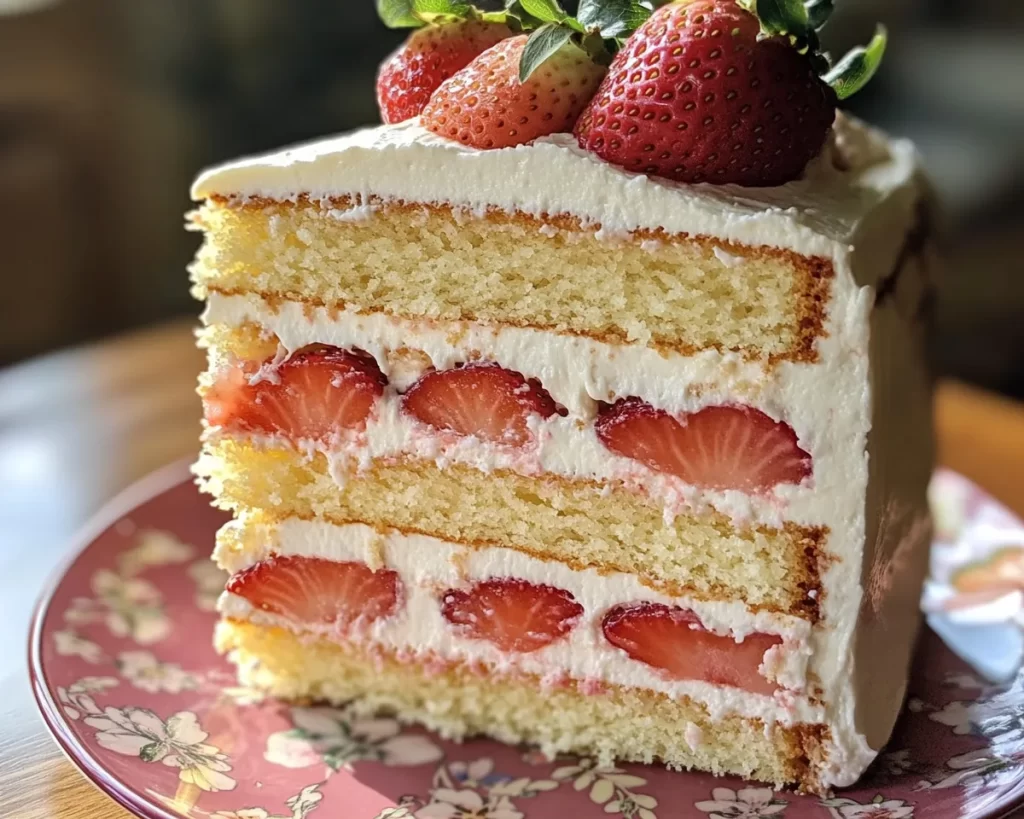
The Spring Birthday Cake: Strawberry Vanilla Layer Cake is a delightful dessert that genuinely embodies the essence of spring. It features layers of soft, fluffy vanilla cake that are interspersed with a luscious strawberry filling. The cake’s origin can be traced back to classic layer cakes, yet this particular version adds a refreshing twist by embracing one of spring’s most iconic fruits—strawberries. The vanilla cake’s texture is airy and tender, allowing it to absorb the sweet strawberry juices beautifully.
When you take your first bite, the layers melt in your mouth, surrounded by the brightness of fresh strawberries. The balance between the sweet cake and tart strawberries creates a flavor explosion that can satisfy just about anyone’s sweet tooth. The look of this cake is equally enchanting, with the vibrant red of strawberries against the pale yellow of the vanilla cake, topped with a fluffy cream frosting. It’s a show-stopper, perfect for any birthday celebration or even as a treat for yourself!
Why You’ll Love This
There are countless reasons to fall in love with Spring Birthday Cake: Strawberry Vanilla Layer Cake. Firstly, its combination of flavors—sweet vanilla and fresh strawberries—is irresistible. The cake is a testament to seasonal ingredients, making it not just tasty but also a wholesome choice. Additionally, it’s straightforward enough for beginners, yet it still has that wow factor that can impress seasoned bakers.
One common misconception is that layer cakes are complex and time-consuming, but the steps are methodical, and with a little organization, they can be quite straightforward. You’ll find this cake surprisingly budget-friendly, as strawberries become relatively inexpensive in spring, allowing you to create an elegant dessert without breaking the bank. Furthermore, it’s versatile! The flavor profile can be modified to fit various dietary needs while remaining equally delicious.
Ingredients You’ll Need
- All-purpose flour: This is the foundation of your cake, providing structure and stability. If you’re gluten-free, consider using a gluten-free baking blend.
- Granulated sugar: Adds sweetness and helps create that tender cake texture. You can replace it with coconut sugar for a healthier option.
- Baking powder: Acts as the leavening agent to help your cake rise. Be sure it’s not expired for the best results.
- Salt: Enhances flavor and balances the sweetness of the cake.
- Unsalted butter: Provides richness and moisture. Make sure it’s at room temperature for easy creaming.
- Eggs: These contribute to the cake’s texture and help with binding. For a vegan alternative, use flax eggs.
- Vanilla extract: Infuses your cake with delicious flavor. Try using a high-quality vanilla for the best taste.
- Milk: Adds moisture to your cake; you can substitute with almond or oat milk for a dairy-free version.
- Fresh strawberries: The star of the show! Use ripe strawberries for the sweetest flavor.
- Heavy cream: Essential for making a fluffy frosting; you can use a dairy-free heavy cream alternative.
Understanding each ingredient is vital, as each plays a specific role in achieving that perfect balance of flavor and texture in your cake. Failing to recognize the significance of any element might lead to a not-so-perfect result, so take care in choosing quality ingredients.
How to Make
1. **Preheat your oven** to 350°F (175°C). As you’re getting started, this ensures the temperature is just right for baking. Consider using light-colored cake pans; dark pans can cause over-browning of the cake.
2. **Prepare your cake pans** by greasing them with butter and dusting them with flour, or you can use parchment paper. This step ensures that your layers come out smoothly without sticking.
3. In a large mixing bowl, **cream together the unsalted butter and granulated sugar** until the mixture is light and fluffy. This usually takes about 3-5 minutes. The air you incorporate during this process is essential for a soft cake.
4. Add in the eggs, **one at a time, mixing well after each addition**, followed by the vanilla extract. Be careful not to overmix; you want to keep it fluffy, not dense.
5. In another bowl, whisk together the all-purpose flour, baking powder, and salt. Gradually **add the dry ingredients to the creamed mixture**, alternating with the milk. Start and finish with the flour mixture. Mix until just combined to avoid a dense cake.
6. **Divide the batter evenly** among the prepared cake pans. Take care with this step, as equal layers will bake evenly and stack beautifully.
7. Bake in the preheated oven for about 25 minutes or until a toothpick inserted into the center comes out clean. While they bake, the aroma will fill your kitchen, building anticipation for that first slice.
8. Once baked, remove the cakes from the oven and **let them cool in the pans for about 10 minutes**. Then, carefully transfer them to wire racks to cool completely. This cooling step is crucial to prevent soggy layers.
9. While the cakes are cooling, **prepare the strawberry filling**. Begin by washing and hulling your fresh strawberries. In a bowl, mash half of the strawberries to release their juices and mix with a little sugar to enhance sweetness.
10. Make your frosting by beating heavy cream in a mixing bowl until it holds soft peaks. Gradually add in powdered sugar to sweeten, along with a splash of vanilla extract for flavor.
11. Once the cakes are completely cool, **layer them**. Place one cake layer on a serving plate and spread a layer of the mashed strawberries. Add a layer of whipped cream frosting on top, then gently place the second cake layer on top.
12. **Repeat the process** with more strawberry filling and cream between each layer. Finish by frosting the entire cake with the whipped cream. Decorate with fresh strawberry slices on top for a beautiful presentation.
13. Chill the completed cake in the refrigerator for at least 30 minutes before serving. This helps to set the layers and makes cutting easier.
Variations & Substitutions
Gluten-Free Variation: If you’re catering to gluten-free guests or have a gluten sensitivity, you can easily adapt this recipe. Substitute the all-purpose flour with a gluten-free flour blend. Many blends work well for baking and can yield impressive results if they contain xanthan gum. Be sure to check that your baking powder is gluten-free and adjust the mixing process slightly to ensure it’s not overworked, as gluten-free flours require gentle handling.
Dairy-Free Variation: To make this cake suitable for a dairy-free diet, use a plant-based butter and substitute heavy cream with coconut cream. Coconut cream provides similar richness and creates a fabulous frosting. Utilize non-dairy milk options for both the batter and the whipped cream. Coconut or almond milk works beautifully, allowing for a soft and delicious cake.
Chocolate Strawberry Layer Cake: For chocolate lovers, this cake can be transformed into a chocolate strawberry layer cake by substituting a portion of the all-purpose flour with cocoa powder. The resulting chocolate layers will add a whole new dimension to the flavors, perfectly complementing strawberries. Additionally, consider drizzling some melted chocolate over the top for an elegant finish!
Mini Layer Cakes: Instead of creating one large cake, consider making multiple smaller cakes. Use a muffin tin to bake individual layers and stack them with strawberry filling and frosting between each. This variation is not only adorable but also perfect for portion control, making it easier for guests and children to enjoy without feeling overwhelmed by a large slice.
Common Mistakes to Avoid
When embarking on your Spring Birthday Cake journey, it’s essential to steer clear of common pitfalls that could lead to less-than-perfect results. One of the most recurrent mistakes is **overmixing** the cake batter. While it can be tempting to keep mixing until everything is thoroughly combined, doing so can create a dense texture, which isn’t what you want. Aim to mix until just combined.
Another common issue is **incorrect oven temperature**. Always preheat your oven, as a cold oven can affect baking times and cake rise, leading to uneven layers. Additionally, ensure that you are using leveled measuring cups for dry ingredients, as too much flour can make the cake dry. Lastly, a common blunder is not letting the cakes cool completely. Attempting to frost a warm cake can lead to a gooey mess. Patience is key while waiting for the cake to cool!
Storage, Freezing & Reheating Tips
Proper storage is vital to keeping your Spring Birthday Cake fresh and flavorful. After assembling the cake, it can be stored in the refrigerator for up to 3 days. Cover it loosely with plastic wrap to keep it from drying out while still allowing for airflow. If you’ve got leftovers, place individual slices in airtight containers, allowing for easy grab-and-go desserts.
For longer storage, this cake freezes exceptionally well. To freeze, wrap portions tightly with plastic wrap once the cake has cooled completely. Then place them into a freezer-safe bag or container, removing as much air as possible before sealing. This method helps prevent freezer burn. To enjoy, thaw overnight in the refrigerator and let it sit at room temperature for about 30 minutes before serving.
When reheating, simply slice your cake and pop it in the microwave for a few seconds to slightly warm it. The cake can also be enjoyed cold, providing a refreshing sensation, especially in warmer weather. Regardless of how you choose to store or reheat this cake, always ensure food safety practices are observed to keep your delicious dessert as fresh as possible.
Frequently Asked Questions
Can I make this cake ahead of time? Absolutely! This cake can be baked a day in advance. Allow the layers to cool completely and wrap each layer individually in plastic wrap. Store them in the refrigerator overnight. When you’re ready to serve, assemble and frost the cake the following day.
Why is my cake dry? The primary reasons for a dry cake often lie in overbaking or using too much flour. It’s essential to follow the mixing instructions and not leave the cake in the oven longer than recommended. Always check for doneness a few minutes before the timer goes off.
Can I use frozen strawberries instead of fresh? Yes, you can, but ensure you thaw and drain them before using. Frozen strawberries might produce more liquid than fresh ones, which can affect the texture of your cake layers.
How do I get my cake layers even? One effective method is to use a kitchen scale to weigh your batter for each layer. Alternatively, use measuring cups to ensure an equal amount of batter in each pan. A spatula can also be useful to even out the batter in the pans.
Can I decorate this cake differently? Absolutely! Feel free to be creative with decorations. You could use additional whipped cream dollops, chocolate shavings, or even edible flowers to enhance its appearance. Personalizing your dessert can make it even more special!
Conclusion:
Embrace the joy of baking and the delightful flavors in your Spring Birthday Cake: Strawberry Vanilla Layer Cake. This recipe is a fantastic way to celebrate special occasions or enjoy a sweet treat on any day of the week. Its light, refreshing taste combined with the soft, moist layers makes it a winner for all ages. Dive into the world of baking and create your masterpiece that can be customized to suit your taste buds or dietary needs. So, grab your apron, gather your ingredients, and let your creativity flow in the kitchen—your delicious celebration awaits!