Prep time: 20 minutes
Cook time: 25 minutes
Total time: 45 minutes
Servings: 4
As you step into the kitchen, the aroma of savory chicken mingling with melted cheese fills the air, igniting an instinctual craving. Picture yourself unwrapping a warm, cheesy chicken roll-up; its golden, crisp exterior contrasts with the tender, flavorful filling inside. This Cheesy Chicken Roll Up is more than just a dish—it’s a meal that satisfies the whole family, providing not only a delicious flavor explosion but also easy preparation that fits seamlessly into any busy evening. You’ll relish the simplicity of the ingredients; all it takes is a few items from your kitchen to create this culinary delight. In this article, you’ll learn not just how to make this dish, but why it has the potential to change your culinary life.
What Is This Cheesy Chicken Roll Up Will Change Your Life!?
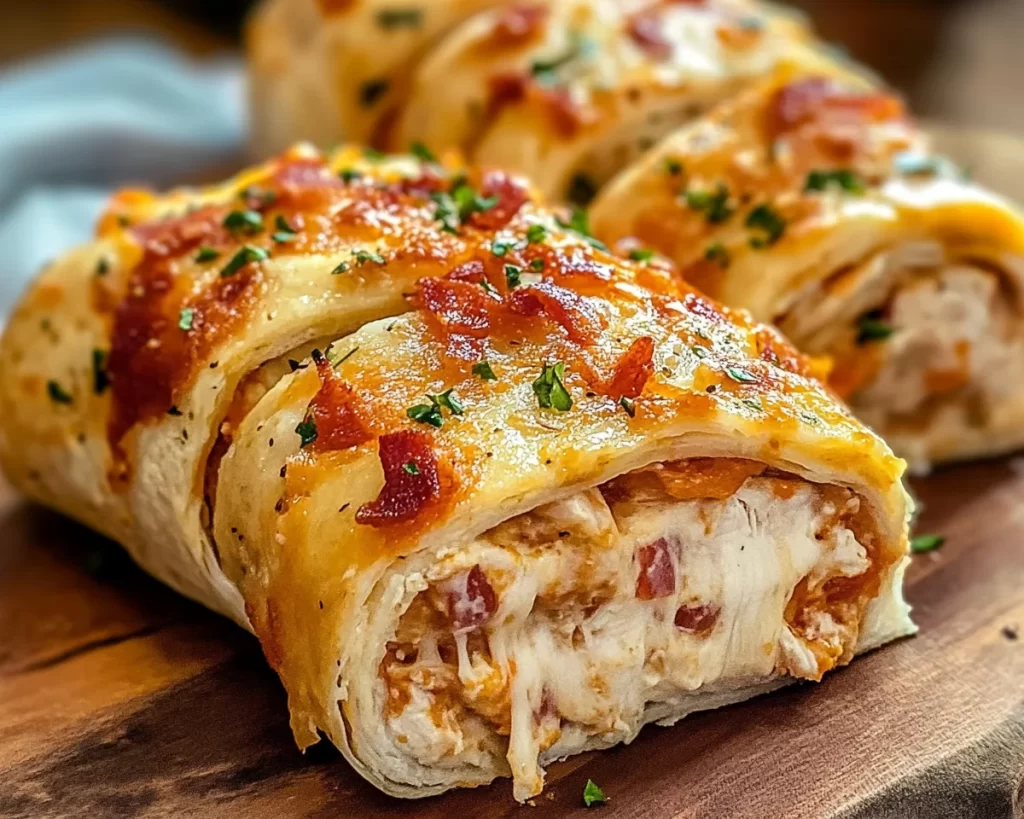
The Cheesy Chicken Roll Up is a delightful dish that showcases the wonderful marriage of tender chicken, gooey cheese, and wholesome vegetables, all beautifully wrapped and baked to perfection. Originating from the desire to create quick, satisfying meals, this recipe combines classic American comfort food with a twist of modern convenience. The core of the roll-up is made from seasoned chicken, often combined with shredded cheese, spices, and perhaps even a dash of your favorite sauces to elevate the flavor profile.
The texture is where this dish truly shines; imagine biting into a crisp tortilla enveloping a warm, cheesy mixture, gooey enough to stretch yet cohesive enough to hold its shape. The slight crunch from baking and the rich, savory filling create an engaging culinary experience. With each roll-up, you’ll find yourself swept away by layers of flavor that cater to your palate, leaving you satisfied yet yearning for more.
Serving these roll-ups not only brings delight to the dining table but also sparks conversations about their endless customization possibilities. Whether you’re cooking for your kids or entertaining guests, these can be tailored with unique ingredients that cater to every taste, demonstrating their impressive versatility. The beauty of this dish lies in how seamlessly it transforms into something new with just a few simple tweaks, making it an essential recipe for any home cook.
Why You’ll Love This
This Cheesy Chicken Roll Up is a treasure trove of benefits that makes it an instant favorite. To start, the taste is absolutely irresistible; the smoky and rich flavors meld into a creamy, cheesy concoction that envelops the delicious chicken. Who doesn’t love the comforting allure of melting cheese against perfectly cooked chicken? Additionally, this dish is quite easy to prepare, requiring only a handful of ingredients and minimal cooking skills. It’s perfect for busy parents who often find themselves in need of quick and satisfying meals after long days.
The cost efficiency of this recipe cannot be overstated. With simple ingredients commonly found in your kitchen, this meal is budget-friendly. An average family can create a delightful dinner without breaking the bank. Health-conscious cooks will love that it’s easy to sneak in nutritious veggies, making it customizable for dietary needs.
Perhaps a common misconception is that cheesy dishes are always unhealthy; however, with this recipe, you can use whole-grain tortillas and lean cuts of chicken to create a meal that’s not only delicious but also nutritionally balanced. The versatility of the roll-up allows you to try various fillings, from spicy to mild, vegetarian to protein-packed, ensuring everyone gets to enjoy their personal favorites.
Ingredients You’ll Need
- Boneless, skinless chicken breasts: Key to the dish, chicken breasts provide lean protein. You can substitute with turkey or even tofu for a vegetarian option.
- Shredded cheese (Cheddar or Mozzarella): Cheddar offers a sharp flavor, while mozzarella gives a milder, gooey texture. A combination is also delicious!
- Tortillas: Flour tortillas work best, but you can use whole wheat or corn tortillas for a healthier twist.
- Spinach or other greens: For added nutrition, spinach enhances the flavor and brings vibrancy. Other greens, such as kale, can work as substitutes.
- Spices (Garlic powder, paprika): Essential for flavoring, adjusting the amount can bring more depth to your roll-ups.
- Sour cream or Greek yogurt: Provides creaminess and a tangy flavor, making the filling even richer.
- Olive oil: Garnish and grill for a golden, crispy finish.
Each ingredient plays a specific role in creating this outstanding dish. Feel free to substitute with what you have at home. Cooking should be fun and not restrictive, so adapting this recipe is key to personalizing your plate.
How to Make
- Prepare the chicken: Begin by preheating your oven to 375°F (190°C). While it warms up, season the boneless, skinless chicken breasts with garlic powder, paprika, and a pinch of salt and pepper. Heat a skillet over medium heat, add a drizzle of olive oil, and sauté the chicken for about 6-7 minutes on each side until it’s cooked through and has a slight golden color. Let the chicken rest for about 5 minutes before shredding it.
- Assemble the filling: In a bowl, combine the shredded chicken with shredded cheese, chopped spinach, and a dollop of sour cream or Greek yogurt for extra creaminess. Mix well to ensure every ingredient is evenly distributed, creating a cohesive filling that bursts with flavor.
- Prepare the tortillas: Lay a tortilla flat on your work surface. Spoon an appropriate amount of the filling (about ¼ cup) onto the center of each tortilla, leaving space on the edges to allow for rolling. Be careful not to overfill, as this will make wrapping difficult.
- Roll it up: Starting from one edge, gently roll the tortilla over the filling, tucking it in as you go to create a neat cylinder. Once you reach the other edge, seal it with a dab of water or extra sour cream. Repeat with the remaining tortillas and filling mix.
- Bake to perfection: Place the rolled ups seam-side down on a baking sheet lined with parchment paper. Brush the top with a little olive oil and sprinkle any leftover cheese on top for added flavor. Bake them in the preheated oven for about 20-25 minutes, or until they are golden brown and crispy.
- Serve: Take them out of the oven and let them cool for several minutes before slicing them in half, allowing the melty goodness to be revealed. Serve warm with your choice of dipping sauces, such as ranch, salsa, or guacamole.
This detailed step-by-step process showcases how easy it is to make Cheesy Chicken Roll Ups. With layers of intricate flavors and textures, each step builds anticipation for the final result. Make sure to taste as you go to adjust seasonings according to your palate.
Variations & Substitutions
Mexican Fiesta Variation: Spice up your roll-ups with a hint of Mexican flare by incorporating black beans, corn, and jalapeños into your filling. The combination of these ingredients not only adds vibrant colors but also layers of flavor that transport your taste buds to a fiesta kitchen. Replace the traditional cheese with a Mexican cheese blend for extra zest. This variation offers a delightful kick, perfect for those seeking a spicy twist.
Vegetarian Delight Variation: Transform this dish into a meatless marvel by using substitute ingredients like mushrooms, zucchini, or bell peppers. Sauté these vegetables with spices for delicious depth, marrying them with cheese and greens for a satisfying experience. This option is not only accessible to vegetarians but also integrates more vegetables into your meals. Try adding some lentils or chickpeas for additional protein that doesn’t sacrifice flavor or texture.
BBQ Chicken Roll-Up Variation: Elevate your roll-ups by adding a touch of BBQ sauce to the shredded chicken. This sweet and tangy flavor pairs beautifully with cheese, adding a new dimension to the dish. Opt for grilled chicken for an even more pronounced smoky flavor. The BBQ sauce not only enhances the taste but also keeps the filling moist, resulting in a mouthwatering bite.
Breakfast Roll-Up Variation: Why not turn your roll-up into a hearty breakfast option? By incorporating scrambled eggs, cheese, and diced tomatoes or peppers into your filling, you create a protein-packed morning meal. You can even add crumbled sausage or bacon for those who want a meaty kick. These breakfast roll-ups are perfect for meal prep; simply wrap and refrigerate for a quick grab-n-go breakfast!
Common Mistakes to Avoid
One common issue that cooks face when preparing Cheesy Chicken Roll Ups is overfilling the tortillas. When you attempt to jam too much filling into each roll-up, it becomes nearly impossible to seal them properly, leading to a potential mess and uneven cooking. To avoid this mishap, stick to the recommended portion size. Keeping it manageable ensures your roll-ups maintain their shape.
Another misstep is not allowing the chicken to rest after cooking. Skipping this step can result in dry chicken, as the juices won’t have had time to redistribute. Letting the chicken rest for a few moments will keep it tender and moist throughout the cooking process.
Additionally, be cautious of incorrect oven temperatures. A too-hot oven can result in a browned exterior while leaving the insides undercooked. Always preheat your oven properly and consider using a kitchen thermometer to ensure it is at the correct temperature.
Lastly, remember that letting your roll-ups sit for a few moments before slicing improves your serving presentation. Cutting immediately can cause the cheesy filling to ooze out and create a less appealing dish. Patience here pays off.
Storage, Freezing & Reheating Tips
Storing and reheating your Cheesy Chicken Roll Ups require careful considerations to maintain freshness. If you have leftover roll-ups, allow them to cool completely at room temperature before transferring them to an airtight container. Properly sealing them will prolong their freshness, and they can typically be stored in the refrigerator for up to 3-4 days.
If you wish to freeze your roll-ups, be sure to wrap them individually in plastic wrap and then place them in a freezer-safe bag. They can last in the freezer for up to 2 months. When you’re ready to enjoy them again, simply remove from the freezer and let thaw overnight in the refrigerator.
For reheating, the oven is your best friend to maintain that crispy exterior. Preheat your oven to 375°F (190°C) and reheat the roll-ups on a baking sheet for about 15 minutes or until heated through. Alternatively, you can use a microwave, but the crispy texture will be sacrificed—simply heat for about 1-2 minutes, checking to avoid overheating.
Always follow safe food handling practices, including not letting the roll-ups sit out for longer than 2 hours at room temperature. Proper storage and reheating can mean the difference between a delightful repeat meal and a dry, bland experience.
Frequently Asked Questions
Can I make Cheesy Chicken Roll Ups ahead of time?
Absolutely! You can prep the filling and roll them up a day in advance. Store them in the refrigerator and then bake when you’re ready to serve. Alternatively, freeze them for convenience.
What can I serve with my Cheesy Chicken Roll Ups?
These roll-ups pair beautifully with a variety of sides such as a garden salad, coleslaw, or even some crispy tortilla chips and salsas. You can also serve them with a side of dipping sauces like ranch or guacamole for added flavor.
Is there a gluten-free option for the tortillas?
Yes, many stores offer gluten-free tortilla options made from alternative flours, such as almond or coconut flour. This allows those with gluten sensitivities to enjoy the flavors of this delightful dish.
Can I use leftover chicken for this recipe?
Definitely! Using leftover chicken is a great time-saver. Just make sure to shred or chop it into bite-sized pieces before combining it with the rest of the ingredients to create that delicious filling.
Are there any low-calorie alternatives for this recipe?
You can easily lower the calories by using baked chicken breast, low-fat cheese, and whole-wheat or corn tortillas. Adjusting the filling ingredients can also help you create a lighter version of these roll-ups without sacrificing flavor.
Conclusion:
The Cheesy Chicken Roll Up is not only a flavorful addition to your dinner repertoire but also a practical, versatile recipe that you can customize to your heart’s content. With layers of delicious flavor, ease of preparation, and budgeting-friendly ingredients, it brings joy to every table. I encourage you to try this recipe, and don’t be afraid to make it your own by adding your favorite ingredients or experimenting with variations. With this dish on hand, you’ll find yourself poised to impress family and friends at any gathering. So roll up your sleeves, get cooking, and enjoy a warm, cheesy delight that’s bound to become a new family favorite!