Prep time: 30 minutes
Cook time: 20 minutes
Total time: 50 minutes
Servings: 12 cupcakes
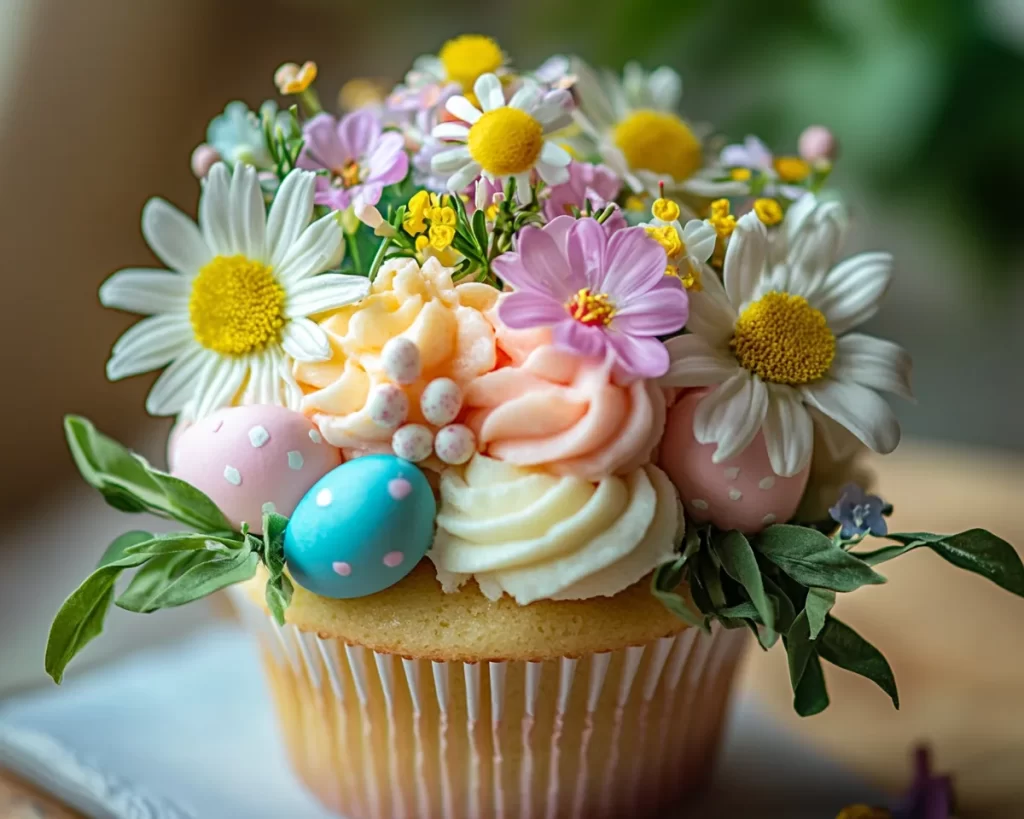
Indulging in a freshly baked cupcake can spark happiness and nostalgia, reminding you of family gatherings or special occasions. With Easter just around the corner, there’s no better way to celebrate than by creating a delightful Easter Vanilla Cupcake Bouquet. This recipe stands out not only for its adorable presentation but also for its mouthwatering taste and fluffy texture. What’s more? You’ll learn how to master this recipe with step-by-step instructions that ensure success every time.
This playful yet sophisticated dessert can serve as a centerpiece for your table and is perfect for both kids and adults alike. You’ll discover the joy of crafting these delectable treats, impressing your family and friends with both your baking skills and creativity. From rich frosting to the soft, pillowy cake, this cupcake bouquet radiates warmth and festivity. Let’s get started!
What Is Easter Vanilla Cupcake Bouquet?
The Easter Vanilla Cupcake Bouquet combines two beloved elements: a classic vanilla cupcake and an imaginative floral arrangement. Traditionally, a cupcake is a small cake designed to serve one person, and its versatility knows no bounds. The frosting can come in various colors and flavors, making it a fantastic canvas for creativity. The term “bouquet” implies a decorative assembly, evoking the image of flowers—alluding to a presentation that’s as pleasing to the eyes as it is to the palate.
Originating from the world of creative baking, this decorative idea brings a festive flair to any celebration. The soft and fluffy texture of the cupcake pairs perfectly with the sweet, velvety frosting, making each bite an indulgence. As you take a bite, the buttery flavor of the cake beautifully harmonizes with the sweetness of the frosting, creating a delightful experience that feels both festive and comforting.
Traditionally served during Easter or springtime gatherings, this dessert serves as more than just a treat; it offers a sensory experience. The vibrant colors of the frosting emulate the beauty of spring flowers. You might find varying flavors—from vanilla to lemon—each with a different take but still designed to bring joy and warmth to your festive table.
Why You’ll Love This
There are countless reasons to adore the Easter Vanilla Cupcake Bouquet. First and foremost is its **impressive taste**—the combination of fluffy vanilla cake and creamy frosting makes for an unforgettable treat. The light, airy texture of the cake perfectly complements the robust flavor of the frosting, creating a flavorful delight that will have everyone returning for seconds.
Moreover, the ease of preparation makes this recipe accessible even for beginners. With easily available ingredients and clear instructions, you won’t find yourself overwhelmed. This cupcake bouquet provides a fun and relaxing activity for busy parents who want to enjoy baking with their kids or for those just starting their culinary journey.
Cost-effectiveness also plays a crucial role in why you will love this recipe. Most of the ingredients needed are common pantry staples, which means you won’t have to break the bank stocking up on specialty items. Additionally, the versatility of this recipe allows you to customize it according to dietary needs or personal preferences without sacrificing flavor.
Now, let’s not forget about the visual appeal. When displayed at gatherings, these cupcakes resemble a beautiful bouquet, drawing all eyes to the table, which is perfect for **Instagram-ready moments**. Many people often imagine cupcakes as simple, but this recipe will challenge that notion, offering beauty and flavor in each bite.
Ingredients You’ll Need
- All-purpose flour: Essential for the structure of the cake.
- Sugar: Provides sweetness and moisture.
- Baking powder: Acts as a leavening agent, ensuring your cupcakes are light and fluffy.
- Butter: Adds richness and flavor; make sure it’s at room temperature for easy blending.
- Eggs: Contributes to the texture and binding.
- Milk: Helps to keep the batter moist.
- Vanilla extract: Enhance the flavor with a rich aroma.
- Powdered sugar: For the creamy frosting; it’s super fine, making for a wonderful consistency.
- Food coloring: Optional, but adds vibrancy for your frosting.
- Fresh flowers or decorative sticks: To create the bouquet effect.
Each ingredient plays a significant role in crafting the overall flavor and integrity of your cupcakes. If you’re out of **all-purpose flour**, consider using **cake flour** for an even lighter texture. Swap out **milk** for a non-dairy alternative like almond or oat milk if you wish for a vegan option, and **butter** can be replaced with coconut oil for a dairy-free treat. The key is to use quality ingredients, as they greatly enhance the final flavor.
How to Make
1. Preheat your oven to 350°F (175°C). While it preheats, gather your ingredients and line a muffin tin with cupcake liners. This is an essential step, as it prevents sticking and aids in easy removal after baking.
2. In a large bowl, cream together the room-temperature butter and sugar until the mixture is light and fluffy. An electric mixer works best for this step, but a whisk can suffice with some extra elbow grease. You’ll know you’ve achieved the right consistency when the mixture is pale in color and airy.
3. Add the eggs, one at a time, mixing well after each addition. It’s crucial to incorporate the eggs thoroughly, as they contribute to the batter’s moisture and structure.
4. In another bowl, whisk together the all-purpose flour, baking powder, and a pinch of salt. Gradually add this dry mixture into the wet ingredients, alternating with the milk. Begin and end with the flour mixture. This method ensures a smoother batter without clumps, leading to a well-balanced texture.
5. Once mixed to perfection, fold in the vanilla extract, ensuring it’s evenly distributed throughout the batter. The vanilla helps elevate the flavor, making it richer and more enticing.
6. Fill each cupcake liner about two-thirds full to allow room for rising in the oven. Bake for 18-20 minutes or until a toothpick inserted into the center comes out clean. This is a vital step; overbaking can lead to dryness, while underbaking results in raw centers.
7. Once baked, remove the cupcakes from the oven and allow them to cool in the tin for about 5 minutes before transferring them to a wire rack to cool completely. This cooling period is important for frosting; warm cupcakes can cause the frosting to melt.
8. While your cupcakes are cooling, prepare the frosting. In a mixing bowl, beat the softened butter until creamy. Slowly add in the powdered sugar, ensuring it’s mixed well before adding milk for a smoother texture. If you want to add colors, separate the frosting into different bowls and add food coloring.
9. Once the cupcakes are fully cooled, use a piping bag to pipe the frosting in a swirl pattern on top of each cupcake, mimicking a blooming flower. This step is where creativity shines; you can use various piping tips to achieve different floral designs.
10. For the finishing touch, arrange the frosted cupcakes into a bouquet-like formation. You can use small sticks or straws poked into the base of the cupcake for added structure, enhancing the aesthetic appeal.
This entire process is not only straightforward but allows you to engage with your creations as you bring them to life. Remember to taste this treat along the way—quality control is key!
Variations & Substitutions
Chocolate Cupcake Variation: For a chocolate twist, substitute half of the all-purpose flour with cocoa powder. This will offer a rich chocolate flavor while retaining the moistness. Perfect for chocoholics!
Lemon Zest Variation: Incorporate freshly grated lemon zest into the batter for a citrusy touch. This lightens up the cupcakes immensely, making them ideal for springtime gatherings.
Gluten-Free Variation: Use a gluten-free flour blend in place of all-purpose flour. It’s essential to check that your baking powder is gluten-free too. These gluten-free cupcakes can be just as delightful when baked correctly, ensuring everyone can indulge.
Vegan Variation: Replace eggs with flaxseed meal (1 tablespoon of flaxseed mixed with 2.5 tablespoons of water per egg), and substitute butter with coconut oil. Utilize a plant-based milk for a delicious vegan option.
Decorative Toppings Variation: Instead of traditional frosting, consider using whipped cream or even a drizzle of chocolate ganache. Accompany your cupcakes with edible flowers or sprinkles to elevate their appearance.
By incorporating these variations or substitutions, you can tailor the cupcakes to fit dietary restrictions or simply to cater to your preferences and those of your guests. The base recipe allows for creative freedom without compromising taste.
Common Mistakes to Avoid
A few common pitfalls may occur during the baking process. One of the primary issues is **overmixing** the batter. Overmixing can lead to dense cupcakes rather than the desired fluffy texture. Mix just until the dry ingredients are incorporated to maintain lightness.
Another common mistake is improperly measuring your flour. Too much flour can result in dry cupcakes; use a spoon to aerate your flour before scooping it into your measuring cup.
Always allow your cupcakes to cool completely before frosting. If you frost warm cupcakes, the frosting will melt, ruining your beautifully piped creations.
Equally critical is paying attention to **baking times**. Baking them for too long can dry out your cupcakes, while underbaking may lead to raw batter—both are easily avoidable with a toothpick check. It’s essential to be attentive throughout this process to ensure the best results.
Storage, Freezing & Reheating Tips
To store your Easter Vanilla Cupcake Bouquet, place the cupcakes in an airtight container. They can be kept at room temperature for about 2-3 days. If you need to keep them longer, refrigerate them, although be mindful that refrigeration can slightly alter the texture of the frosting.
For longer storage, you can freeze the unfrosted cupcakes for up to three months. Wrap them tightly in plastic wrap and then place them in a freezer-safe container. When ready to enjoy, thaw them in the refrigerator overnight and frost as desired.
If you have leftover decorated cupcakes, freeze them individually on a baking sheet first until hard, then transfer to a container. Thaw in the refrigerator and serve them at room temperature.
Be sure to maintain food safety by ensuring all containers are properly sealed and that the cupcakes don’t sit out for too long, especially if they have perishable toppings.
Frequently Asked Questions
Can I use different flavors of frosting?
Absolutely! Feel free to experiment with various flavors like chocolate, strawberry, or cream cheese. Each frosting can bring a unique twist to the overall taste.
How do I achieve the perfect cupcake height?
Filling cupcake liners to the two-thirds mark and using the right leavening agents can create beautifully risen cupcakes. Make sure to give your batter enough room to expand while baking.
Can I make these cupcakes ahead of time?
Yes, you can! Bake the cupcakes a day in advance and frost them just prior to serving for the best presentation and taste.
What decorative options can I use besides fresh flowers?
You can use edible glitter, sprinkles, fruits, or chocolate shavings. Each offers a fun way to add personality and flair to your cupcake bouquet.
Are there any dietary concerns I should be aware of?
Always check the ingredients you use, especially if serving to a group. Consider allergies to nuts, gluten, or dairy, and offer variations to cater to dietary restrictions.
Conclusion:
This Easter Vanilla Cupcake Bouquet offers the perfect combination of stunning presentation and delectable flavor. Each bite is sure to bring joy, making it a festive centerpiece for your celebrations. Encouraging kids to join in on the decorating process elevates the fun, promoting not just the joy of baking but beautiful family experiences as well. With so many variations, feel free to make this recipe your own or tailor it to suit your guests’ preferences. Don’t hesitate to share these beauties with friends and family—they will appreciate the effort and love you’ve put into crafting them. So gather your ingredients, don your apron, and let your creativity flow in the kitchen!